This is an archive version of the document. To get the most up-to-date information, see the current version.
Creating VeeamZIP Backups
You can quickly back up running and powered off VMs with VeeamZIP. VeeamZIP can be helpful if you want to create an ad-hoc backup for VMs, archive VMs before decommissioning and so on. You can create VeeamZIP backups for one or more VMs.
To create VeeamZIP backups:
- Open the Inventory view.
- In the infrastructure tree, select a host or VM container in which the VMs that you want to back up reside.
- In the working area, select the VMs and click VeeamZIP > VeeamZIP on the ribbon or right-click the VMs and select VeeamZIP.
To quickly find the necessary VMs, type the VM name or a part of it in the search field at the top of the working area and click the Start search button on the right or press [Enter] on the keyboard.
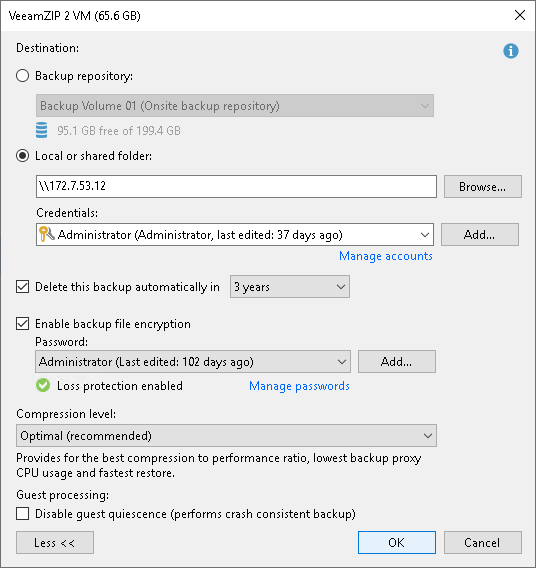
- In the Destination section of the VeeamZIP <N> VM window, specify a location in which you want to store VeeamZIP backups.
- To store VeeamZIP backups in a backup repository, select Backup repository and choose the necessary backup repository from the list.
- To store VeeamZIP backups in a local folder on the backup server, select Local or shared folder, click Browse on the right and select a folder in which VeeamZIP backups must be stored.
- To store VeeamZIP backups in a shared folder, select Local or shared folder and type in the UNC name of the shared folder in the field below. Keep in mind that the UNC name always starts with two back slashes (\\).
If the shared folder requires authentication, select the necessary credentials from the Credentials list. If you have not set up credentials beforehand, click the Manage accounts link or click Add on the right to add necessary credentials. For more information, see Managing Credentials.
- Use the Delete this backup automatically list to specify retention settings for the created VeeamZIP backups. By default, VeeamZIP backups are not removed and kept in the specified location for an indefinite period of time.
- To encrypt VeeamZIP backups, select the Enable backup file encryption check box. From the Password list, select a password that you want to use for encryption. If you have not created a password beforehand, click Add or use the Manage passwords link to specify a new password. For more information, see Managing Passwords for Data Encryption.
- From the Compression level list, select a compression level for created backups: None, Dedupe-friendly, Optimal, High or Extreme.
- By default, Veeam Backup & Replication uses VMware Tools quiescence to create a transactionally consistent image of VMs. You can disable VM quiescence. To do this, select the Disable guest quiescence check box. In this case, Veeam Backup & Replication will create a crash-consistent VM backup.
- Click OK. The VeeamZIP task will start immediately. Veeam Backup & Replication will create a full backup file (VBK) and store it in the specified location. The VM name, date and time of the file creation are appended to the file name so you can easily find the necessary backups afterwards.
- As the job runs, you can track the job performance in the real-time mode. To see the job results once it completes, open the History view, expand the Jobs node and click Backup. Then double-click the job session in the list.
|
Veeam Backup & Replication keeps settings of the latest VeeamZIP task. To quickly create VeeamZIP backups with the same settings and store backups in the same location, right-click the necessary VM and select VeeamZIP to. |