Recon for Veeam Infrastructure 3.0 User Guide
About Recon for Veeam Infrastructure
Recon for Veeam Infrastructure is a cybersecurity solution powered by Coveware by Veeam. The solution helps you to detect suspicious ransomware activities on your backup infrastructure components providing an additional layer of proactive data protection alongside other malware detection methods. Potential threats are classified according to the MITRE ATT&CK® framework.
You can simultaneously install and run Recon on 10 endpoints — physical or virtual machines. Both Microsoft Windows and Linux operating system are supported. For more information, see System Requirements.
How Threat Detection Works
When you run Recon for the first time, it performs the initial scan and creates a scheduled task for the next scans that will run automatically once a day.
The scan usually takes a couple of minutes. Scanning may increase CPU usage (5% on average) depending on the amount of data.
During the scan, Recon collects the following data:
- System information including IP addresses, hostnames, and usernames
- Windows Registry keys and values
- Microsoft Windows event logs
- File system structure including file names and folder names
- Process list
- Service list
- Installed software
- Browser history (domain only)
- Shell history and command line arguments
Note |
Recon does not have direct access to the file content but may collect potential sensitive data if it is presented in the names or application history. |
After the scan is finished, scan results are saved to the temporary %HOSTNAME%-%TIMESTAMP% folder, for example, VBRSRV01-1710444882. Recon encrypts and sends the data to Coveware. After the upload is complete, the temporary folder is automatically deleted.
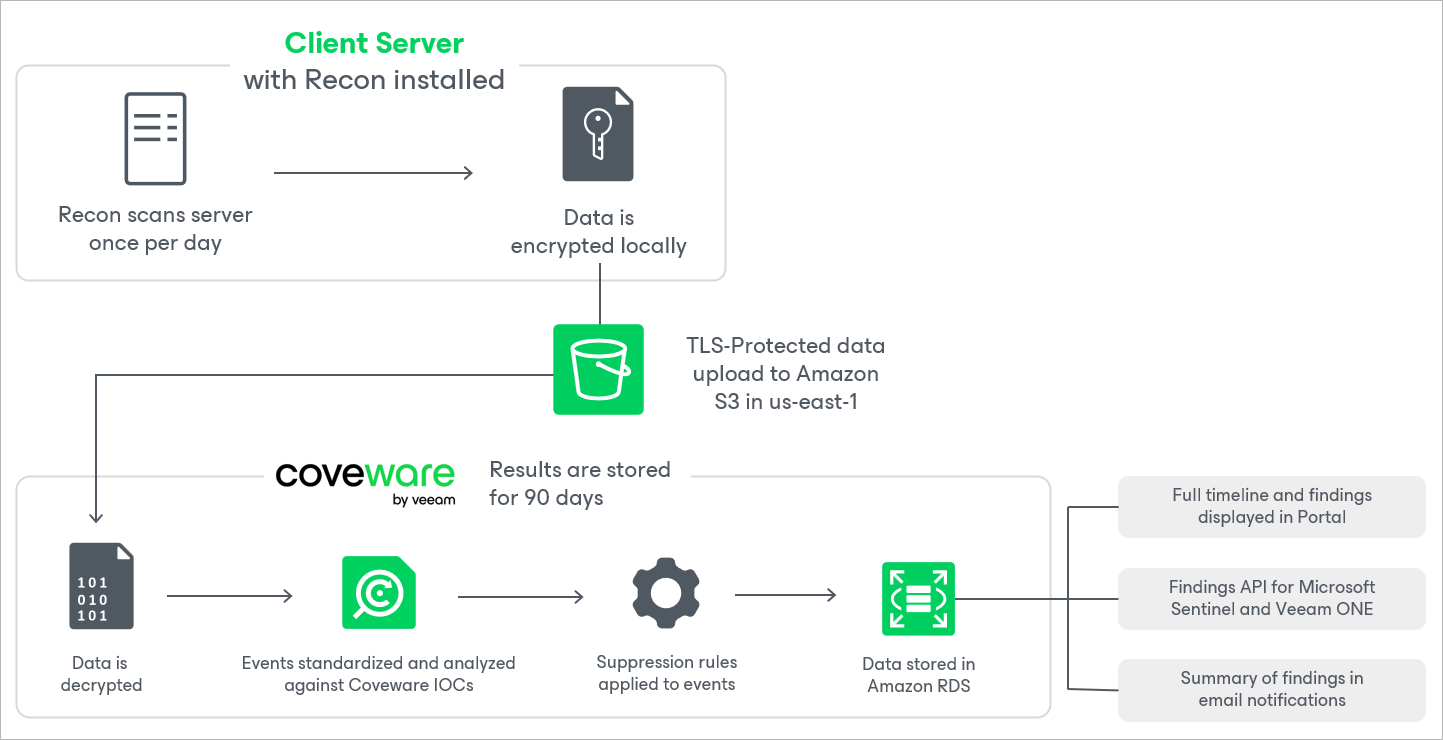
You can view and manage all events based on scan results in the Coveware portal. For more information, see Working With Events.
Prerequisites
Before you run Recon, do the following:
- Check license requirements and system requirements.
- Configure firewall rules if required.
- Activate the solution in the Veeam portal.
- Set up an account in the Coveware portal.
- Add more users if required.
Licensing
Recon for Veeam Infrastructure is included in the Advanced and Premium edition of the Veeam Data Platform Universal License.
VCSP partners must have an Advanced or Premium edition of the Veeam Data Platform rental license to use the solution for their tenants. For more information, see the Veeam Data Platform section in the Veeam Rental Licensing and Usage Reporting Guide.
System Requirements
Recon supports the following operating systems:
- 64-bit version of Microsoft Windows 10 or later.
- 64-bit version of Microsoft Server 2016 or later.
- 64-bit versions of Linux distributions using kernel version 2.6.32 or later and
glibcversion 2.12.0 or later.
Firewall Rules
If you have strict firewall rules, add the following outbound connections to the allowlist.
| From | To | Protocol | Port | Notes |
|---|---|---|---|---|
Machine with Recon | update.coveware.com | TCP | 443 | Used to get updates for Recon. |
| TCP | 443 | Used to communicate with the Recon REST API and upload scan results. |
For Amazon connections, you can also add to the allowlist us-east-1 IP ranges instead of domain names. For more information, see this Amazon article.
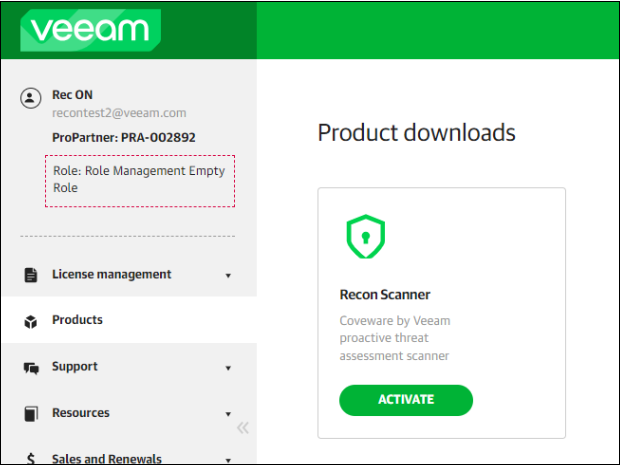
Activating Solution
To activate Recon for Veeam Infrastructure, perform the following steps:
- Log in to your Veeam account.
Note |
The account must have one of the following roles assigned: Primary License Administrator, Secondary License Administrator, License Administrator, Primary Account Administrator, Secondary Account Administrator, or Cross-Account Administrator. |
- Click My Account > Products.
- In the Product downloads section, select Recon and click Activate.
After you activate the solution, you will receive an email to set up your Coveware account. If there is an issue with the email delivery, contact Coveware Support.
Setting Up Coveware Account
To access the Coveware portal, log in to your Coveware account using SSO (Google or Microsoft) or the link from the email you receive after product activation.
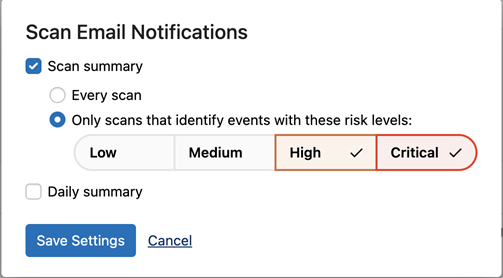
By default, you will receive email notifications with scan results after each scan. To change the notification schedule, click your account at the top-right corner and select Notifications. Note that configuration applies only to the current account.
Adding Users
You can add up to 15 additional users if required. To do this, log in to your Coveware account and click Settings > Users > Add User.

Running Recon
You can run Recon in the following environments:
Running Recon on Microsoft Windows
To run Recon on a Microsoft Windows machine, perform the following steps:
- Log in to your Coveware account.
- Click Download Recon > Download for Windows to download the archive with the latest build.
- On the target machine, create the Recon folder and copy to this folder files from the archive:
recon.exe— a 64-bit executable file.config.dat— a configuration file.
If required, you can specify any other name for the folder that contains Recon files. Consider that after you configure Recon, the folder name and location of the files must not be changed. Otherwise, the scheduled task will not work properly.
- Right-click the
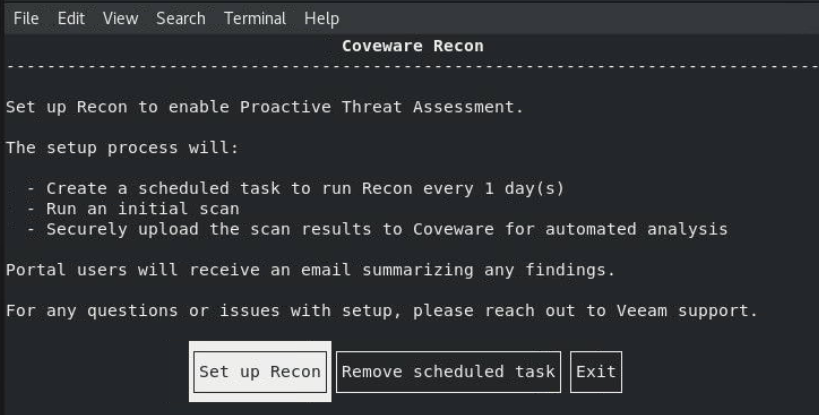
recon.exefile and select Run as administrator. In the opened window, select Set up Recon and press [Enter].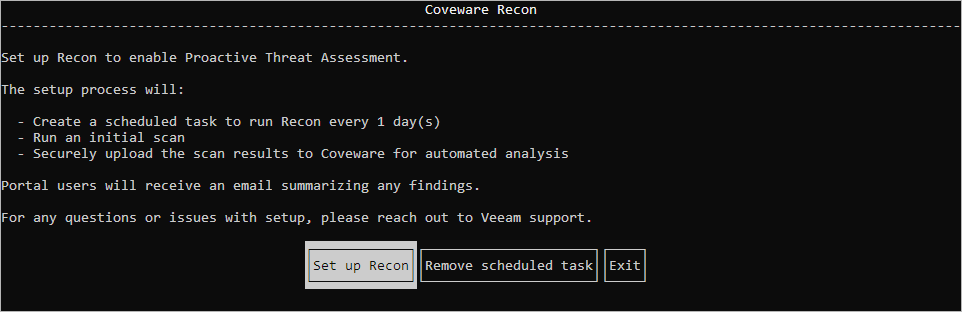
- Specify proxy settings if required. To complete the installation, press [Continue].

Note |
If you have issues with running Recon, see the Troubleshooting section. |
To remove Recon from the machine, perform the following steps:
- Right-click the
recon.exefile and select Run as administrator. - In the opened window, select Remove scheduled task and press [Enter]. Alternatively, you can delete the Recon folder and its content.
Running Recon on Linux
To run Recon on a Linux machine, perform the following steps:
- Log in to your Coveware account.
- Click Download Recon > Download for Linux to download the archive with the latest build.
- On the target machine, create the Recon directory and copy to this directory files from the archive:
recon— a binary file.config.dat— a configuration file.
If required, you can specify any other name for the directory that contains Recon files. Consider that after you configure Recon, the directory name and location of the files must not be changed. Otherwise, the scheduled task will not work properly.
- Give the
reconfile execute permissions. To do this, run the following command in the Recon directory:chmod +x recon - Run Recon with elevated privileges:
sudo ./recon - In the opened dialog box, select Set up Recon and press [Enter].
- Specify proxy settings if required. To complete the installation, press [Continue].
Note |
If you have issues with running Recon, see the Troubleshooting section. |
To remove Recon from the machine, perform the following steps:
- Run Recon with elevated privileges:
sudo ./recon - In the opened dialog box, select Remove scheduled task and press [Enter]. Alternatively, you can delete the Recon directory and its content.
Running Recon on Isolated Machine
If the machine running Recon does not have direct outbound internet access, you can still collect and upload scan results using one of the following options:
- Proxy access (Preferred Method) — if an outbound proxy is available in your environment. For more information on proxy settings, see Running Recon on Microsoft Windows or Running Recon on Linux.
- Deferred upload (Windows Only) — if no proxy is available but a jumpbox exists between the isolated machine and the machine with internet access.
How Deferred Upload Works
Deferred upload works in the following way:
- On the isolated Windows machine, Recon runs as a daily scheduled task and saves encrypted scan results locally. For more information, see Configuring Isolated Machine.
- Scan results are transferred through a jumpbox to the machine with internet access.
- A separate scheduled task on the machine with internet access uploads scan results to Coveware. For more information, see Configuring Machine with Internet Access.
Requirements and Limitations
Consider the following:
- The file transfer method used for scan results depends on your environment, operating systems, and security policies. For more information, contact your security team.
- On the machine with internet access, configure outbound connections to Coveware servers. For more information, see Firewall Rules.
- Both machines must have a copy of the
recon.exefile and use the sameconfig.datfile.Since Recon cannot be updated automatically on the isolated machine, you must periodically copy a new version of the
recon.exeandconfig.datfiles to the isolated machine using the same file transfer method.
Step 1: Configuring Isolated Machine
To configure a Windows isolated machine, perform the following steps:
- Create a folder for scan results, for example,
C:\Recon\ReconResults. - Create a scheduled task to save scan results:
- Run Task Scheduler as an Administrator and click Action > Create Task.
- On the General tab, configure the following:
- In the Name field, enter
Coveware Recon - Scan. - In the Security options section, change the user account to
SYSTEM. - Select the Run whether user is logged on or not option.
- Select the Run with highest privileges check box.
- In the Name field, enter
- On the Triggers tab, click New and configure the following:
- In the Begin the task field, select On a schedule.
- In the Settings section, select Daily and specify preferred time (for example, 2:00 AM).
- Select the Enabled check box.
- On the Actions tab, click New and configure the following:
- In the Program/script field, select
C:\Recon\recon.exe. - In the Add arguments field, enter
triage --output-path C:\Recon\ReconResults.
- In the Program/script field, select
- On the Conditions tab, clear the Start the task only if the computer is on AC power check box.
- On the Settings tab, configure the following:
- Select the Run task as soon as possible after a scheduled start is missed check box.
- For already running tasks, select the Do not start a new instance rule.
- Click OK.
Step 2: Configuring Machine with Internet Access
To configure a machine with internet access, perform the following steps:
- Create a folder for the scan results received from the isolated machine, for example,
C:\Recon\IncomingResults. - Create a scheduled task to upload scan results to Coveware:
- Run Task Scheduler as an Administrator and click Action > Create Task.
- On the General tab, configure the following:
- In the Name field, enter
Coveware Recon - Upload. - In the Security options section, change the user account to
SYSTEM. - Select the Run whether user is logged on or not option.
- Select the Run with highest privileges check box.
- In the Name field, enter
- On the Triggers tab, click New and configure the following:
- In the Begin the task field, select On a schedule.
- In the Settings section, select Daily and specify the time to run the task an hour after the task you configured on the isolated machine.
- Select the Enabled check box.
- On the Actions tab, click New and configure the following:
- In the Program/script field, select
C:\Recon\recon.exe. - In the Add arguments field, enter
upload --output-path C:\Recon\IncomingResults.
- In the Program/script field, select
- On the Conditions tab, clear the Start the task only if the computer is on AC power check box.
- On the Settings tab, configure the following:
- Select the Run task as soon as possible after a scheduled start is missed check box.
- For already running tasks, select the Do not start a new instance rule.
- Click OK.
Working With Events
In the Coveware portal, you can perform the following operations with events:
Viewing Events
The Coveware portal displays the following event types:
- Events with no status. These events are considered as non-suspicious activity. You can view them in the Timeline section.
- Events with the Triage status. These events, or findings, are detected as suspicious activity during scan result analysis. You can view active findings in the Triage Inbox section. All findings including archived and suppressed ones are displayed in the Timeline section.
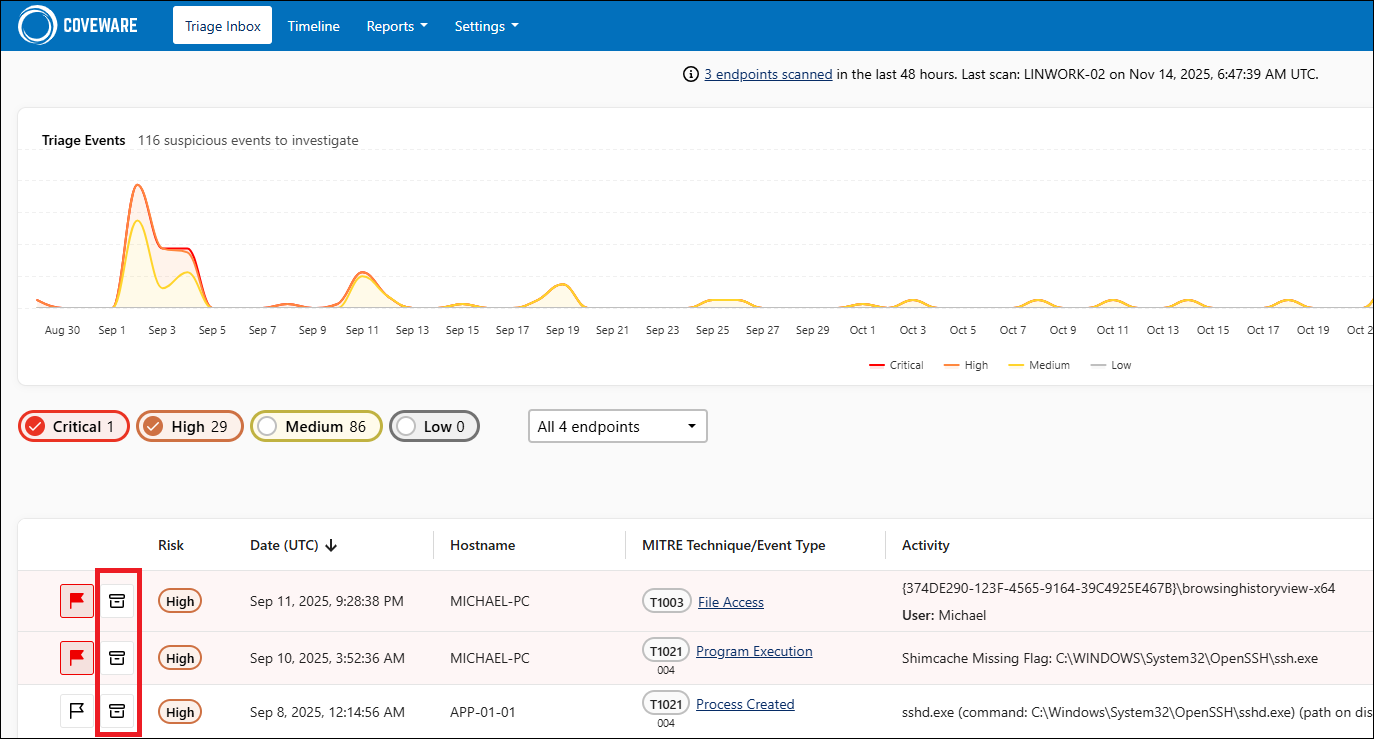
Triage Inbox
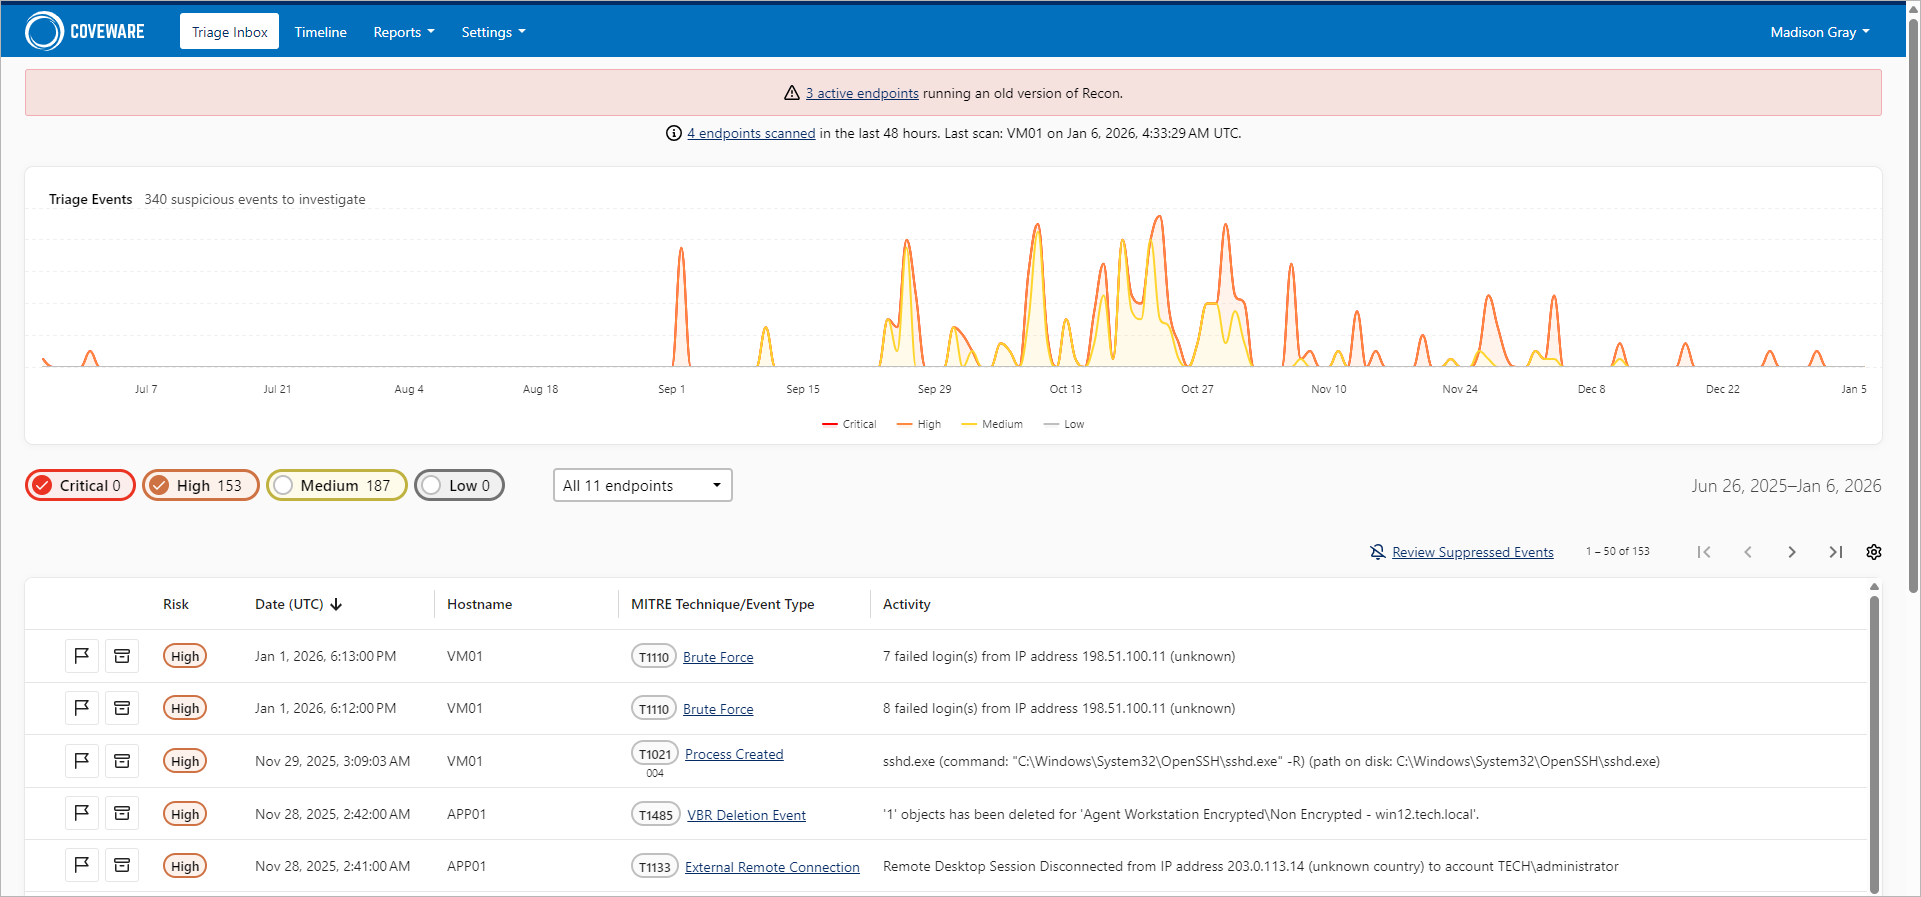
To view aggregated information on suspicious activity detected on machines where Recon runs, log in to the Coveware portal and click Triage Inbox.
The dashboard includes the following widgets:
- A colored graph displaying daily statistics on created findings. Data is shown for the whole period, for all risk levels and endpoints. You can filter findings by the risk level. To do this, click the risk level you want to hide on the graph.
- A table displaying detailed information on created findings for the whole period for all endpoints. By default, only findings marked as Critical and High are shown. You can filter data by the risk level and by the specific endpoint.
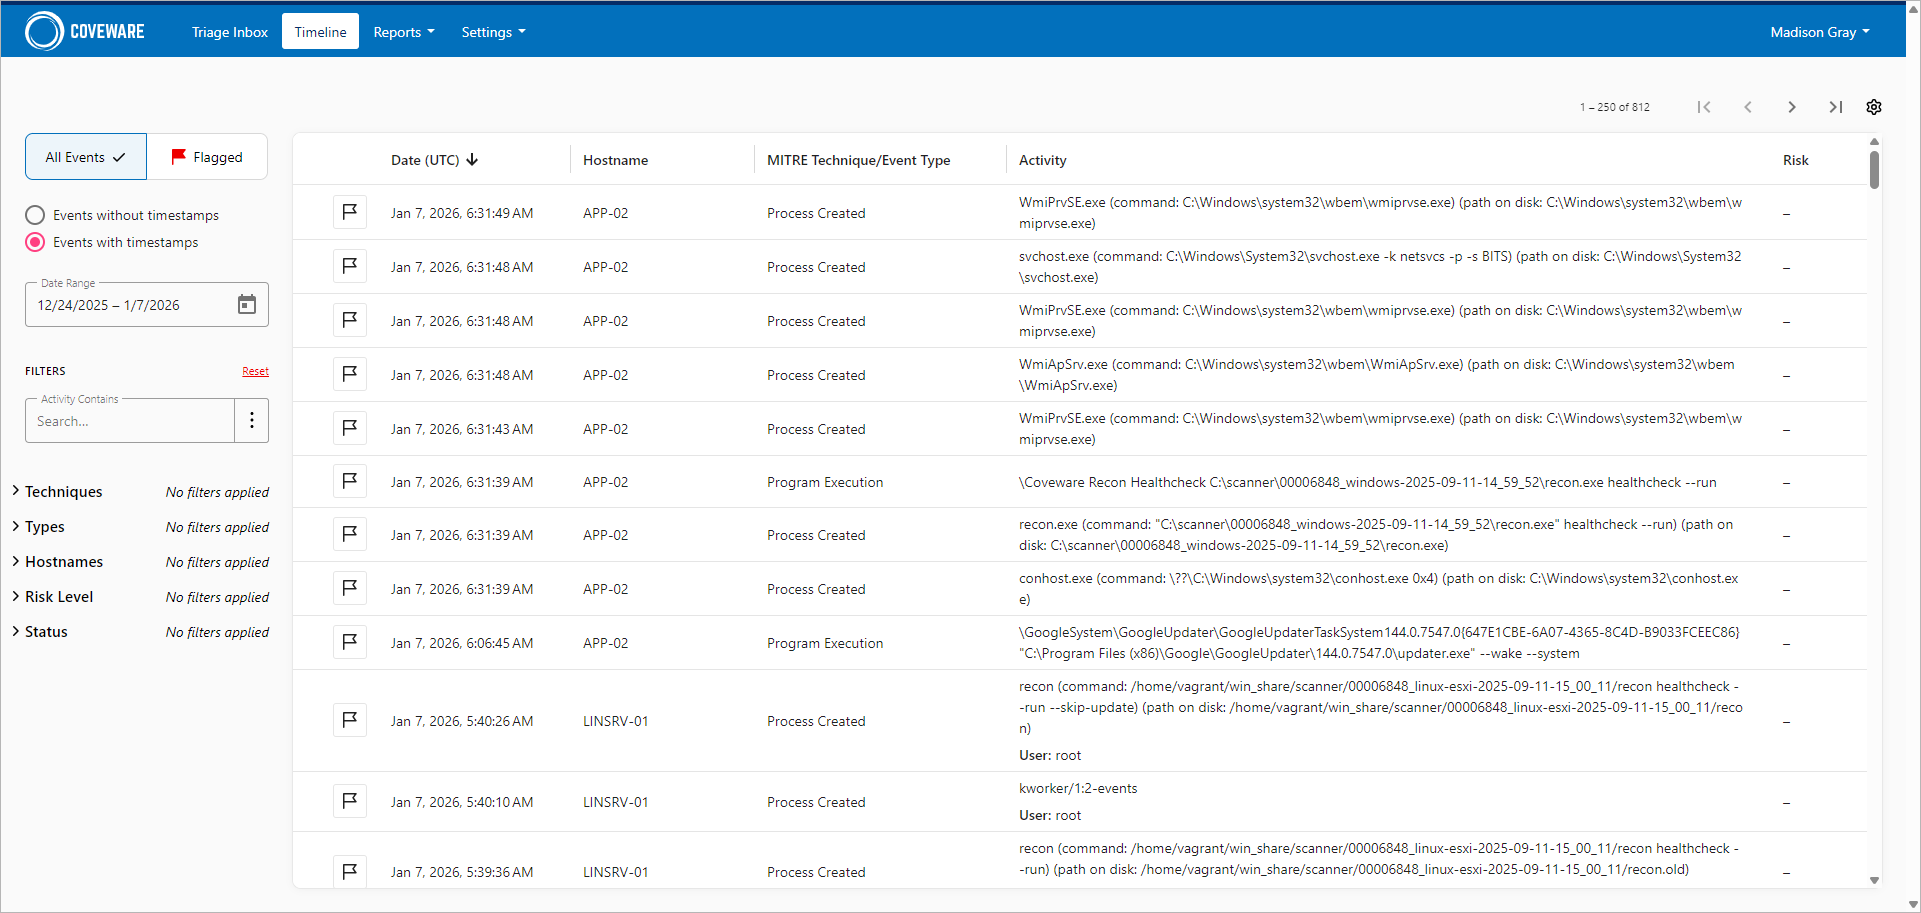
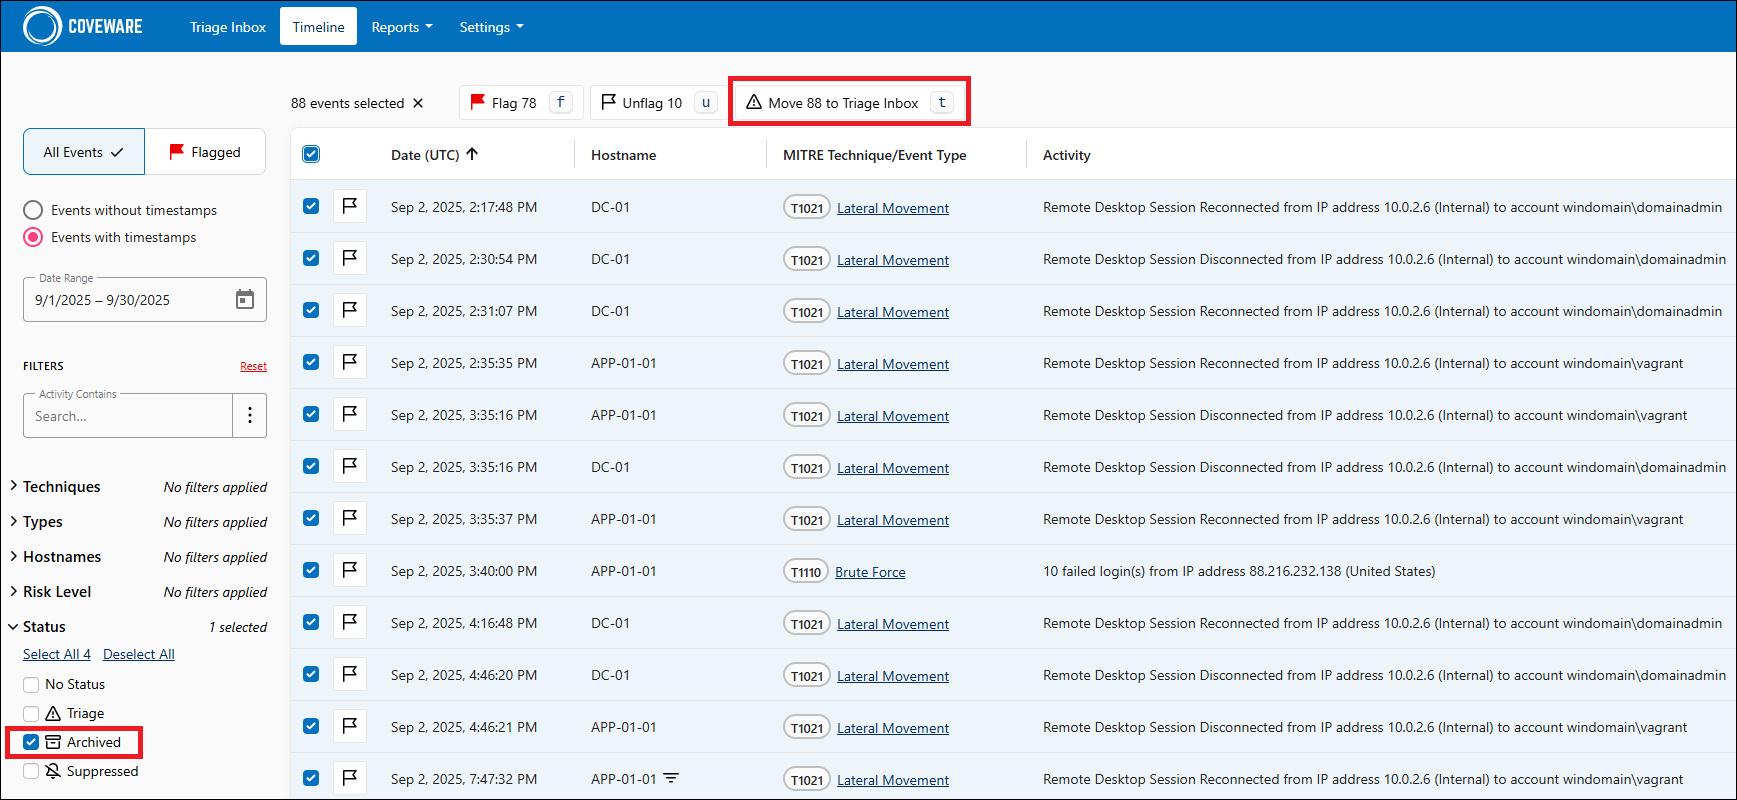
Timeline
For advanced event view, click Timeline. In this section, you can perform the following operations:
- Filter events by various parameters including status, time range, MITRE technique, risk level, endpoint, and so on.
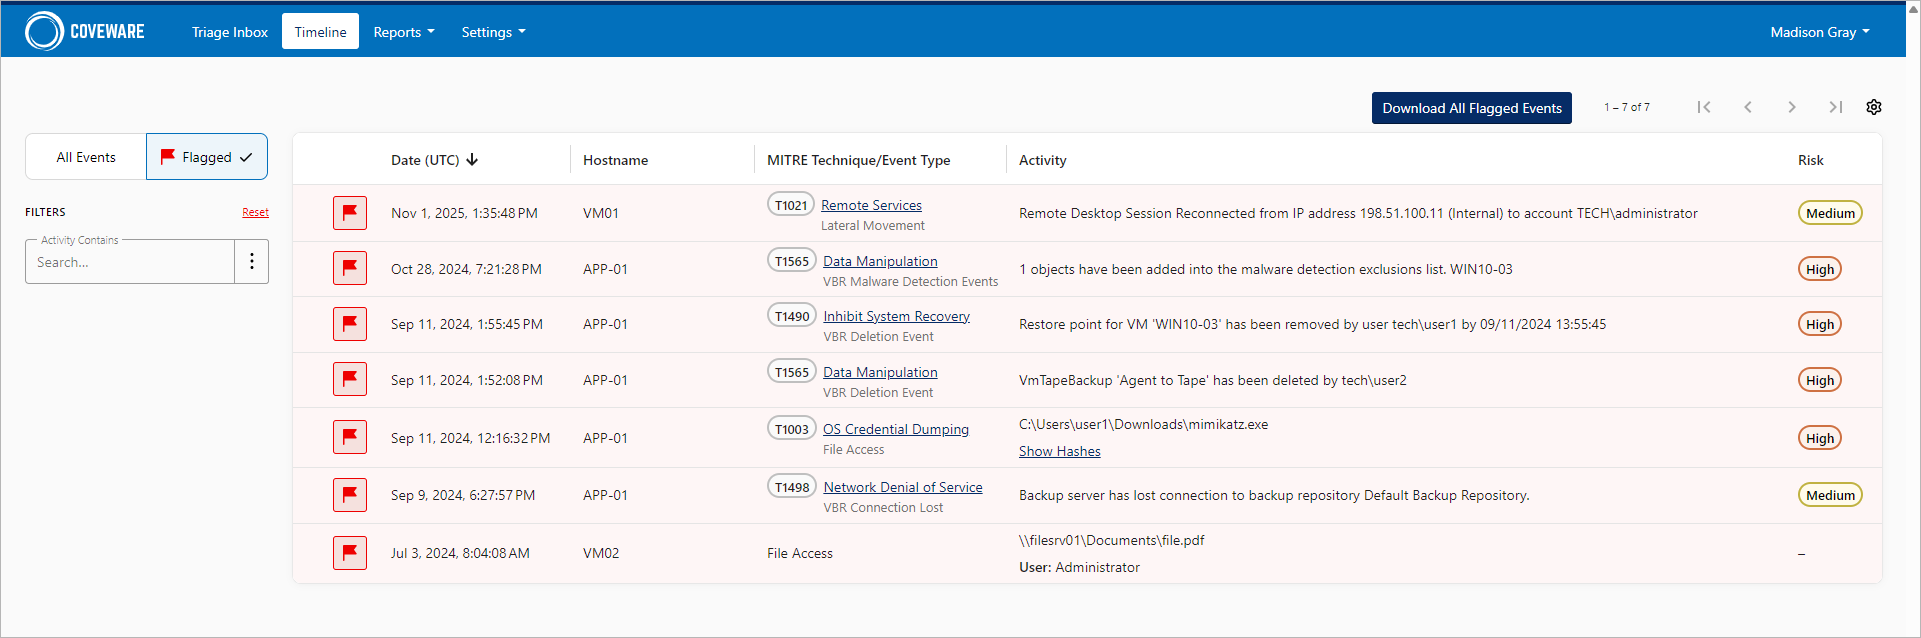
- Download the list of findings flagged as malicious.
- Move archived and suppressed findings to the Triage Inbox.
Flagging Events
You can flag findings that you confirmed as malicious or require for the future investigation. To do this, perform the following steps:
- Log in to the Coveware portal and click Triage Inbox.
- Select the finding from the table and click the flag icon.
To unflag the event, click the flag icon once again.

All flagged findings can be found in the Timeline section. To download information on flagged events in the CSV format, do the following:
- In the filter menu of the Timeline section, click Flagged.
- Click Download All Flagged Events.
Archiving Events
You can archive findings that do not require further investigation. To do this, perform the following steps:
- Log in to the Coveware portal and click Triage Inbox.
- Select the finding from the table and click the archive icon. The event will be removed from the Triage Inbox.
All archived findings can be found in the Timeline section. To move the event back to the Triage Inbox, do the following:
- In the Timeline section, filter events by the Archived status.
- Select one or more events and click Move N to Triage Inbox.
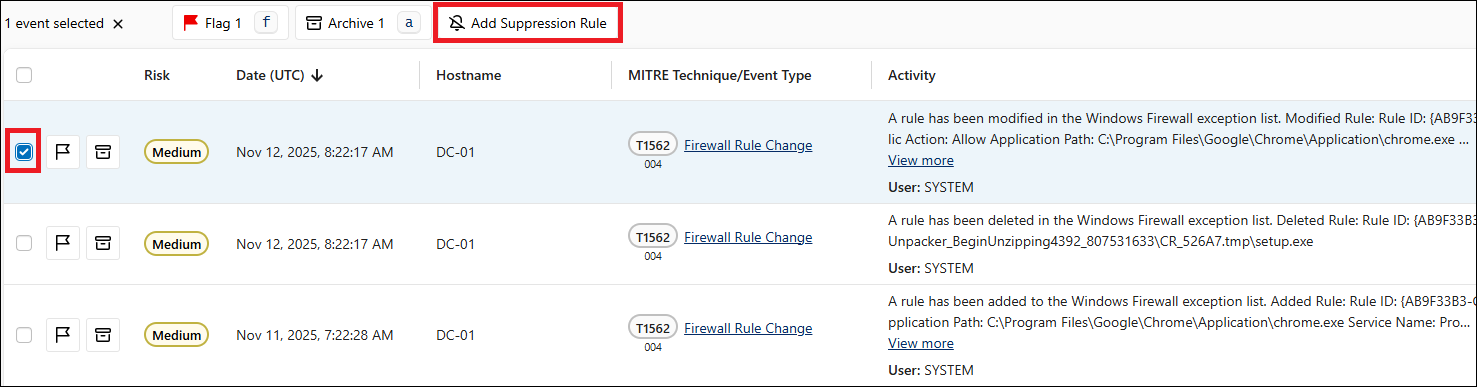
Suppressing Events
You can suppress false positive findings to exclude them from future scans. To do this, perform the following steps:
- Log in to the Coveware portal and click Triage Inbox.
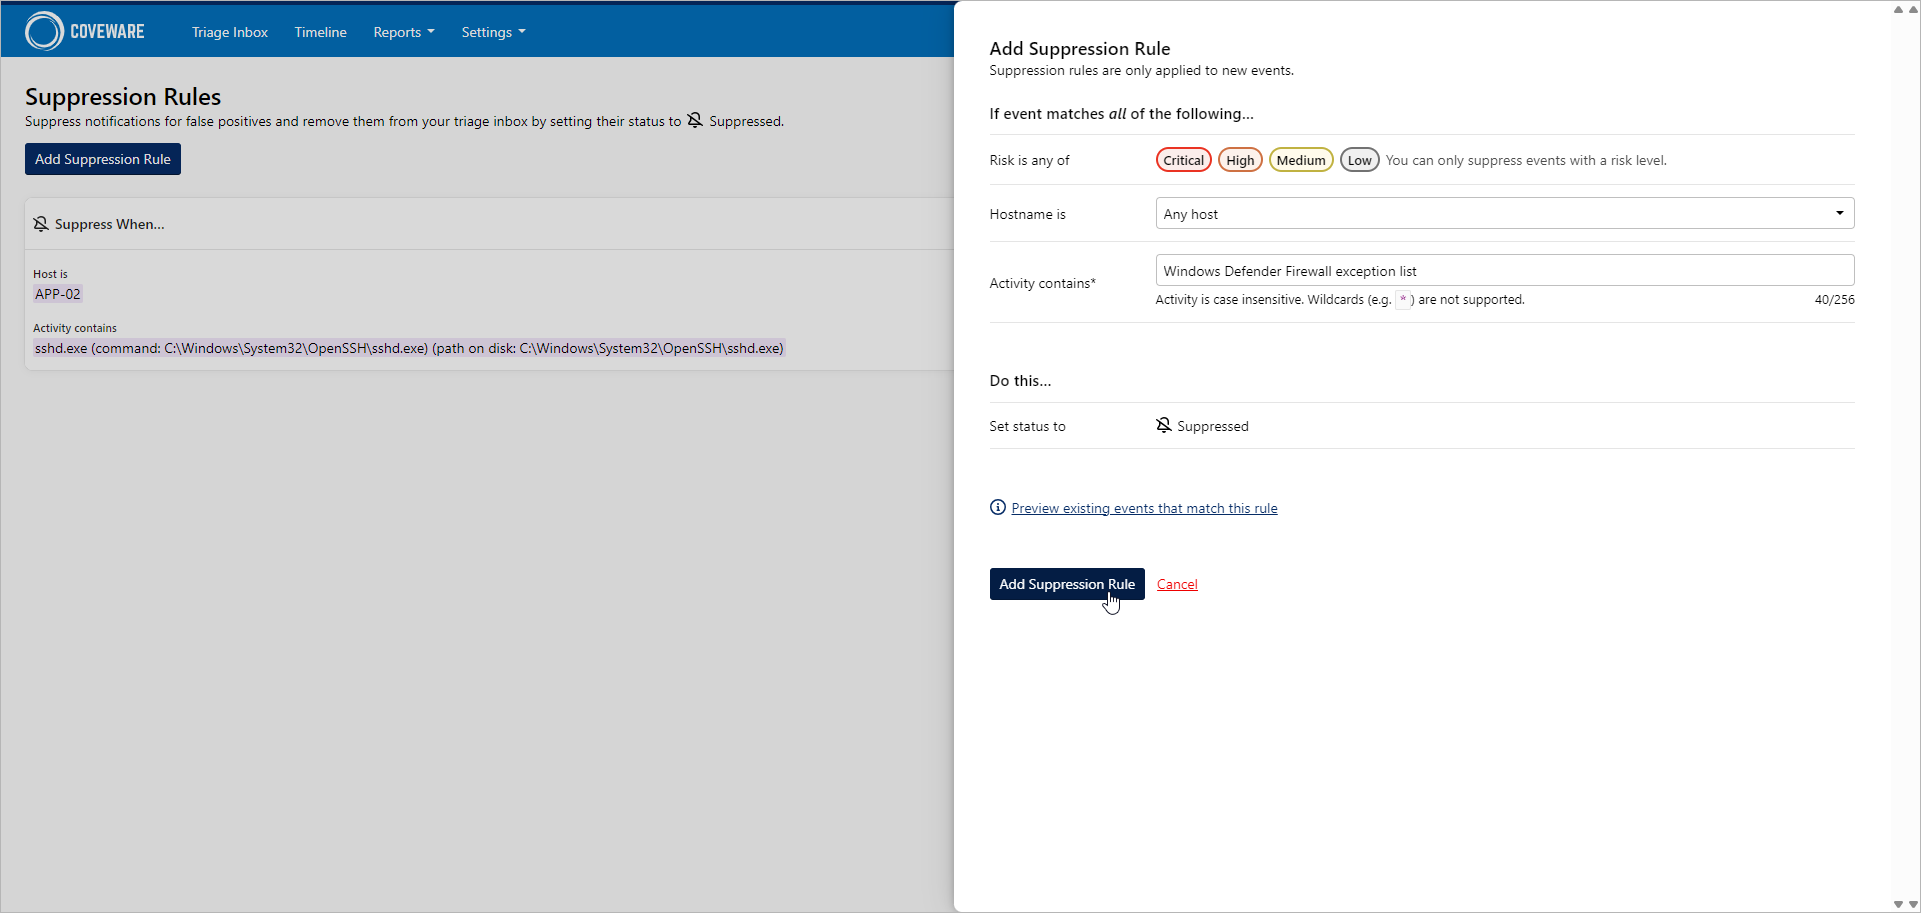
- Select the finding from the table and click Add Suppression Rule.
- Review rule conditions. You can also preview existing events that match this rule.
- Click Add Suppression Rule.
Any further findings that match this rule will be suppressed and not displayed in the Triage Inbox. Previous events will not be affected.
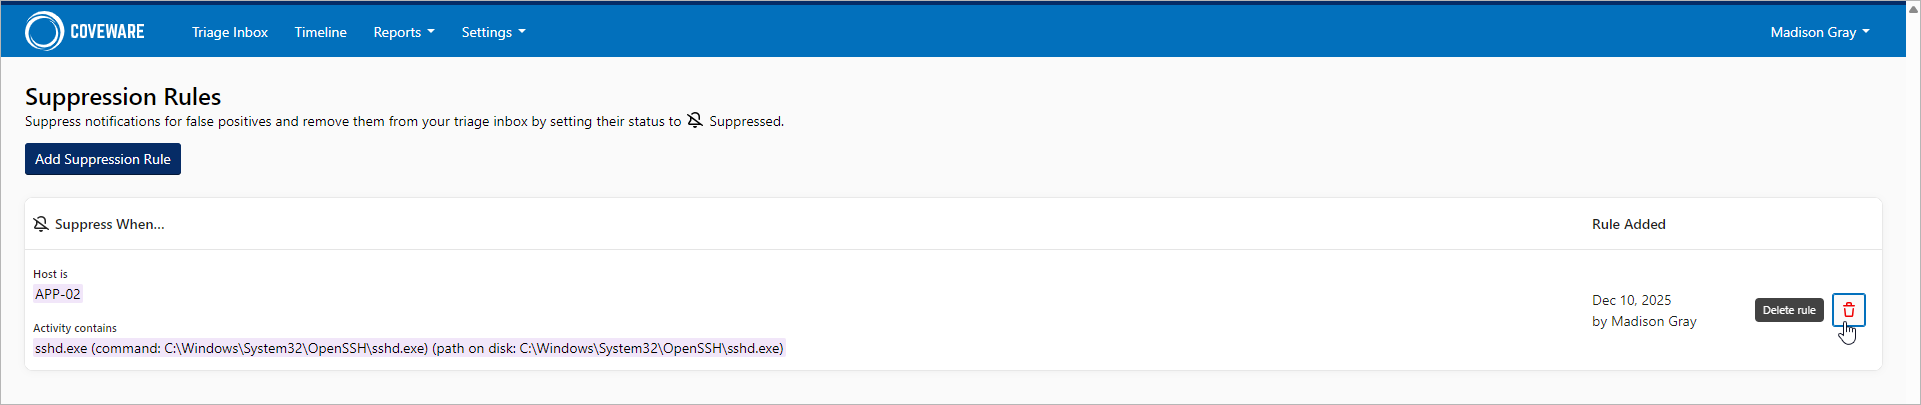
All suppression rules can be found in the Settings > Suppression Rules section. To create a custom suppression rule, do the following:
- In the Settings > Suppression Rules section, click Add Suppression Rule.
- Specify rule conditions and click Add Suppression Rule.
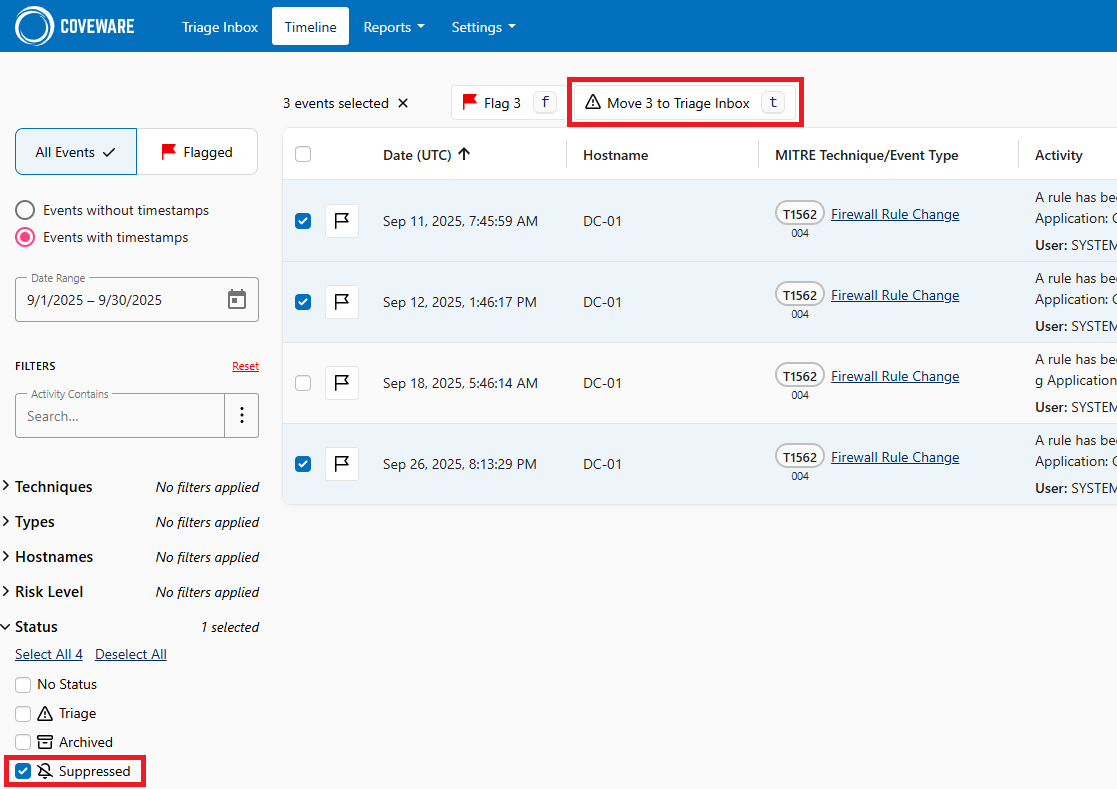
All suppressed findings can be found in the Timeline section. If you want to move the event back to the Triage Inbox, do the following:
- In the Timeline section, filter events by the Suppressed status.
- Select one or more events and click Move N to Triage Inbox.
If you do not want to suppress specific findings further, remove the suppression rule. To do this, perform the following steps:
- Click Settings > Suppression Rules.
- Select the rule and click the delete icon.
Reports
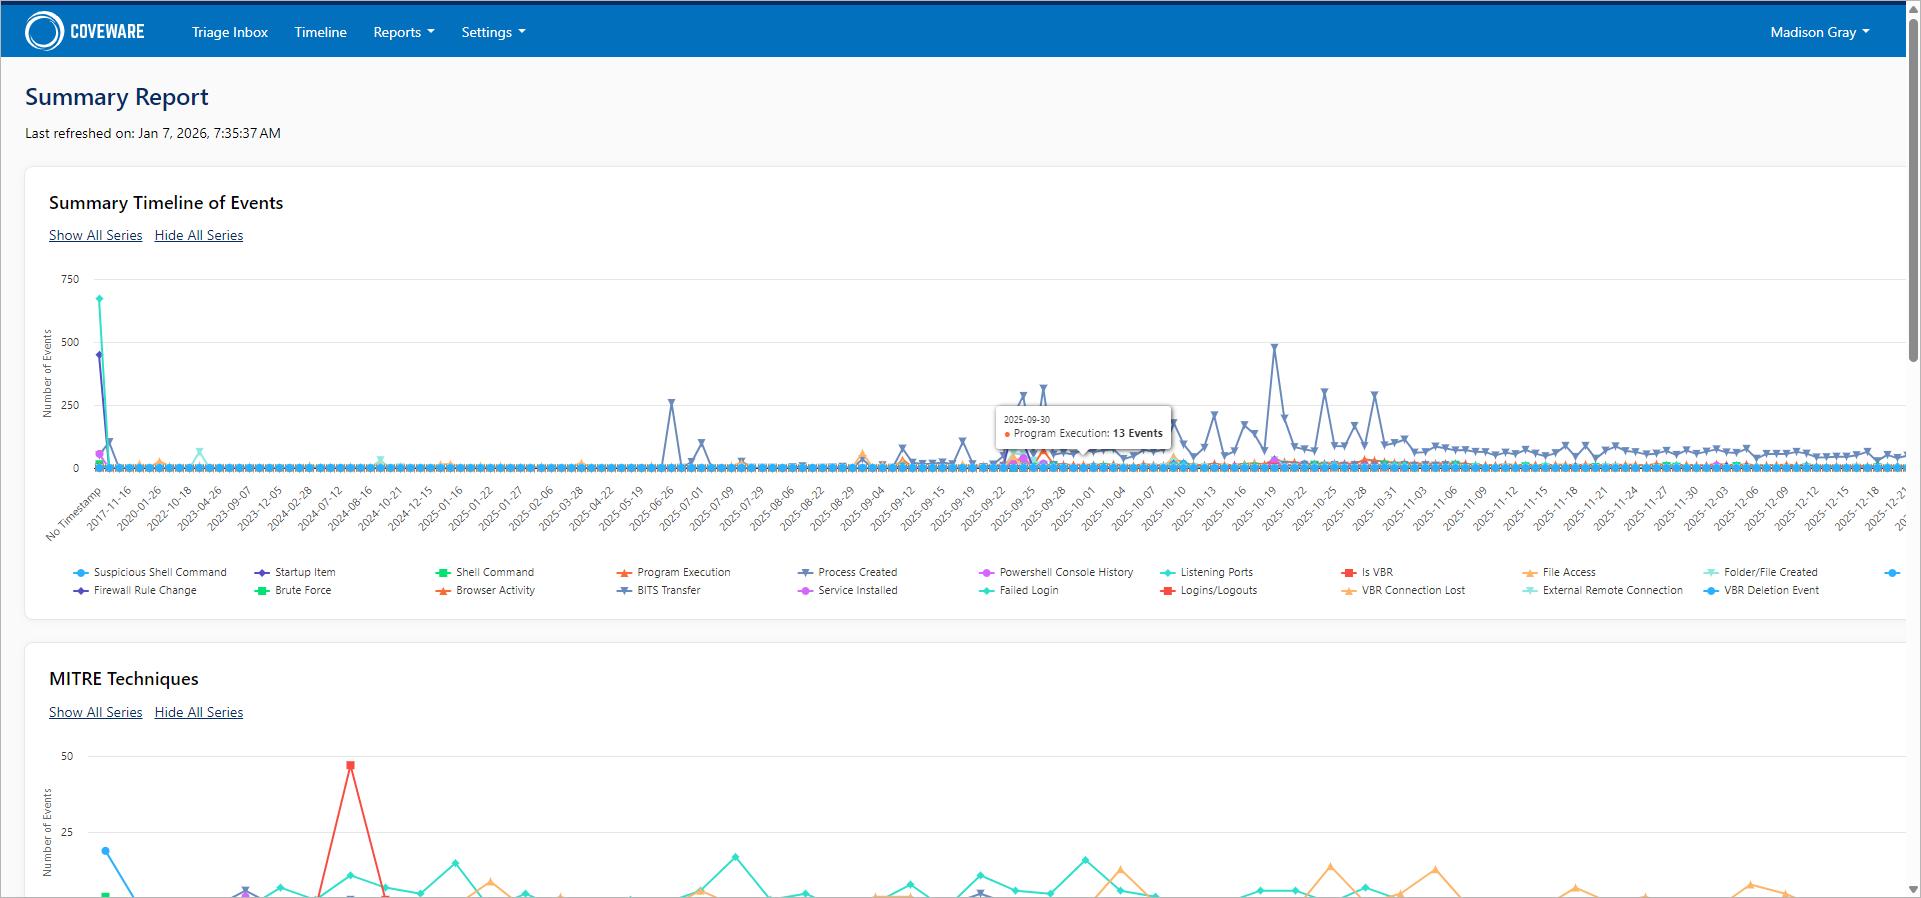
In the Reports section of the Coveware portal, you can view the following built-in reports:
- Summary Report — Displays the breakdown of event types, MITRE techniques and endpoint events by day. Also includes a colored stacked bar chart displaying the breakdown of event types by endpoint.
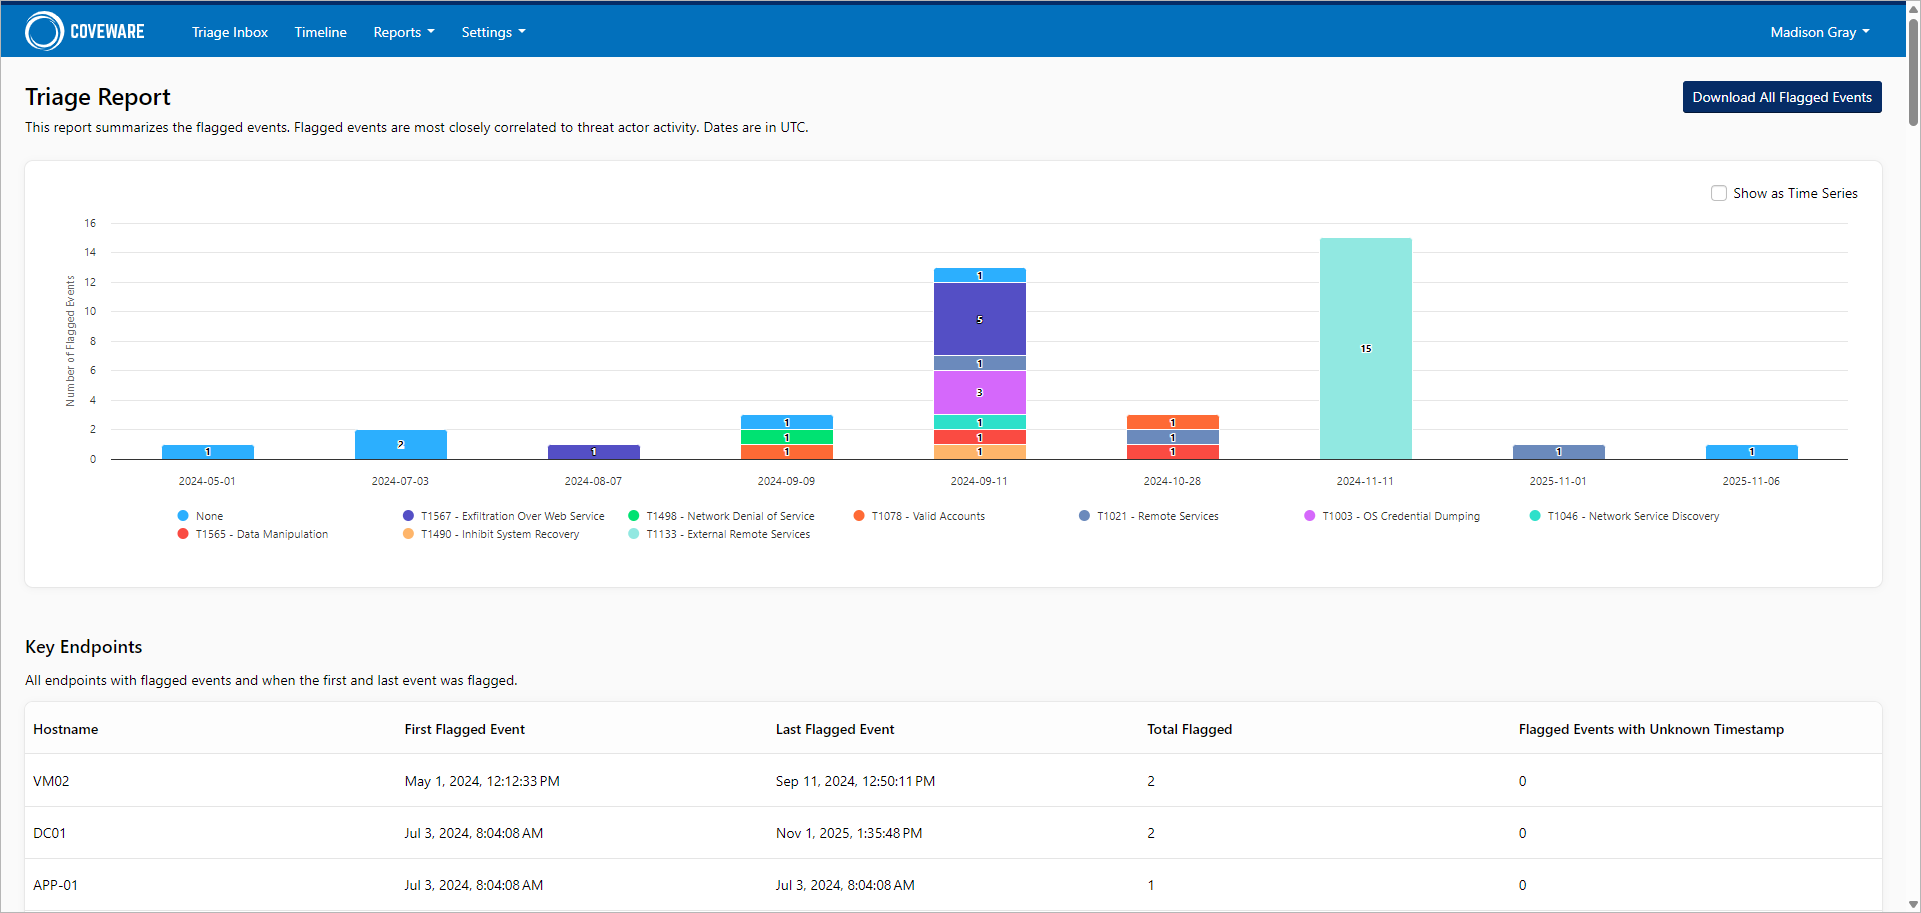
- Triage Report — Displays aggregated information on flagged findings correlated with key endpoints and MITRE TTPs — Tactics, Techniques, and Procedures. Also includes mitigation summary.
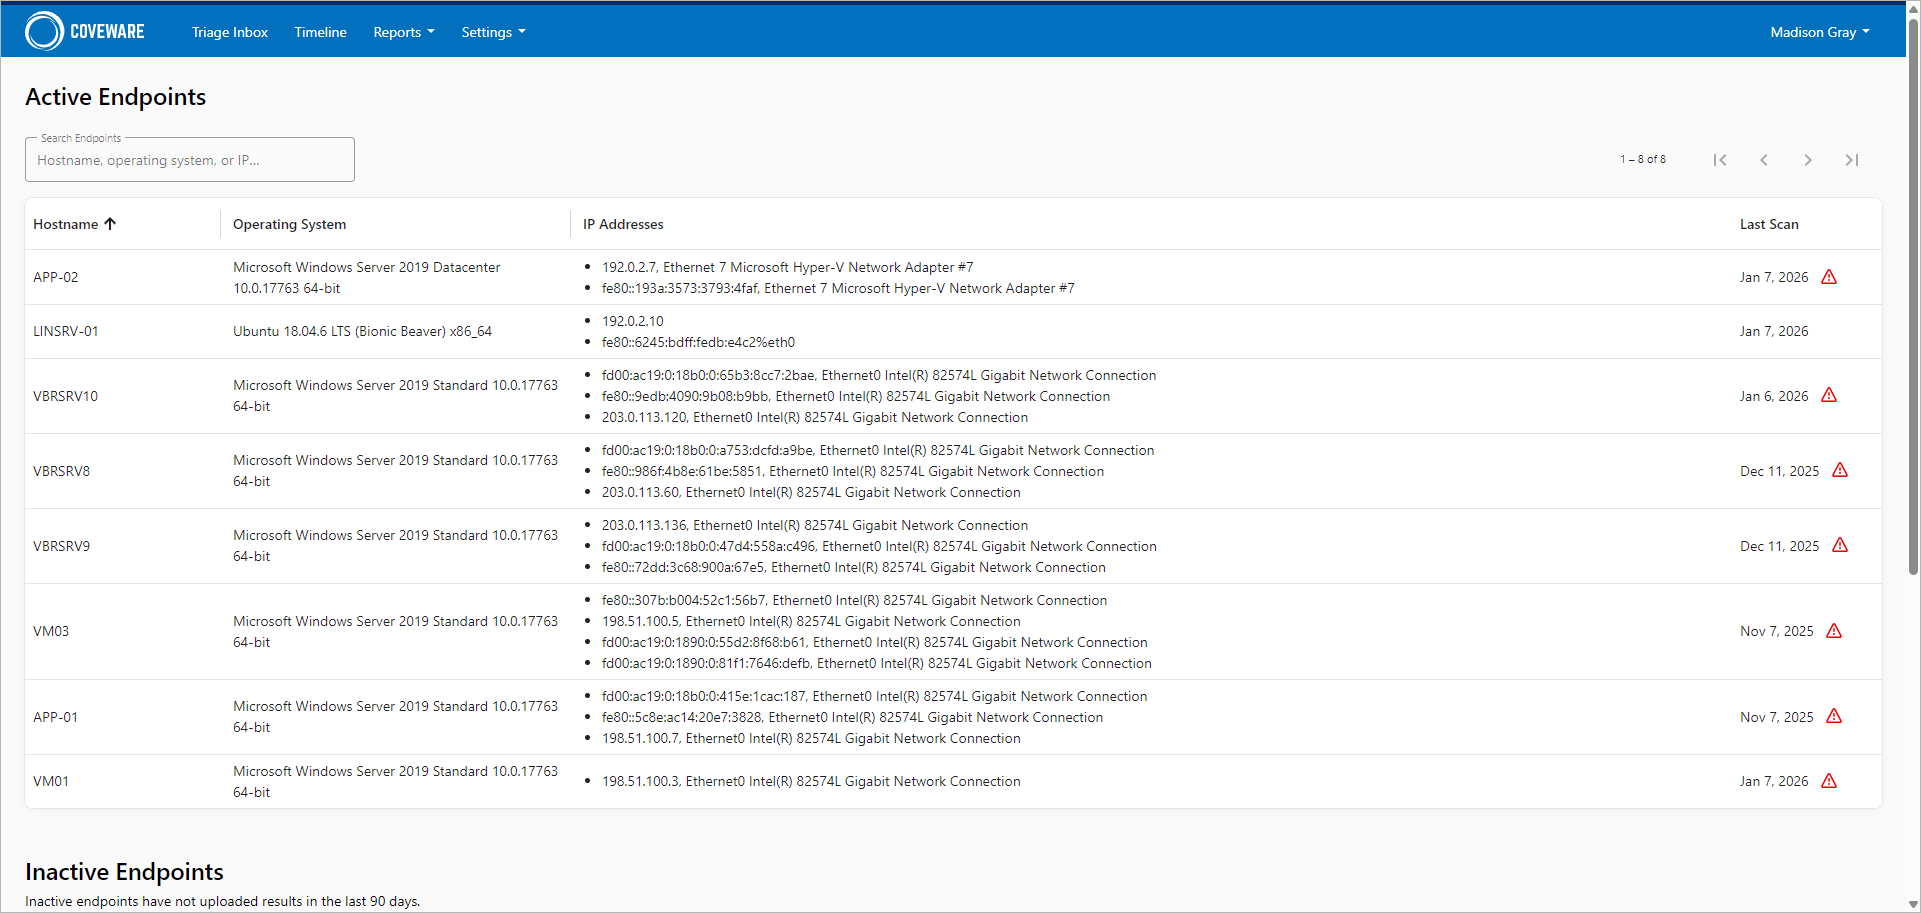
- Endpoints — Displays information on active and inactive endpoints. Active endpoints that have outdated version of Recon or did not send scan results for the last 7 days also display a warning.
Integrations
Recon for Veeam Infrastructure supports the API integration with the following Veeam products:
- Veeam App For Microsoft Sentinel
- Veeam ONE 13.0.1 (build 13.0.1.5924) and later
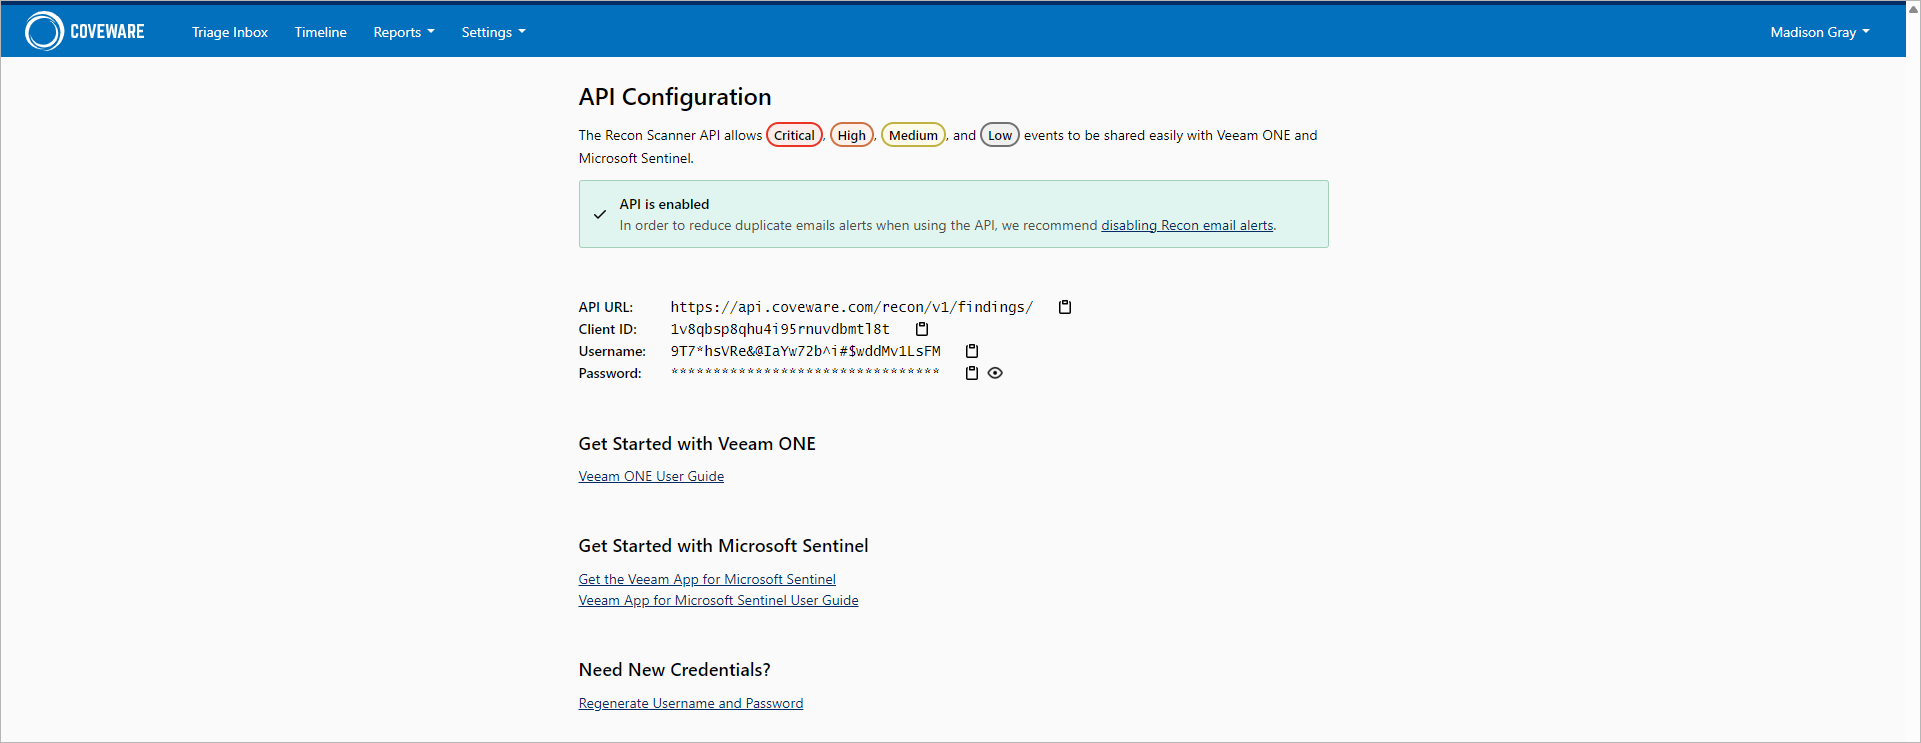
To get the Recon REST API configuration, do the following:
- Log in to the Coveware portal and click Settings > API.
- Click Enable API.
- Copy the following settings:
- API URL
- Client ID
- Username
- Password
Important |
Username and password appear only once. If you lost these credentials, you can generate new one. To do this, click Regenerate Username and Password. Make sure that you update your integration configuration with new credentials. |
For more information on how to integrate Recon for Veeam Infrastructure into Veeam ONE, see the Coveware Integration section in the Veeam ONE User Guide.
For more information on how to integrate Recon for Veeam Infrastructure with Veeam App for Microsoft Sentinel, see the Configuring Coveware Settings section in the Veeam App for Microsoft Sentinel User Guide.
Troubleshooting
This section describes troubleshooting steps for the following issues related to Recon:
Issues with Running Recon
Some antivirus or EDR solutions may block Recon from running. To mitigate this risk, add the Recon directory and its content to the antivirus exclusions.
Issues with Recon Update
During the Recon update, the following error messages may appear:
| Error Message | Troubleshooting Steps |
|---|---|
Updates could not be checked due to a connection error. | Check the internet connection on the endpoint and in your infrastructure. Also make sure that you properly configure firewall rules. For more information, see Firewall Rules. |
Updates could not be checked due to a server refusing authorization. Aborting. | The configuration token may have been revoked. Contact Coveware Support. |
Updates could not be checked due to a server error. | Contact Coveware Support. |
Updates could not be checked due to an unknown error. | Contact Coveware Support. |
Issues with Data Upload
If Recon cannot upload scan results to Coveware, perform the following troubleshooting steps:
- Check the internet connection on the endpoint and in your infrastructure.
- Make sure that you properly configure firewall rules. For more information, see Firewall Rules.
- If you use a proxy server, make sure that you have properly configured proxy settings during the initial setup. For more information, see Running Recon.
- If the endpoint does not have direct internet access and no proxy is available, upload scan results using deferred upload. For more information, see Running Recon on Isolated Machine.
- If the problem still exists, contact Coveware Support.
FAQ
What is Coveware?
Coveware is a leading incident response company acquired by Veeam in April 2024. Coveware specializes in cyberextortion cases and helps users to recover their data with a focus on transparency, efficiency, and integrity. Leveraging world-class experts, patent-pending technology, and extensive experience from handling thousands of cases, Coveware provides clients with accurate forecasting, negotiation and settlement services, optimizing outcomes and accelerating the recovery process.
How is Recon for Veeam Infrastructure different from my AV/EDR solution?
The following key features distinguish Recon for Veeam Infrastructure from other solutions:
- Recon for Veeam Infrastructure is a lightweight solution that consumes minimum system resources. It can run in production environments with a low performance impact.
- Recon for Veeam Infrastructure focuses on a retrospective view of the machine activity. This helps you to detect potential threats that may have preceded active monitoring or fallen outside default data retention periods.
- Recon for Veeam Infrastructure combines malware detection methods with the context analysis. This helps you to detect threat actors that try to avoid detection by using legitimate tools already present in the environment.
- Recon for Veeam Infrastructure is designed to detect behavior specific to Veeam Backup & Replication environments out of the box, without causing conflicts with backup solutions.
- Recon for Veeam Infrastructure automatically updates its indicators of compromise (IoC) library before starting a scan. This guarantees that scan results will be relevant to the latest MITRE data.
I am a VCSP partner. How can I track events from my tenant endpoints?
Tenant endpoints are displayed in the same way as other endpoints. You can track events from all endpoints in the Triage Inbox. Advanced filtering is available in the Timeline section.
Consider the following:
- Tenants cannot view events. Only service providers have access to the Coveware data.
- If you configured the integration with Veeam ONE, the data will be also visible only in your Veeam ONE instance and not available for the tenants. For more information, see the Coveware Integration section in the Veeam ONE User Guide.
What can Recon find?
Recon can identify unexpected network connections, unusual user behavior, suspicious file activity, data exfiltration attempts, and potential brute force attacks.
Where is my data uploaded? Is it secure?
Scan results are uploaded to a secure location in AWS S3 — US East Region. Data security is guaranteed by built-in encryption mechanisms compliant with SOC 2 Type II Attestation standards.
Does Recon have access to my backup data?
Recon does not have direct access to the file content including backup files. For more information on data collection objects, see How Threat Detection Works.
What happens if Recon finds suspicious activity?
If you suspect malicious activity, perform further investigation with your security team. Coveware Support assists issues related to Recon itself and cannot provide security guidance around forensic results.
How to update Recon?
Recon automatically checks and installs updates before starting a scan.
What’s New
July 2026
New authentication method: you can now log in to the Coveware portal using Microsoft SSO.
June 2026
New authentication method: you can now log in to the Coveware portal using Google SSO.
November 2025
Recon for Veeam Infrastructure v3.0 released:
- Veeam ONE Integration: Recon findings can now be automatically surfaced inside the Veeam ONE Threat Center giving users a centralized view of suspicious activity. All findings can be forwarded through Veeam ONE native integrations for deeper investigation or automated response workflows.
- Expanded Coverage: You can install Recon on up to 10 servers within Veeam Data Platform including backup repositories, proxies, gateways, and Active Directory servers.
- Suppressing and Archiving Events: Events that have been reviewed or do not need further investigation can now be archived from the Triage Inbox. Suppression rules can also be created for events that users may not need to be continiusly alerted on.
October 2025
Recon for Veeam Infrastructure integrated with Veeam App for Microsoft Sentinel. You can now track Veeam events and security activities found with Recon directly in your Microsoft Sentinel workspace.
For more information, see Veeam App for Microsoft Sentinel User Guide.
July 2025
The Triage Inbox section added to the Coveware portal. Key features:
- Enhanced Visibility: Instantly access and review suspicious events, ensuring potential threats never go unnoticed.
- Risk-Based Filtering: Prioritize your response by filtering events according to their risk level.
- Actionable Context: Gain deeper insights into suspicious activity with direct links to relevant MITRE ATT&CK® information, helping you understand and respond faster.
March 2025
Recon for Veeam Infrastructure v2.1 released:
- Expanded Coverage: You can install Recon on up to 5 servers within Veeam Data Platform including backup repositories, proxies, gateways, and Active Directory servers.
- Linux Support: Recon is now compatible with all modern Linux distributions, making for easier installation and support.
- Enhanced Features: User access management, email notification settings, a new endpoint overview page, direct proxy access, and more.
Disclaimer
Coveware Parties are not responsible for any errors or omissions (negligent or otherwise), regardless of the cause, for the results obtained from the use of this content, or for the performance of any computer, hardware or software used or modified in conjunction with this content. The content is provided on an “as is” basis. COVEWARE PARTIES DISCLAIM ANY AND ALL EXPRESS OR IMPLIED WARRANTIES, INCLUDING, BUT NOT LIMITED TO, ANY WARRANTIES OF MERCHANTABILITY OR FITNESS FOR A PARTICULAR PURPOSE OR USE, FREEDOM FROM BUGS, SOFTWARE ERRORS OR DEFECTS, THAT THE CONTENT’S FUNCTIONING WILL BE UNINTERRUPTED OR THAT THE CONTENT WILL OPERATE WITH ANY SOFTWARE OR HARDWARE CONFIGURATION. In no event shall Coveware Parties be liable to any party for any direct, indirect, incidental, exemplary, compensatory, punitive, special or consequential damages, costs, expenses, legal fees, or losses (including, without limitation, lost income or lost profits and opportunity costs or losses caused by negligence) in connection with any use of the content even if advised of the possibility of such damages.