 This is an archive version of the document. To get the most up-to-date information, see the current version.
Installing Veeam Backup Agents with Discovery Rules
You can install Veeam backup agents on managed and client computers using discovery rules. This is a recommended installation method. It allows you to run discovery and initiate the installation procedure in the Veeam Service Provider Console portal. Thus, you can minimize manual operations with the managed and client computers, or usage of any 3rd party tools during the installation process. For details on discovery process, see How Installation with Discovery Rules is Performed.
How Installation of Veeam Backup Agents is Performed
Installation of Veeam backup agents runs as follows:
- A backup administrator initiates the installation process.
- If a discovery rule is configured to install Veeam backup agents on discovered computers and set up a backup job, the installation process is initiated automatically after discovery. The backup administrator must only initiate the discovery process.
- Otherwise, the backup administrator must instruct Veeam Service Provider Console to install Veeam backup agents on discovered computers.
- The master agent downloads the Veeam backup agent setup file from the Veeam Installation Server (over the Internet), and uploads this file to discovered computers.
- The master agent downloads the Veeam Service Provider Console management agent setup file from the Veeam Service Provider Console server, uploads this file to discovered computers, triggers management agent installation, and configures management agents to communicate with Veeam Service Provider Console.
- Veeam Service Provider Console management agents on the discovered computers trigger installation of Veeam backup agents.
- When installation completes, management agents activate Veeam backup agents.
- If a backup job must be set up as part of the installation procedure, management agents apply a backup policy.
Required Privileges
To perform this task, a user must have one of the following roles assigned: Portal Administrator, Site Administrator, Portal Operator.
Prerequisites
Before you install Veeam backup agents:
- Configure discovery rules and run discovery to identify computers on which you plan to install Veeam backup agents and install Veeam Service Provider Console management agents on discovered computers.
For details, see Deploying Management Agents with Discovery Rules.
- [For Microsoft Windows computers] Make sure that client or hosted computers are configured to allow installation: the File and Printer Sharing (SMB-In) firewall rule must allow inbound traffic.
- Make sure that the machine that hosts the master agent is powered on, has connection to the Internet, and can access discovered computers.
- [For Microsoft Windows computers] Make sure you have an account with local Administrator permissions on all client or hosted computers.
This account will be used to upload Veeam backup agent setup files to client or hosted computers and perform installation.
- [For Linux computers] Make sure you have the root account or any user account with super user privileges on all client or hosted computers.
This account will be used to upload Veeam backup agent setup files to client or hosted computers and perform installation.
- If you plan to assign a backup policy as part of the installation procedure, create a new backup policy or check and if necessary customize one of the predefined policies.
For details, see Configuring Backup Policies.
Installing Veeam Backup Agents
Install Veeam backup agents on discovered computers.
Note: |
This step is not required if you configured discovery rules to install Veeam backup agents. In this case, installation of Veeam backup agents will be initiated automatically after discovery. |
To install Veeam backup agents on discovered computers:
- Log in to Veeam Service Provider Console.
For details, see Accessing Veeam Service Provider Console.
- In the menu on the left, click Discovery.
- Open the Discovered Computers tab and navigate to Computers.
- Select check boxes next to the necessary computers.
- Click Install Backup Agent and select OS type: Windows, Linux or macOS.
Alternatively, you can right-click the necessary computer and choose Install Backup Agent.
The Install Backup Agent window will pop up.
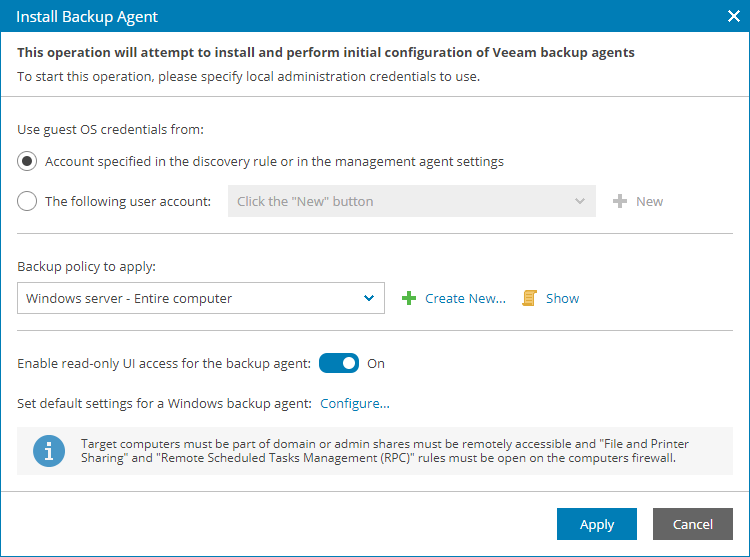
- In the Use guest OS credentials from section, select an account that will be used to upload setup files to discovered computers and start installation.
The account must have local Administrator permissions on computers where you want to install Veeam backup agents.
- Select Account specified in the discovery rule or in the management agent settings if you want to use for installation the same account that you specified for discovery of client or hosted computers, either in the master agent configuration or in the discovery rule settings.
- Select The following user account if you want to specify an account different from the one that you used for discovery. You can select an account from the list or click New to specify credentials for a new account.
- In the Backup policy to apply list, choose a backup policy that must be applied as part of the installation process.
If you allocated all cloud resources specified in the policy to the company, the chosen backup policy will be used to configure backup job settings after installing Veeam backup agents. You can select No policy if you do not want to configure backup job settings as part of installation.
To view the selected policy details, click the Show link. To configure a new backup policy, click Create New and configure a new backup policy. For details, see Configuring Backup Policies.
Note that you cannot assign a backup policy targeted to a Veeam Cloud Connect repository to a hosted Veeam backup agent.
- By default, the read-only access mode is enabled for all Veeam backup agents. To disable the read-only access mode for Veeam backup agents, set the Enable read-only UI access for the backup agent toggle to Off.
For details on the read-only access mode for Veeam backup agents, see Enabling Read-Only Access Mode.
- [For Veeam Agent for Microsoft Windows] To push global settings for Veeam backup agents, click Configure and specify default global settings for Veeam backup agents. For details on the global settings for Veeam backup agents, see Configuring Veeam Backup Agent Global Settings.
- Click Apply.
- Wait for the installation process to complete.
The installation process may take up to several minutes.
Checking Installation Results
To make sure that installation of Veeam backup agents has completed successfully, complete the following steps:
- Log in to Veeam Service Provider Console.
For details, see Accessing Veeam Service Provider Console.
- In the menu on the left, click Discovery.
- Open the Discovered Computers tab and navigate to Computers.
- Find the necessary computers in the list.
- Check the value in the Deployment Status and Deployment Progress columns.
If installation was successful, the Deployment Status must be Success, and the Deployment Progress must be 100%.
- Click a link in the Deployment Status column to display session details of the installation procedure.
If you want to cancel Veeam backup agent deployment, click Cancel Deployment. If the installation was canceled and the Deployment Status is Failed, click Clear Logs to update the status.
In some cases, after installation you might need to perform additional operations. For example, if the setup detects a pending computer reboot, the list of installation session details, will display a warning notifying that reboot is required. To complete the installation, you can initiate computer reboot in Veeam Service Provider Console. For details, see Rebooting Remote Computers.