 This document is not maintained any longer.
Set Up VPN from Endpoints to Local Site
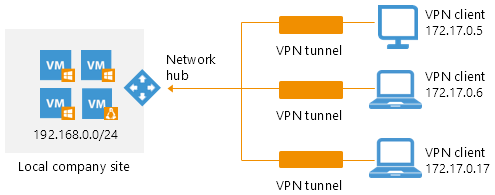
You can use Veeam PN to set up a VPN connection from remote user machines to application and services on a local company site. This scenario can be helpful if some of your users are working remotely, for example, travelling, and still need to use company resources. In this case, you can provide separate users with remote access to the company site over the VPN.
Reference Environment
This how-to assumes that your company environment is configured in the following way:
- Local company site: your applications and services are hosted on a local company site.
- Remote users: users who need to gain access to the local company site are working remotely.
In this scenario, you will deploy Veeam PN components in the following way:
- The network hub will be deployed on the local company site.
- You will configure VPN settings on user machines with the help of OpenVPN.
Whenever users need to access resources on the local company site, they will establish a VPN connection to the network hub, that, in its turn, will route requests to machines on the local company site.
Prerequisites
To follow instructions of this how-to, check the following prerequisite:
You must have a VMware vSphere host on the local company site. The network hub is deployed as a virtual appliance and placed on a VMware vSphere host.
Step-By-Step Walkthrough
To set up a VPN connection from user machines to the local company site, you will:
- Deploy the network hub on the local company site
- Register HUB site
- Register clients for user machines in the Veeam PN portal
- Configure OpenVPN on user machines
- Establish a VPN connection from user machines to the network hub on the local company site
Step 1. Deploy Network Hub in Local Company Site
The network hub is the core of the VPN infrastructure. If you want to set up a VPN connection from user machines to company resources, you must deploy the network hub on the local company site.
- Download the Veeam PN OVA package from: https://www.veeam.com/downloads.html and save it in a network shared folder.
- In VMware vSphere Web Client, open the hosts and clusters inventory list and select a host on which you want to place the network hub.
- From the menu at the top of the working area, select Actions > Deploy OVF Template.
- At the Select source step of the wizard, select Local file, click Browse and browse to the Veeam PN OVA package.

- Follow the next steps of the wizard and specify network hub deployment settings: datastore on which the network hub disk must be placed, disk format, network to which the network hub must be connected and so on.
- At the last step of the wizard, select the Power on after deployment check box and click Finish.
VMware vSphere will deploy the network hub on the selected host. The deployment process typically takes several minutes. Wait for this process to complete and proceed to network hub configuration.

- In VMware vSphere Web Client, navigate to the Summary tab and get an IP address of the network hub.
- In a web browser, access the network hub portal by the following address: https://<networkhubIP>.
The browser will display a warning notifying that the connection is untrusted. Ignore the warning and agree to proceed to the portal.
- At the Welcome to Veeam PN screen of the portal, log in to the network hub portal using credentials of the built-in account:
- Username: root
- Password: VeeamPN
- Click Login.
- When prompted, change the password for the built-in account.

- At the first step of the Initial Configuration wizard, select Network hub and click Next.

- Specify parameters for a self-signed certificate that Veeam PN will use to secure communication in the VPN: the certificate key length and click Next.

- After the certificate is generated, click OK, then click Next to proceed to network hub configuration.
- In the Network hub public IP or DNS name field, specify an IP address or full DNS name for the network hub. The IP address or DNS name must be public and accessible from remote user machines.
- Select the Enable point-to-site VPN check box. In the Protocol and Port fields, leave default settings.
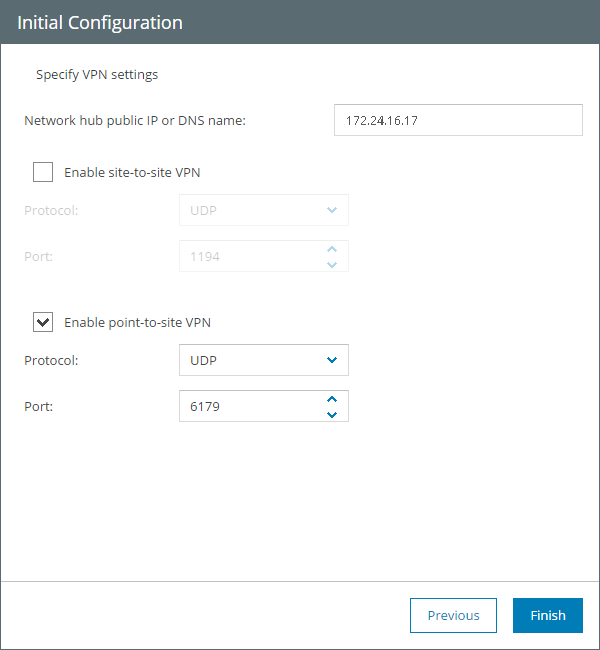
- Click Finish.
When you set up the network hub in a local site and want to make machines in this site accessible over the VPN, you must register this local site as a client in the network hub portal.
To register a hub site client:
- Log in to the network hub portal as a Portal Administrator.
- In the configuration menu on the left, click Clients.
- At the top of the clients list, click Add.
- At the Type step of the wizard, select HUB site.

- At the Site step of the wizard, enter details for the site where the network hub is deployed:
- In the Name field, enter a name for the site. The site name will be displayed in the list of clients.
- In the Network address field, enter the address of the network where the network hub is deployed using the CIDR notation.
Important |
The site name must not contain space characters. |

- At the Summary step of the wizard, review details of the site and click Finish to close the wizard.

Important |
|
Step 3. Register Clients for User Machines
To provide users with access to company resources, you must register clients for these users in the Veeam PN portal. Veeam PN will generate configuration files for users. You will use these configuration files to set up a VPN connection on user machines.
- In the Veeam PN portal, in the configuration menu on the left click Clients.
- At the top of the clients list, click Add.
- At the Type step of the wizard, select Standalone computer.

- At the Client step of the wizard, enter a name for the user machine.

- At the Summary step of the wizard, click Finish.
Veeam PN will generate an XML file with VPN settings for the user. The XML file will be automatically downloaded to the default downloads folder. Save the downloaded file in a network shared folder accessible from the user machine.
- Repeat steps 1-5 for all users to whom you want to provide access.
Step 4. Configure OpenVPN on User Machines
To let a user access company resources, you must configure VPN settings on the user machine. To do this, you must use OpenVPN software and configuration file generated by Veeam PN.
To configure OpenVPN on user machines:
- Download the OpenVPN setup file for the user machine OS from: https://openvpn.net/index.php/open-source/downloads.html.
- Run the OpenVPN setup file and install the product with default installation settings.
- Place the client configuration file generated by Veeam PN in a folder where OpenVPN configuration files are stored: C:\Program Files\OpenVPN\config.
- Repeat steps 1-3 for all users to whom you want to provide access.
Step 5. Establish VPN connection from User Machines to Network Hub
To establish a VPN connection from user machines to the local company site:
- On a user machine, create a batch file with the following command:
openvpn-gui.exe --connect "C:\Program Files\OpenVPN\config\client.ovpn" |
where C:\Program Files\OpenVPN\config\client.ovpn is a path to the user machine configuration file. Note that you must launch the command from the folder where OpenVPN is installed (C:\Program Files\OpenVPN\bin\ by default)
- Run the batch file. Veeam PN will establish a connection from the user machine to the network hub.
- Repeat steps 1-2 for all users to whom you want to provide access.
Result
You have set up a VPN connection from user machines to the local company site. Machines running on the local company site are now accessible to users working remotely.