
You can schedule automatic report delivery for one report or for a number of reports included in a report folder. You can choose to receive ready reports by email, save reports to a folder on a hard drive or to a network share. Note that you can only schedule delivery for saved reports (that is, reports in the My Reports folder and its subfolders).
To schedule automatic report delivery:
- Open the Workspace section.
- Select the necessary folder under My reports on the left.
- In the displayed list of reports, click a saved report for which you want to set scheduled delivery.
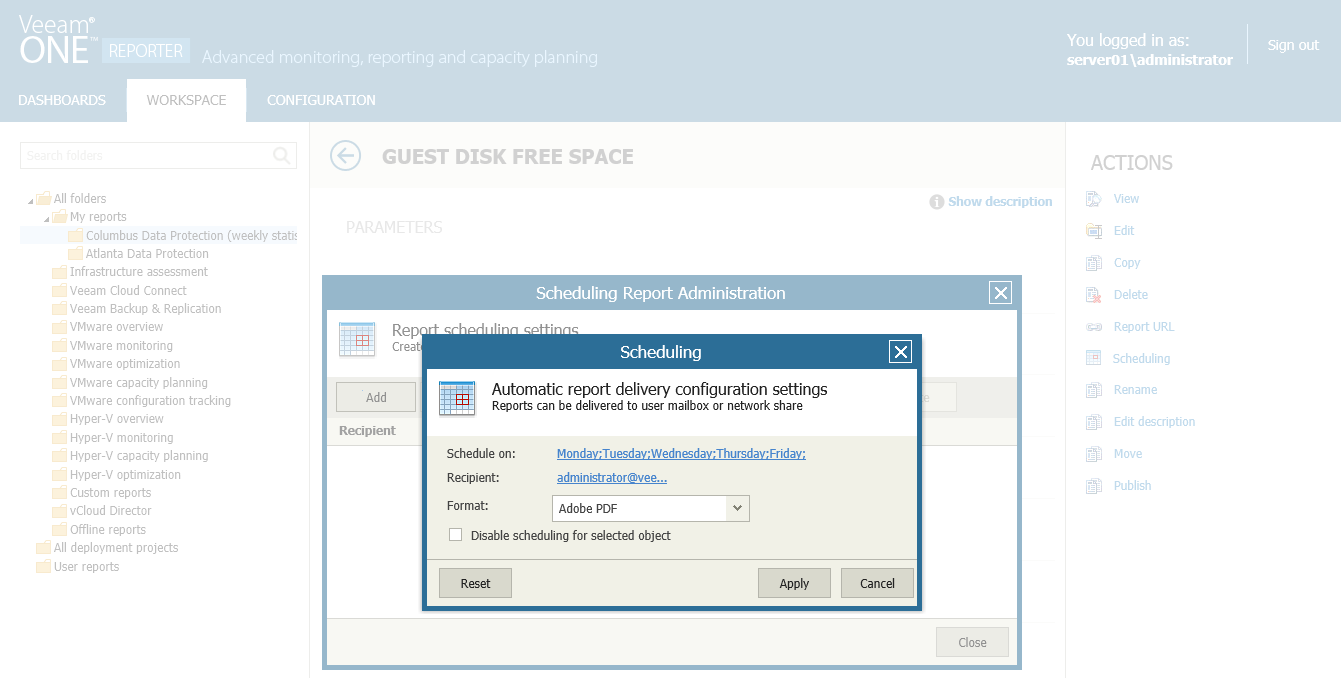
- Click Scheduling in the Actions pane on the right.
- In the Scheduling Report Administration window, click Add.
- In the Scheduling window, configure the scheduling options:
- Click Schedule on and specify a schedule according to which the report must be generated and delivered. For details, see Specifying Delivery Schedule.
- Click Recipient and choose the method used to deliver the report. You can choose to send the report by email or save the report to a folder on a hard drive, or to a network share. For details, see Specifying Delivery Method.
- In the Format list, choose the format in which the report must be saved.
- [Optional] To temporarily disable a schedule, select the Disable scheduling for selected object check box.
- Click Apply to save the specified settings.
- [Optional] You can configure multiple schedules for the same report. Repeat steps 5-8 for each new schedule you want to add.
- Click Close.
To configure automatic report delivery, you must specify the schedule according to which Veeam ONE Reporter must generate and deliver the report.
To configure the report delivery schedule:
- Choose the necessary report and open the Scheduling window, as described in the Scheduling Reports procedure.
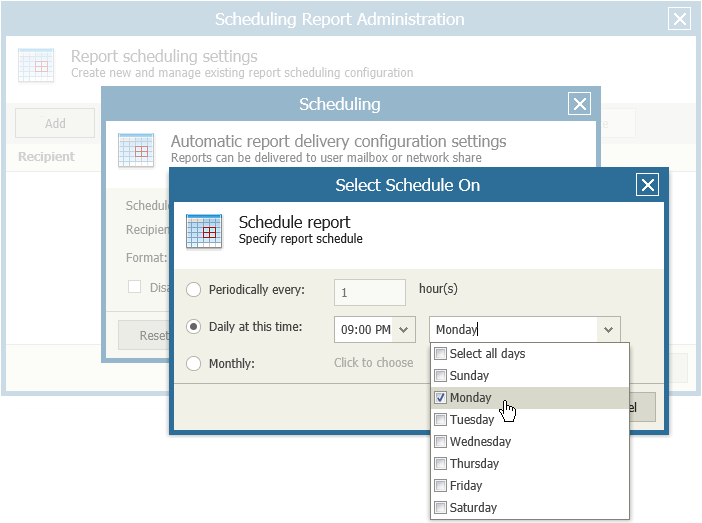
- Click the link in the Schedule on section to define the schedule according to which the report must be generated.
- To generate and deliver reports repeatedly, with a specific time interval, select the Periodically every… hour(s) option and define the necessary interval.
- To generate and deliver reports at specific time, select the Daily at this time option, enter the time and weekdays on which the reports will be created.
- To generate and deliver reports on a monthly basis, select the Monthly option and choose the necessary months and dates or weekdays.
- Click OK to apply the scheduling settings.
To configure automatic report delivery, you must specify the method that Veeam ONE Reporter must use to deliver the report. You can choose to receive ready reports by email, save reports to a folder on a hard drive or to a network share.
To configure delivery of dashboards by email:
- Choose the necessary report and open the Scheduling window, as described in the Scheduling Reports procedure.
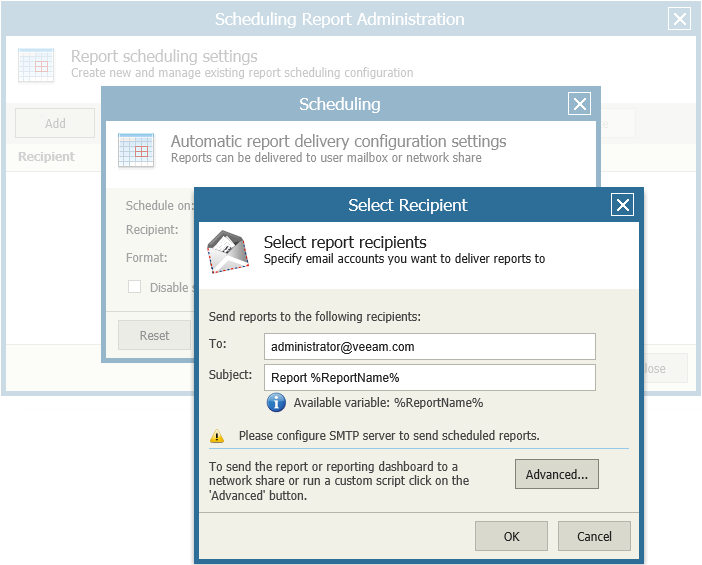
- Click the link in the Recipient section to define how the report must be delivered.
- In the To field, enter recipient’s email address.
If you want to send generated reports to multiple recipients, separate email addresses with a semicolon.
- In the Subject field, enter the email subject title.
You can use the %ReportName% variable in the subject line — Veeam ONE Reporter will substitute this variable with the name of a corresponding report.
- Click OK to apply the delivery method settings.
|
To be able to send reports by email, make sure you specified SMTP settings in Veeam ONE Monitor. For details, see Veeam ONE Monitor User Guide. |
To configure automated delivery of reports to a hard drive or a network share:
- Choose the necessary report and open the Scheduling window, as described in the Scheduling Reports procedure.
- Click the link in the Recipient section to define how the report must be delivered.
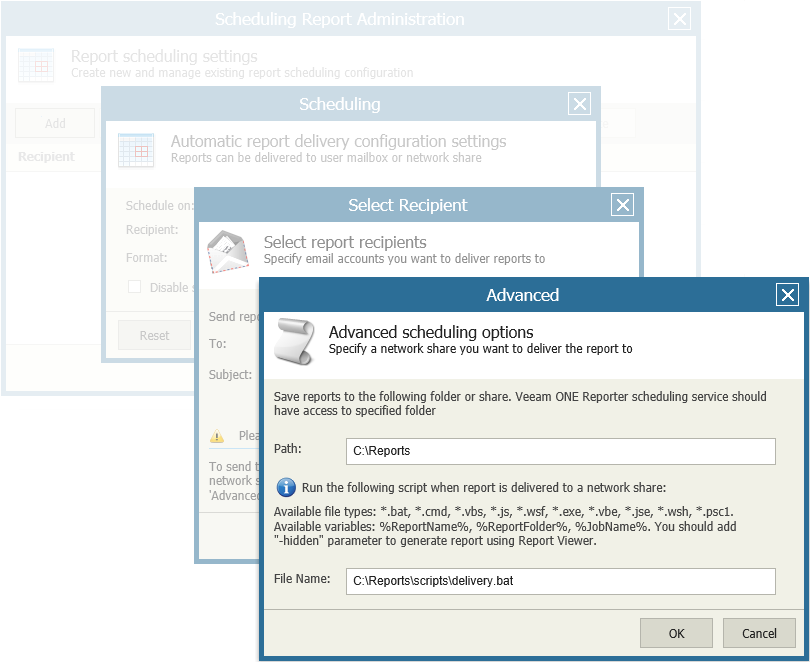
- In the Select Recipient window, click the Advanced button.
- In the Path field, specify the path to a local folder or provide a network path.
The address must lead to a folder that already exists. Veeam ONE Reporter will check if the specified folder exists and whether the folder is accessible by the Veeam ONE Reporter Server. If Veeam ONE Reporter detects any problems accessing the folder, a warning will be displayed next to the Path field.
|
Make sure that the account under which the Veeam ONE Reporter Server service runs has appropriate write permissions for the destination folder. |
- To run a custom script after reports are delivered to the target folder, specify a path to the file with the script in the File Name field.
Running a custom script allows you to perform further manipulations after reports are generated. You can find simple script examples in Appendix D. Scheduling Script Examples.
- Click OK to apply the delivery method settings.
Related Topics
- Scheduling Delivery for Multiple Reports
- Managing Report Schedules
- Viewing Scheduled Report Delivery Results
