This is an archive version of the document. To get the most up-to-date information, see the current version.
Configuring IdP and SSO Settings
Veeam Backup for Salesforce supports single sign-on (SSO) authentication based on the SAML 2.0 protocol. SSO authentication scheme allows a user to log in to different software systems with the same credentials using an identity provider (IdP).
Note |
Only Azure Active Directory oAuth 2.0 IdP is supported in Veeam Backup for Salesforce v1. |
Configuring IdP Settings on Microsoft Azure Side
To configure the IdP settings on the Microsoft Azure side, you must create a new Azure AD application for Veeam Backup for Salesforce in the Microsoft Azure portal. To learn how to register an application with the Microsoft identity platform, see Microsoft Docs.
When creating the application, consider the following:
- The following API permissions must be granted to the application:
- GroupMember.Read.All
- User.Read
- User.Read.All
- The redirect URI added to the application must match the management server FDQN that you use to access the Veeam Backup for Salesforce Web UI. To make sure that you are adding the correct URI, switch to the Configuration page and navigate to Users and Roles > Single Sign-On. The address will be displayed in the Callback URL field.
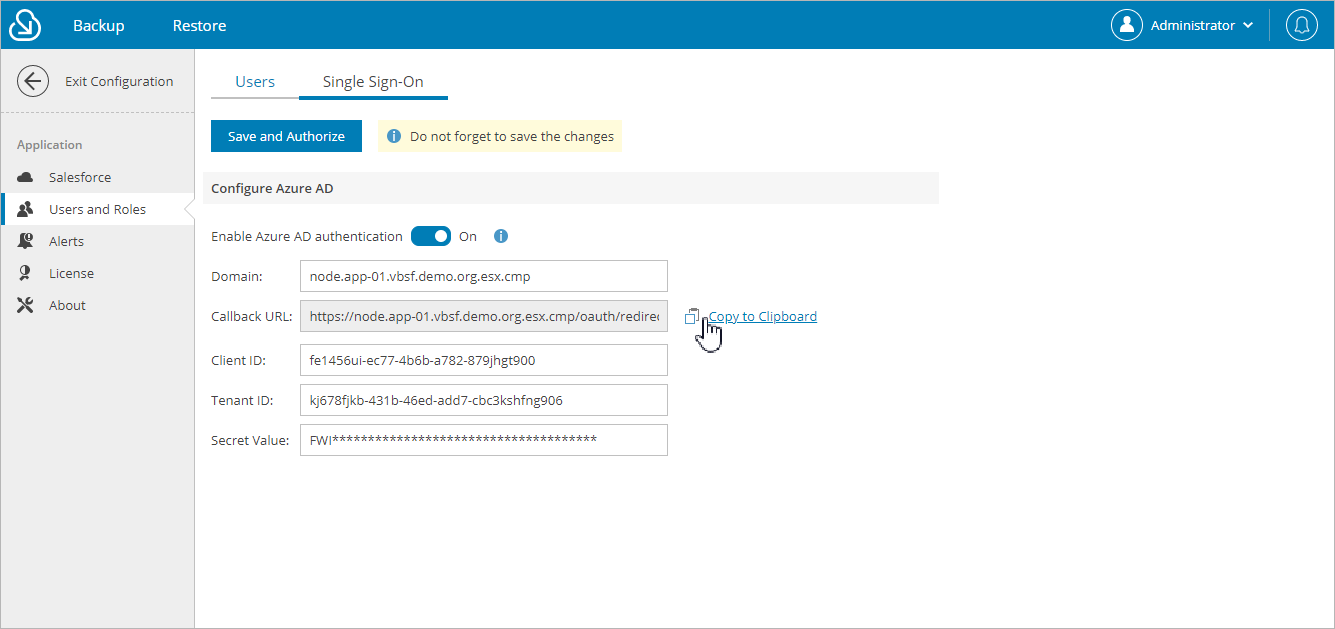
Configuring IdP Settings on Veeam Backup for Salesforce Side
To configure the IdP settings on the Veeam Backup for Salesforce side, do the following:
- Switch to the Configuration page.
- Navigate to Users and Roles > Single Sign-On.
- Set the Enable Azure AD authentication toggle to On.
- In the Client ID field, provide the Application (client) ID of the registered Azure AD application. You can find the ID on the app registration Overview pane in the Microsoft Azure portal.
- In the Tenant ID field, specify the Directory (tenant) ID of the registered Azure AD application. You can find the ID on the app registration Overview pane in the Microsoft Azure portal.
- In the Secret Value field, enter the value of a client secret created in the specified Azure AD application. To learn how to create client secrets, see Microsoft Docs.
- Click Save and Authorize. You will be redirected to the Microsoft Azure portal. In the Microsoft Azure portal, navigate to the created Azure AD application page, and grant admin consent to the application. To learn how to do that, see Microsoft Docs.
As soon as the IdP settings are successfully configured, the SSO session is started. You can start adding users to Veeam Backup for Salesforce. Consider that the SSO session time out is 30 minutes. If the SSO session is expired, you must log in to Veeam Backup for Salesforce using the local administrator credentials once again, and continue adding users for the next 30 minutes.