 This is an archive version of the document. To get the most up-to-date information, see the current version.
Step 5. Select Files to Restore
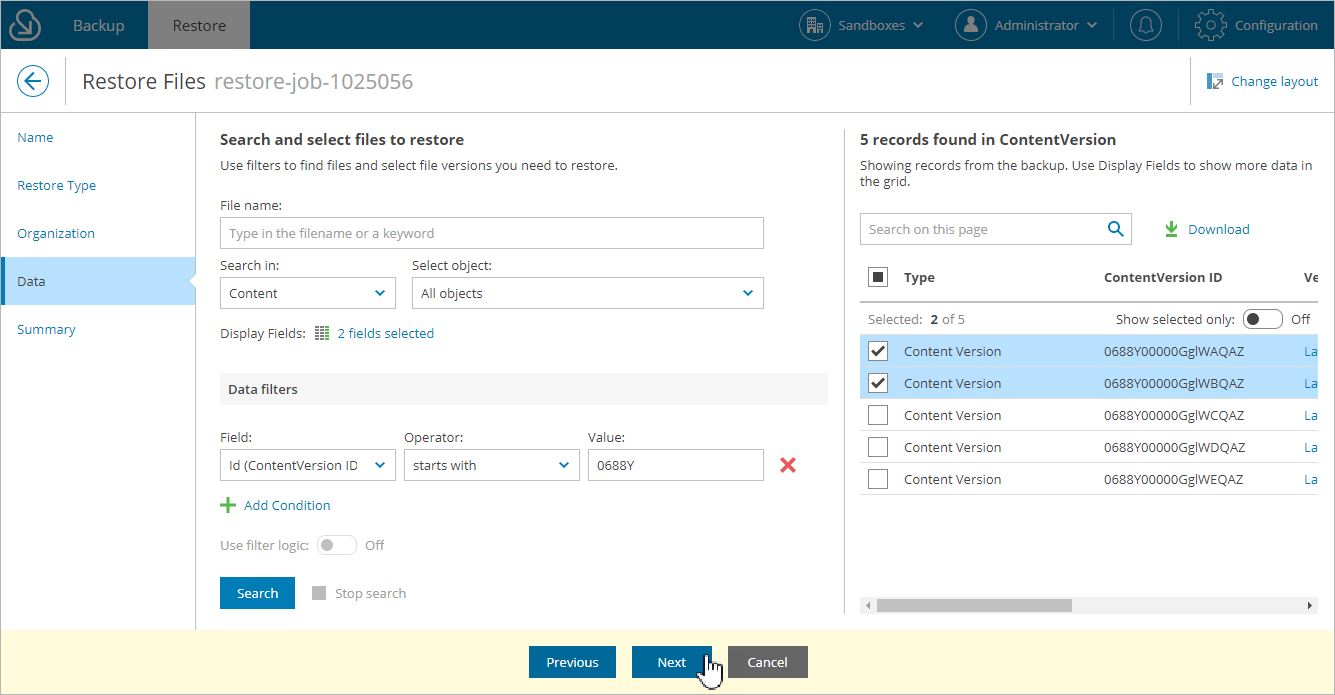
At the Data step of the wizard, you can look through the backed-up data, as well as browse, filter, and choose data that you want to restore. Only files that have been backed up are displayed at this step.
To choose files for restore:
- Specify the file search parameters.
- In the File name field, you can specify a search pattern for the files. Veeam Backup for Salesforce will search for those files whose names match the specified pattern.
- From the Search in drop-down list, select a type of the restored files. If you want restore files of different types in one restore session, you can select Everywhere.
If you select the Attachment or Content type of files, you will be able to specify an object with which the files must be associated.
- The results will be shown in the table with the columns that match specific Salesforce fields. To choose the displayed information, click the link in the Display Fields field and select the necessary Salesforce fields in the Display Fields window.
- Apply additional search conditions using specific filters. To do that, click Add Condition in the Data filters section, and select a field, a conditional operator and the necessary value from the drop-down lists.
Veeam Backup for Salesforce suggests a number of in-built conditional operators, such as contains, equals, starts with, equals, is null and so on. These operators are used to make queries to databases. Note that the time required to process the request depends on the operator you are using, for example, processing a request with the equals operator will take less time than a request with the contains operator.
By default, filters are linked by the AND logical operator. That is, a record is displayed in the search results when all specified conditions are met. You can change this behavior by linking filters with different operators. To do this, set the Use filter logic toggle to On, and specify the filter logic expression using condition ordinal number, brackets and logical operators, for example: 1 AND (2 OR 3) AND NOT 4.
- Click Search.
- In the Records section, Veeam Backup for Salesforce will show the results satisfying your search parameters. Select the files from the search results. Consider that the section displays the maximum number of 500 records per page. You cannot select and add files to the restore session from different pages. That is why it is recommended that you use filters to reduce the number of search results.
For the Content Version type of files, you can choose the version of a file that will be restored. To do that, click the link in the Version column, then compare record versions and select the necessary version in the Select Record Version to Restore window. If you want Veeam Backup for Salesforce to show only field values that differ between selected versions, set the Compare changes toggle to On.
Tip |
You can download up to 10 files to the local machine. To do that, select the necessary items, and click Download. |
