
Step 1. Specify restore point
Select the state to which the database should be restored:
- Restore to the current restore point option instructs Veeam Explorer to recover the database to the moment when current restore point of SQL server VM was created. With this option selected, you will proceed to step 3.
- Restore to a point in time option instructs Veeam Explorer to recover the database to the state as of the specified moment.
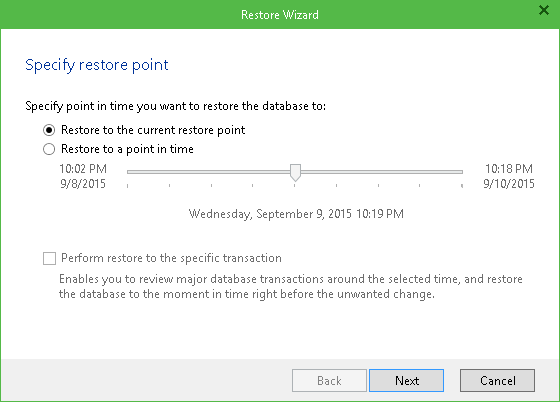
Use the slider to specify the point in time to which you want the database to be restored. Database will be recovered to the closest VM restore point before the moment you specify on the timeline, and then transaction log replay will bring the database to the necessary state.
The timeline includes the following timestamps (relatively to current SQL server restore point):
- Beginning – refers to the previous restore point of SQL server VM which contains selected database backup
- End – refers to the next restore point which contains selected database backup
|
Consider the following:
|
- Finally, you can select the Perform restore to the specific transaction check box - this enables you to review major database transactions around the selected time, and restore the database to the moment in time right before the unwanted change.
With this check box selected, you will proceed to Step 2, with the check box cleared, you will proceed to Step 3.
Step 2. Fine-tune the Restore Point
On this step, you get a list of database operations logged during the time period you have specified.
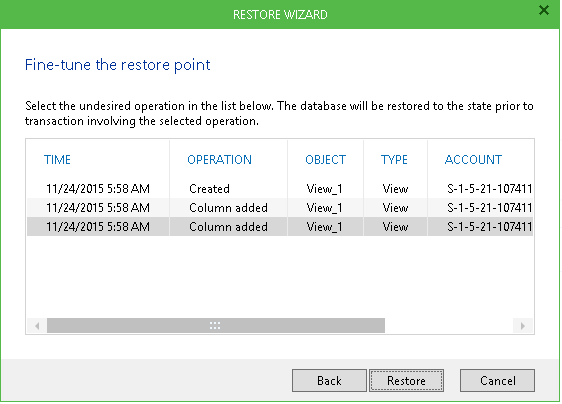
Select the undesired operation (for example, you can select the row deletion or insertion). The database will be restored to the most recent state preceding the selected operation.
|
For the full list of operations for which this process is supported, please refer to the Appendix. |
Step 3. Specify target SQL Server connection parameters
On this step, specify settings for the target server where the database should be restored:

- Supply SQL server virtual machine name and SQL server instance where to restore; use the server_vm_name\instance format. You can select server\instance from the drop-down list, or use the Browse button. Enter database name (by default, the original name will be used). Consider that database in mirror mode cannot be used as a target.
|
Target SQL server must be of the same or later version as the original server. For example, SQL server 2008 database can be restored to SQL server 2008 or 2012, but cannot be restored to SQL server 2005. |
- Specify account to be used for connection with the target SQL server. You can use the current account (under which you are running Veeam Explorer), or specify another account and enter its password.
- You can select to Use SQL Server authentication; if this check box is not selected, Windows authentication will be used. Remember that the account used to access target SQL server must be assigned the sysadmin role on that server.
|
If a database with the specified name exists on the target SQL server instance, the restore process by design will delete it and replace with the database from backup. Thus, when you click Next, a message will be displayed, asking you to confirm the deletion. |
Step 4. Specify AlwaysON Restore Options
If the specified target SQL server supports AlwaysOn Availability Groups, then you will be offered to click Next and specify AlwaysOn restore options; otherwise, proceed to Step 5.
- If you plan to use AlwaysOn capability for the database, select the Add the database to the following group check box, then select the necessary availability group from the list. Database will be restored to the primary server (shown in the list of nodes) and replicated to the secondary node(s).
- If you do not plan to use AlwaysOn capability when restoring the database, clear the the Add the database to the following group check box.
Step 5. Specify Server Connection Credentials
On the next step, specify Windows credentials that will be used to connect to the Windows machine hosting the target SQL server. You can use the account currently logged on, or supply a different account.
|
To be able to copy transaction logs to the target server for further replay, the account you specify for server connection (that is, credentials to connect to Windows server) should be granted sufficient permissions to access the administrative share on that machine (e.g., \\myserver\C$) - Read and Write are minimal required, Full Control recommended. See the Permissions section for information. |
Step 6. Specify Files Location
Finally, specify the location to which database and log files will be restored:

Default path depends on the SQL server. For example, for SQL server 2008 R2 it will be:
%Program Files%\Microsoft SQL Server\MSSQL10_50.<instance_name>.
|
Default path on target Windows server may be different. |
You can click Browse to specify a path you need. After you select the target folder where to copy files, return to the wizard.
Finally, click Restore and wait for the process to complete. Veeam Explorer will notify you of the operation results.
