Viewing Backed-Up Data
NoteS |
This functionality is available to Administrators, Backup Operators and Restore Operators only. |
On the Browse tab, you can view backed-up data of all protected Salesforce organizations:
- Navigate to the Browse tab.
- Select a Salesforce organization whose object records you want to view.
For an organization to be displayed in the list of available organizations, it must be added to Veeam Backup for Salesforce as described in section Managing Salesforce Organizations and must have a backup.
- Select a Salesforce root object whose records you want to view.
For a Salesforce object to be displayed in the list of available root objects, it must have a backup. If the list does not contain the necessary object, the object either does not have a backup or cannot be restored. The object may not have a backup for the following reasons:
- The object was excluded from the backup policy that protects the Salesforce organization to which this object belongs.
- The Salesforce user whose permissions are used for backup operations does not have access to the object.
- Backup of the object is not supported in the current product version. For more information, see Appendix A. Unsupported Objects.
- Choose records that you want to view. To be able to choose records, you must first specify filtering conditions to display records by creation date:
- If you select the Latest option, Veeam Backup for Salesforce will display the latest record versions only.
- If you select the Modified Date option, Veeam Backup for Salesforce will display all record versions for a specific time period. To modify the time period, click the Schedule icon in the Date field.
After you specify the filtering conditions, click Search — Veeam Backup for Salesforce will display all records that meet these conditions. If you want to restore any of the records or record fields, select check boxes next to the necessary records, click Start Restore and complete the Restore Records or Restore Field Values wizard as described in section Creating Restore Jobs.
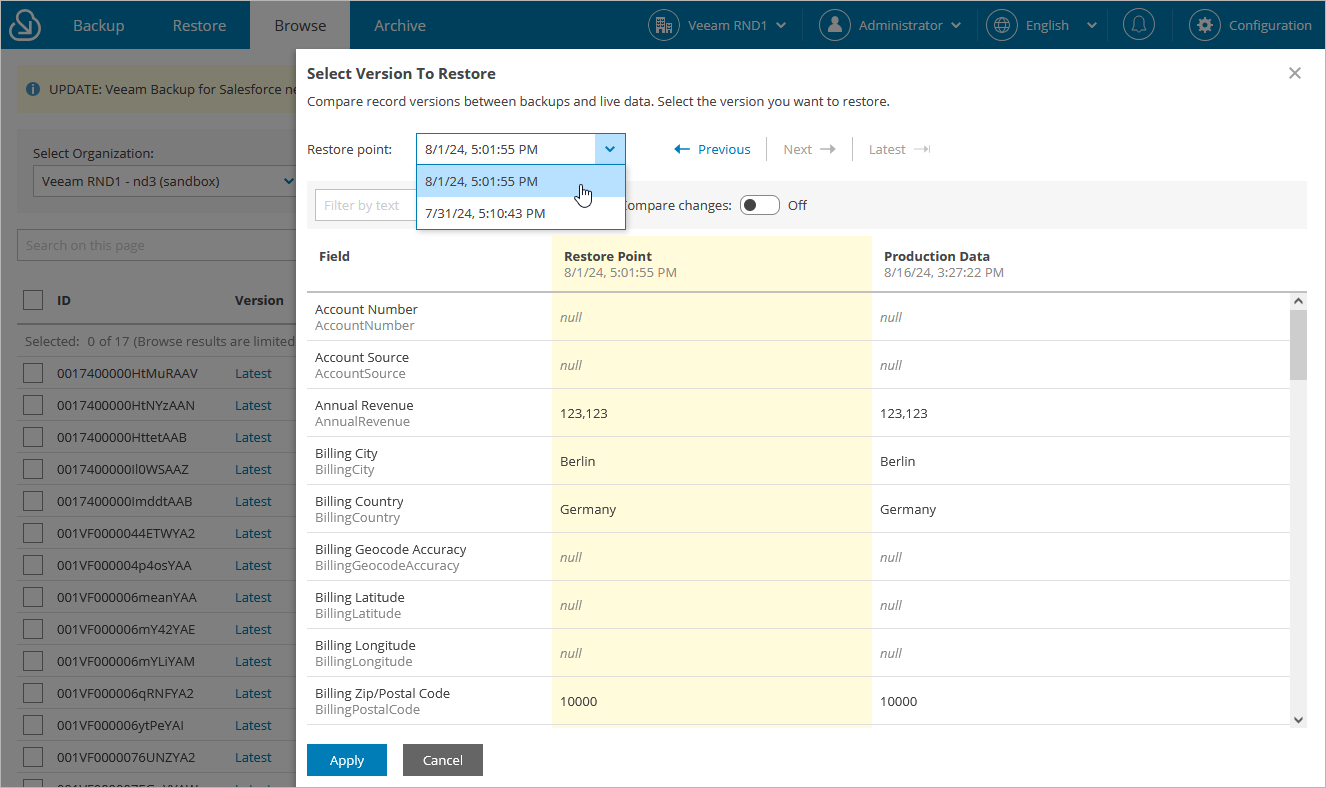
You can also choose the version of each record that will be restored — to do that, click the link in the Version column and select the necessary record version from the Restore point drop-down list.
TipS |
|
By default, you can select up to 500,000 of records for one restore session. To change this limit, modify the ui.restore.max.selected.records parameter value as described in section Configuring Advanced Settings.
Configuring Filtering Settings
Consider that Veeam Backup for Salesforce displays the maximum number of 1000 records per page. If you want to apply specific search conditions and reduce the number of search results, or if you want to select specific Salesforce fields to be displayed in the search results, click Customize in the Filters and display fields field.
Veeam Backup for Salesforce provides a number of built-in conditional operators (such as contains, equals, starts with, is null and so on) that can be used to send requests to databases. When adding conditions, consider the following:
- If you want to search for records with null field values, use the is null operator. Using the equals operator in this case is not supported.
- If you want to search for a list of records, you can use the in operator and specify the IDs of the necessary records using a comma-separated list.
- If you want to search for a record but you do not have any information on this record except for the fact that it is linked to a specific object, you can use the lookup relationship field to filter all records linked to this object. To do that, specify the ID of the necessary object in the Value field.
- If you want to search for records that have been archived, use the vbsf_archived (Archive Restore Point) field.
NoteS |
|
By default, filters are combined by the AND logical operator. That is, a record is displayed in the search results only if all the specified conditions are met. You can change this behavior by combining filters using different operators. To do that, set the Use filter logic toggle to On, and specify the filter logic expression using condition ordinal numbers, brackets and logical operators — for example, 1 AND (2 OR 3) AND NOT 4.
Important |
If a record that you want to restore contains encrypted fields, you will not be able to specify filters for these fields. |