Configuring Notification Settings
To receive notifications on created alerts, you must configure notification settings. You can instruct Veeam Backup for Salesforce to send notifications by email and to specific Slack channels and chats.
Configuring Email Settings
To configure mail server settings, choose whether you want to employ basic or modern authentication for your mail server.
Using Basic Authentication
To employ the basic authentication to connect to your mail server:
- Switch to the Configuration page.
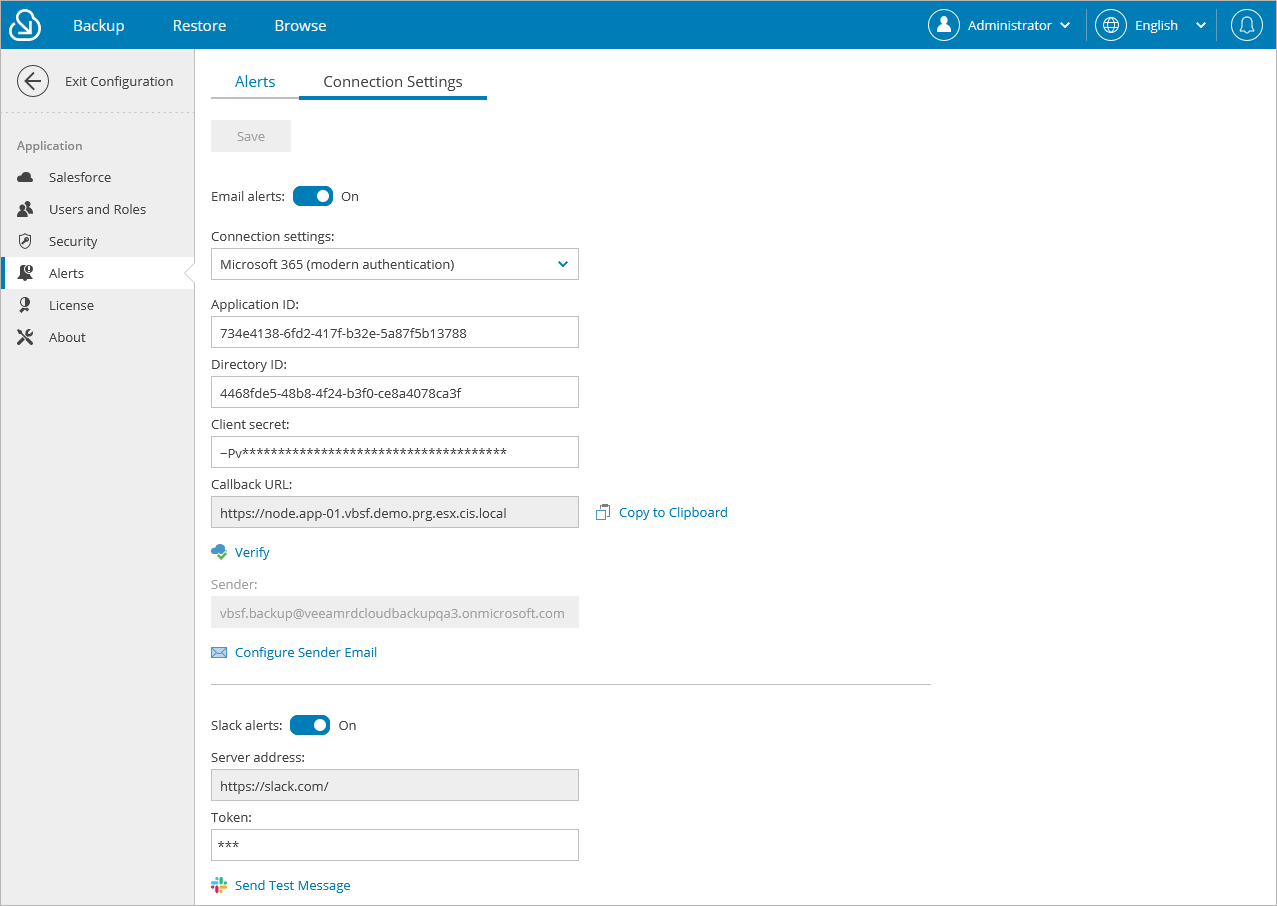
- Navigate to Alerts > Connection Settings.
- Set the Email alerts toggle to On.
- From the Connection settings drop-down list, select SMTP server (basic authentication).
- In the SMTP server field, specify a DNS name or an IP address of the SMTP server. All email notifications (including test messages) will be sent by this SMTP server.
- In the Port field, you can change a communication port for SMTP traffic. The default SMTP port is 25.
- In the Timeout field, specify a timeout for the connection attempt to the SMTP server. The default timeout is 1,000 seconds.
- In the Sender field, enter an email address of the notification sender. This email address will be displayed in the From field of the notifications.
- If your SMTP server requires authentication, select the Require authentication check box and specify user credentials in the Username and Password fields.
- To save the settings, click Save.
|
Tip |
|
Veeam Backup for Salesforce allows you to send a test message to check whether you have configured all settings correctly. To do that, click Send Test Email and specify an email address to which the email will be sent. |
Using Modern Authentication
To employ the modern authentication to connect to the Microsoft 365 server, you must first create a Microsoft Entra ID application for Veeam Backup for Salesforce on the Microsoft Identity Platform. To learn how to register an application, see Microsoft Docs.
When creating the application, consider the following:
- The following API permissions must be granted to the application:
- SMTP.Send
- Mail.Send
- The redirect URI added to the application must match the management server FQDN that you use to access the Veeam Backup for Salesforce Web UI. To make sure that you are adding the correct URI, switch to the Configuration page and navigate to Security > Single Sign-On. The address will be displayed in the Callback URL field.
To configure mail server settings, do the following:
- From the Connection settings drop-down list, select Microsoft 365 (modern authentication).
- In the Application ID field, provide the Application (client) ID of the registered Microsoft Entra ID application. You can find the ID on the app registration Overview pane on the Microsoft Identity Platform.
- In the Directory ID field, specify the Directory (tenant) ID of the registered Microsoft Entra ID application. You can find the ID on the app registration Overview pane on the Microsoft Identity Platform.
- In the Client secret field, enter the value of a client secret created in the specified application.
Keep in mind that you can see and copy a Client Secret value only when creating it. Otherwise, you will not be able to retrieve the value. To learn how to create client secrets, see Microsoft Docs.
- To save the settings, click Save.
You will be redirected to the Microsoft Identity Platform. Navigate to the created application page, and grant admin consent to the application. To learn how to do that, see Microsoft Docs.
- Click Configure Sender Email.
You will be redirected to the Microsoft Identity Platform. Sign in using a Microsoft Identity Platform account that will be used by Veeam Backup for Salesforce to send notification alerts. A user must be assigned a Microsoft 365 license to the Exchange Online service, and a mailbox must be created for this user.
|
Tip |
|
Back to the Veeam Backup for Salesforce Web UI, you can send a test message to check whether you have configured all settings correctly. To do that, specify an email address to which the email will be sent in the Send Test Email window. |
Configuring Slack Settings
To send alert notifications to specific Slack channels and chats, you must create a Slack app. To learn how to create an app in Slack, see Slack Documentation. Depending on how you want the Slack app to work, the Slack app must be assigned a scope of specific permissions, for example: the chat:write permission scope is required to send messages to chats.
To configure Veeam Backup for Salesforce to send alert notifications to Slack, do the following:
- Switch to the Configuration page.
- Navigate to Alerts > Connection Settings.
- Set the Slack alerts toggle to On.
- In the Token field, provide an access token generated by the created Slack app. The access token can be found on your Slack app management page in the OAuth & Permissions sidebar menu.
- To save the settings, click Save.
|
Tip |
|
Veeam Backup for Salesforce allows you to send a test message to check whether you have configured all settings correctly. To do that, click Send Test Message and specify the name of a user or a channel to which the message will be sent. |