 This is an archive version of the document. To get the most up-to-date information, see the current version.
Step 3. Specify Authentication Credentials
Depending on the authentication type that has been selected at the previous step, either of the following dialogs appears:
At this step of the wizard, do the following:
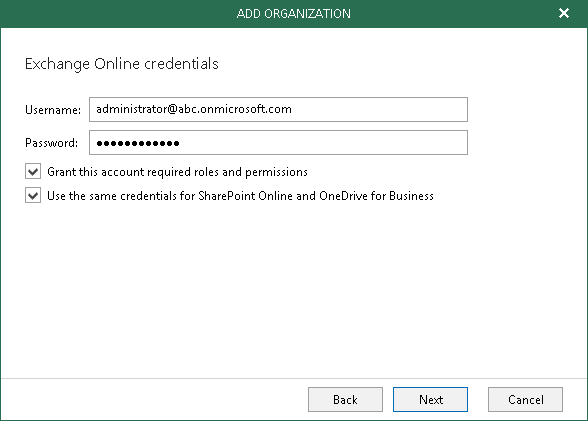
- In the Username and Password fields, specify authentication credentials to connect to the Microsoft Office 365 organization.
The user account must be provided in either of the following formats: user@domain.com or user@domain.onmicrosoft.com. You can also use a non-MFA enabled ADFS account.
- Select the Grant this account required roles and permissions checkbox to automatically assign the ApplicationImpersonation role. For more information, see Granting Roles and Permissions.
- Select the Use the same credentials for SharePoint Online and OneDrive for Business checkbox if you want to use the same credentials to access your Microsoft SharePoint Online and OneDrive for Business data. This checkbox is only available if both organization types have been selected at the Select Organization Deployment Type step.
If the Use the same credentials for SharePoint Online and OneDrive for Business checkbox is not selected, you will be offered to provide required credentials for the Microsoft SharePoint Online and OneDrive for Business organizations at the next step.
Click Next and wait for a connection to be established. Once established, the organization being added will appear in the Organizations view, under the Organizations node.
At this step of the wizard, do the following:
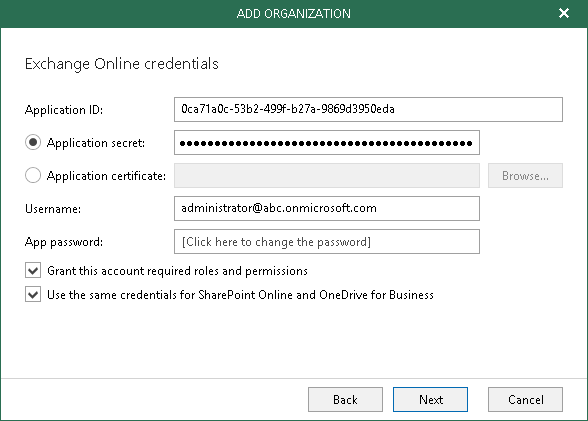
- In the Application ID field, specify the identification number of the application you have created, as described in Understanding Microsoft Graph.
You can find this number in application settings of your Azure Active Directory, as described in this Microsoft article.
- Choose an authentication method.
You can select either Application secret or Application certificate:
- In the Application secret field, enter a secret key to access your custom application.
To obtain a secret key, you will need to generate it first, as described in this Microsoft article.
Mind that a key will become hidden once you leave or refresh the page in the Azure portal. Consider saving the key to a secure location.
- To use a certificate, switch to the Application certificate option and click Browse to select an existing certificate or import a certificate from a .pfx file.
To be able to use a certificate, you must upload it to the Azure portal, as described in this Microsoft article.
- In the Username field, specify your Microsoft Office 365 account name.
- In the App password field, specify the app password that was generated upon enabling Multi-factor authentication (MFA), as described in this Microsoft article.
- Select the Grant this account required roles and permissions checkbox to automatically assign the ApplicationImpersonation role. For more information, see Granting Roles and Permissions.
- Select the Use the same credentials for SharePoint Online and OneDrive for Business checkbox if you want to use the same credentials to access your Microsoft SharePoint Online and OneDrive for Business data. This checkbox is only available if both organization types have been selected at the Select Organization Deployment Type step.
If the Use the same credentials for SharePoint Online and OneDrive for Business checkbox is not selected, you will be offered to provide required credentials for the Microsoft SharePoint Online and OneDrive for Business organizations at the next step.
Click Next and wait for a connection to be established. Once established, the organization being added will appear in the Organizations view, under the Organizations node.
Granting Roles and Permissions
When selecting the Grant this account required roles and permissions checkbox, Veeam automatically assigns the ApplicationImpersonation role, which is required to back up Microsoft Office 365 Exchange mailboxes.
Consider the following:
- The ApplicationImpersonation role can only be assigned to organizations that are not in the compressed state (i.e. to hydrated organizations). An organization can be hydrated automatically by Veeam if the account being used has the OrganizationConfig role.
To hydrate an organization, Veeam uses the Enable-OrganizationCustomization cmdlet. For more information, see this Microsoft article.
- To assign the ApplicationImpersonation role, make sure the account you are using is a member of the Organization Management group and has been granted the Role Management role upfront. Otherwise, the automatic assignment of the ApplicationImpersonation role will fail; an organization will not be added.
- If the ApplicationImpersonation role has already been assigned earlier, this step will be skipped.