安全还原的工作原理
Veeam Backup & Replication uses the mount server as a staging server for scanning machine data with antivirus software. By default, the mount server role is assigned to one of the following machines: the Veeam backup server or a repository that stores machine backups. However, you can assign the mount server role to any 64-bit Microsoft Windows machine in your backup infrastructure. For example, you may want to run the malware scan process on a different server for security reasons. For details on mount server deployment and requirements, see Mount Server.
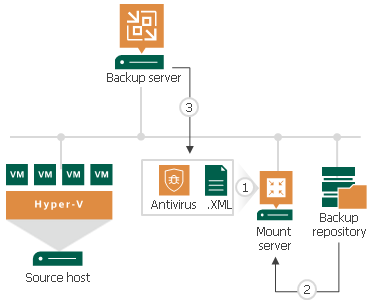
To run the malware scan, Veeam Backup & Replication performs the following actions:
- On the mount server, Veeam Backup & Replication runs Veeam Mount Service to check the antivirus configuration file and antivirus software:
- Veeam Mount Service verifies if the AntivirusInfos.xml configuration file is located in the %ProgramFiles%\Common Files\Veeam\Backup and Replication\Mount Service folder.
- Veeam Mount Service checks the scan settings in the configuration file and verifies if the antivirus is installed on the mount server.
Note that if the antivirus is not installed or the configuration file is improperly configured, Veeam Backup & Replication will not start the restore process. In the restore wizard, you will not be able to pass the step with secure restore settings.
- Veeam Backup & Replication mounts machine disks from backups to the mount server under the C:\VeeamFLR\<machinename> folder.
- Veeam Backup & Replication triggers the antivirus to scan files in the C:\VeeamFLR\<machinename> folder.
If during the scan the antivirus does not detect malware, Veeam Backup & Replication restores the machine to the target location.
If the antivirus detects malware, Veeam Backup & Replication will either abort the restore process, or restore the machine with restrictions depending on the following secure restore settings:
- Disable the network adapter (NIC) on the restored machine.
- Connect the restored machine to a different Microsoft Azure virtual network.
- Change the AWS security group for the restored machine.
You can further access the restored machine or its disks in the isolated environment and clean the infection.
Related Topics