This is an archive version of the document. To get the most up-to-date information, see the current version.
Step 3. Register or Select Azure AD Application
At this step of the wizard, you can create a new application in Azure Active Directory or select an existing one.
Use this method if you have selected the Register a new Azure AD application automatically option at the previous step of the wizard.
Use this method if you have selected the Use an existing Azure AD application option at the previous step of the wizard.
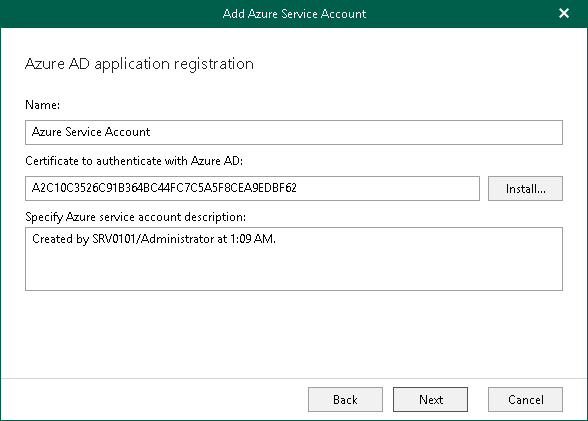
Registering New Azure AD Application
You can register a new Azure AD application in Azure Active Directory. Veeam Backup for Microsoft 365 will use this application for data exchange when transferring backed-up data from Azure Blob storage to Azure Archive storage during backup copy jobs.
When registering a new Azure AD application, Veeam Backup for Microsoft 365 automatically grants the required permissions to this application.
To register a new Azure AD application, do the following:
- In the Name field, enter a name that you want to use to register a new Azure AD application in your Azure Active Directory.
- Click Install to specify an SSL certificate that you want to use for data exchange between Veeam Backup for Microsoft 365 and an Azure AD application.
- In the Select Certificate wizard, select a certificate. For more information, see Installing SSL Certificates.
You can generate a new self-signed certificate or use an existing one. Before using an existing certificate, make sure to register this certificate in Azure Active Directory. For more information, see this Microsoft article. When generating a new self-signed certificate, Veeam Backup for Microsoft 365 will register it automatically.
- In the Specify Azure service account description field, enter optional description.
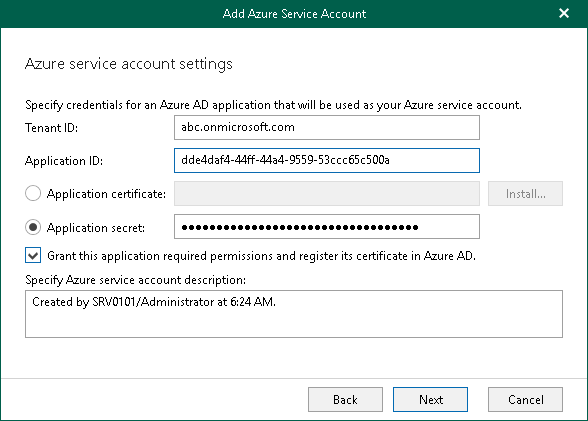
Using Existing Azure AD Application
You can specify an existing Azure AD application in your Azure Active Directory. Veeam Backup for Microsoft 365 will use this application for data exchange when transferring backed-up data from Azure Blob storage to Azure Archive storage during backup copy jobs.
To use an existing application, do the following:
- In the Tenant ID field, specify a name of your Microsoft 365 organization.
- In the Application ID field, specify an identification number of your Azure AD application.
You can find this number in an application settings in your Azure Active Directory. For more information, see this Microsoft article.
- Select an Azure AD application authentication type. You can select either Application secret or Application certificate:
- To use a certificate, select the Application certificate option and click Install. For more information, see Installing SSL Certificates.
Mind that you must upload a certificate file to the Azure portal beforehand. For more information, see this Microsoft article.
- To use a secret key, select the Application secret option and enter a secret key in the field nearby to access your custom application.
To obtain a secret key, you will need to generate it first. For more information on how to generate a secret key, see this Microsoft article.
Mind that a key will become hidden once you leave or refresh the page in the Azure portal. Consider saving the key to a secure location.
- Select the Grant this application required permissions and register its certificate in Azure AD check box to automatically grant required permissions to Azure AD application.
Veeam Backup for Microsoft 365 will also register the specified certificate in your Azure Active Directory.
Mind that if this check box is not selected, Veeam Backup for Microsoft 365 skips the Log in to Microsoft 365 and Select Microsoft Azure Subscription steps and finishes the wizard.
- In the Specify Azure service account description field, enter optional description.