Step 2. Configure Connection to Salesforce Organization
At the Connection step of the wizard, connect to a Salesforce organization and specify a database that will be used to store backed-up data:
- In the Log in with Salesforce account section:
- Choose a Salesforce organization that you want to protect. You can choose an organization that is already connected to Veeam Backup for Salesforce or connect to a new organization. For an organization to be displayed in the list of available organizations, it must not be protected by any other backup policy on this management server and must belong to the company selected at step 1.
To connect to a new organization, do the following:
- Choose whether you want to use a Salesforce organization hosted on a production instance, sandbox instance or custom domain. If you select the Custom domain option, you must also specify the organization domain name.
- Click Log in with Salesforce account. You will be redirected to the Salesforce authentication page.
- On the Salesforce authentication page, enter credentials of a Salesforce user of the organization that you want to protect, and click Log in.
The specified Salesforce user must be assigned permissions required for Veeam Backup for Salesforce to be able to perform backup and restore operations. For more information on the required permissions, see Permissions.
Note |
Veeam Backup for Salesforce does not store Salesforce user credentials used to log in to Salesforce. To authorize in Salesforce and access Salesforce data, Veeam Backup for Salesforce uses the Connected App specified during the initial configuration. You can change the Connected App as described in section Changing Connected App Tokens, but keep in mind that after changing the Connected App, you will have to re-authorize all connections to Salesforce organizations added to Veeam Backup for Salesforce. |
- Back to the Add Backup Policy wizard, check whether any errors occurred during the authentication process and do the following:
Important |
If an error occurs, check whether the Salesforce organization whose user you used to log in to Salesforce is not protected by another backup policy configured on this management server. |
- In the Verify permissions section, verify whether the permissions assigned to the specified user are enough to perform backup and restore operations. To do that, click Verify permissions and wait for the check to complete. If any of the permissions are missing, you must grant them in the Salesforce console manually as described in Salesforce documentation.
- In the Connect to a database section, choose a database that will be used to store backups of the protected Salesforce organization. To do that, click Select a database. The Database connection window will open.
You can add a new database or select a database that has already been added to Veeam Backup for Salesforce:
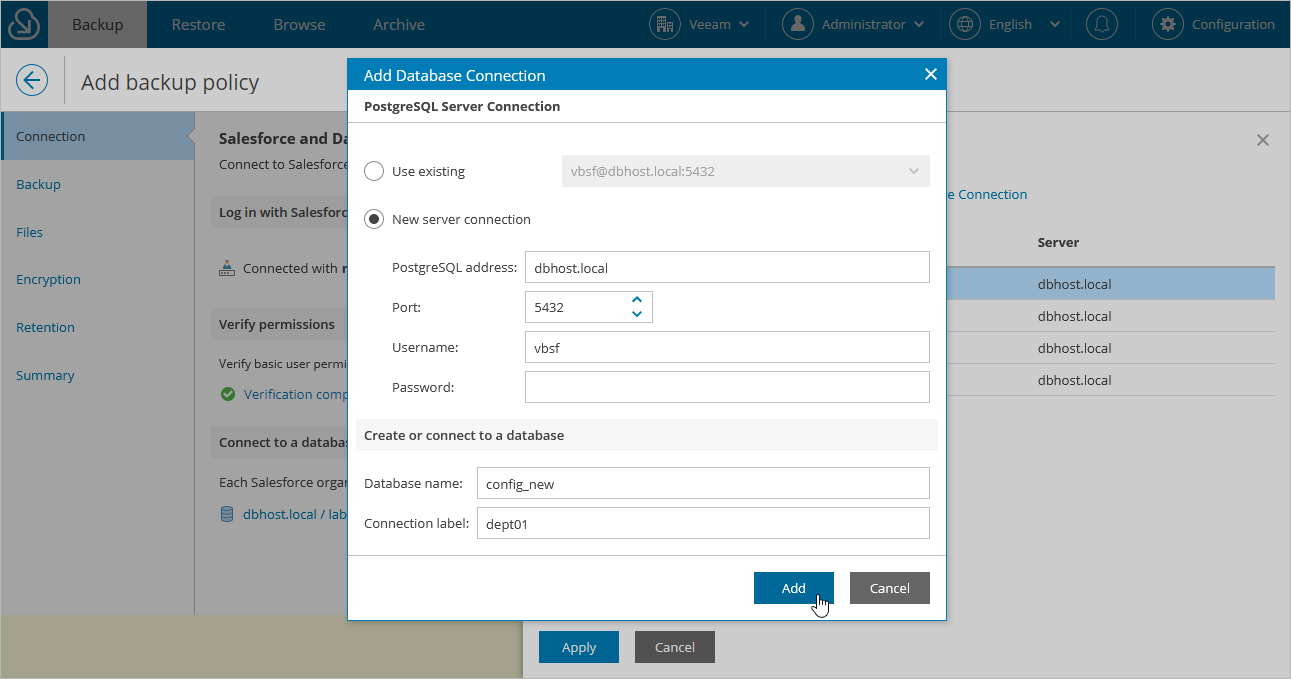
- To add a database without closing the Add Backup Policy wizard, click New Database Connection and specify connection settings in the Add Database Connection window as described in section Adding Databases.
- To specify an already added database, select the database from the list. For a database to be displayed in the list of available databases, it must be created as described in section Adding Databases. You cannot choose a database that is used to protect any other Salesforce organization as one database can be used to protect one organization only.
Notes |
When connecting to a database, consider the following:
|