 This is an archive version of the document. To get the most up-to-date information, see the current version.
Launching Application and Exploring Backups
To open Veeam Explorer for Microsoft Exchange and load backups, you can use any of the following methods:
- The Explore option to load backups created in Veeam Backup for Microsoft 365. For more information, see the Data Restore section of the Veeam Backup for Microsoft 365 User Guide.
When loading backups located in object storage repositories, Veeam Explorer for Microsoft Exchange will notify you about the location of these backups. You can select the Don't show this message again check box to unsubscribe from such notifications. To disable these notifications, clear the Show pop-up notifications on startup check box. For more information, see Configuring Advanced Settings.
- The Restore application item option to load backups created in Veeam Backup & Replication.
For more information, see the Application Items Restore section of the Veeam Backup & Replication User Guide.
- Go to Start, click Veeam Explorer for Microsoft Exchange and manually open Microsoft Exchange databases, as described in the Standalone Databases and External Servers section.
When you open Veeam Explorer for Microsoft Exchange from the Start menu, all backed-up databases will be loaded automatically.
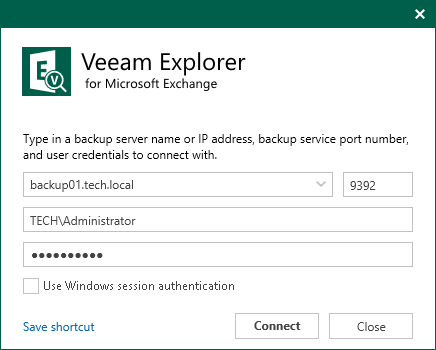
If you open Veeam Explorer for Microsoft Exchange from the Start menu on a machine that runs the Veeam Backup & Replication console and Veeam Explorers only, specify the following:
- The domain name or IP address of a server to which you want to connect
- The port number
- User account credentials
Consider the following:
- To perform recovery operations, Veeam Explorer for Microsoft Exchange must be run with elevated permissions. The user account must be a member of the local Administrators group on the machine where Veeam Explorer for Microsoft Exchange is installed.
- The account must have the Veeam Backup Administrator or Veeam Restore Operator role on the target backup server.
To use the account under which Veeam Explorer for Microsoft Exchange is running, select Use Windows session authentication.
To save the connection shortcut to the desktop, click Save shortcut in the bottom-left corner.
In This Section