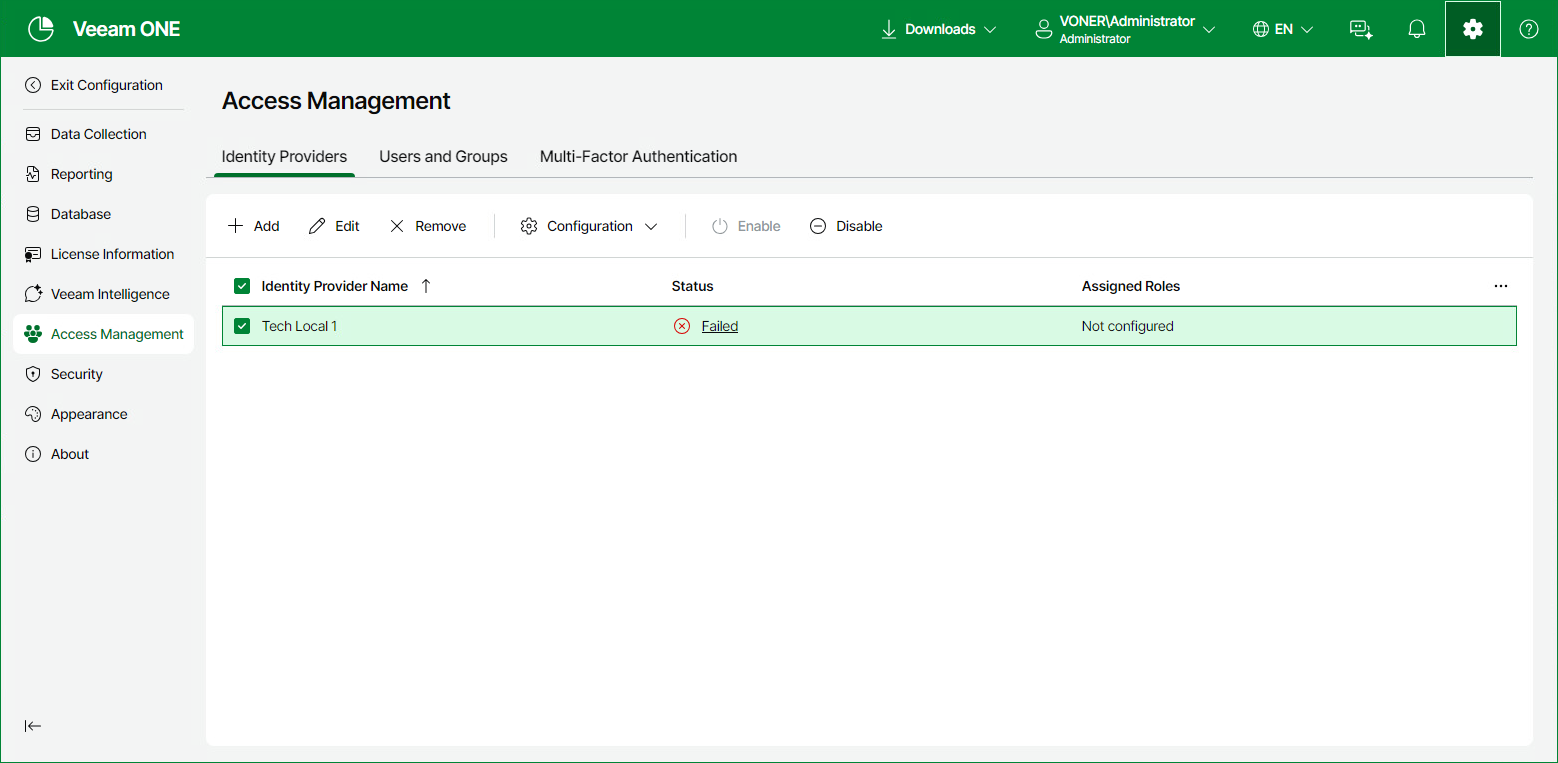
Managing Identity Providers
Veeam ONE allows you to create and manage identity provider configurations to set up single sign-on (SSO) using SAML.
To configure identity providers, you must have the Veeam ONE Administrator role, and the administrator role on the relevant identity provider platform.
Identity Provider Requirements
Configure the identity provider to meet the following requirements. In the URLs, <FQDN> is the address that you use to open Veeam ONE Web Client, <port> is the Veeam ONE Web Client port and <Client ID> is the Client ID that you specify when you add the identity provider. You can copy the URLs from the Add Identity Provider wizard or import them into the identity provider with the metadata file.
|
Setting |
Requirement |
|---|---|
|
SP entity ID (also called Identifier or Audience) |
https://<FQDN>:<port>/api/Saml2/<Client ID> |
|
Assertion consumer service URL |
https://<FQDN>:<port>/api/Saml2/<Client ID>/Acs Binding: HTTP-POST. |
|
Single logout URL |
https://<FQDN>:<port>/api/Saml2/<Client ID>/Logout The URL is included in the metadata file. |
|
Authentication requests |
Veeam ONE signs authentication requests. The signing certificate is included in the metadata file. |
|
Assertions |
The identity provider must sign assertions. |
|
NameID format |
urn:oasis:names:tc:SAML:1.1:nameid-format:emailAddress Veeam ONE requests this format in authentication requests. The identity provider must issue the NameID in this format. Otherwise, sign-in fails with the following error: An internal error occurred during authentication. |
|
NameID value |
Must exactly match the user name added on the Users and Groups tab. It is recommended to use the user principal name (UPN). |
|
User attributes |
Not required. |
|
Group claim |
Required only if you grant access to groups. Claim name: http://schemas.xmlsoap.org/claims/Group or Group. The claim name is case-sensitive. For example, group is not accepted. The claim value must exactly match the group name added on the Users and Groups tab. |
|
Roles |
Not sent by the identity provider. You assign roles in Veeam ONE on the Users and Groups tab. |
Adding Identity Providers
You can add identity providers (IdP) to allow users to log in to Veeam ONE using external authentication services. SAML authentication requires a service provider (SP) to set up a trust relationship with an identity provider (IdP). To do that, you must create an IdP configuration in Veeam ONE.
Before you add an identity provider, check the following prerequisites:
- The Veeam ONE server must trust the TLS certificate of the identity provider URL. If the identity provider uses a self-signed certificate or a certificate issued by a private certification authority (CA), import this certificate or the CA certificate to the Trusted Root Certification Authorities store of the local computer on the Veeam ONE server. Otherwise, the Add Identity Provider wizard fails with the following error: Cannot find the metadata entity ID. Specify a valid entity ID or provide a valid metadata URL. For details see this KB article.
- The Veeam ONE server does not need to be a member of an Active Directory domain.
- Open Veeam ONE Web Client using the FQDN that users will use to sign in. Veeam ONE takes the host part of the SP entity ID URL and Assertion consumer URL from the address in the browser. If you open Veeam ONE Web Client using an IP address or a short name, the URLs contain this IP address or short name.
To add an identity provider:
- Open Veeam ONE Web Client.
For details, see Accessing Veeam ONE Components.
- At the top right corner of the Veeam ONE Web Client window, click Configuration.
- In the configuration menu on the left, click Access Management.
- On the Identity Providers tab, click Add to open the Add Identity Provider wizard.
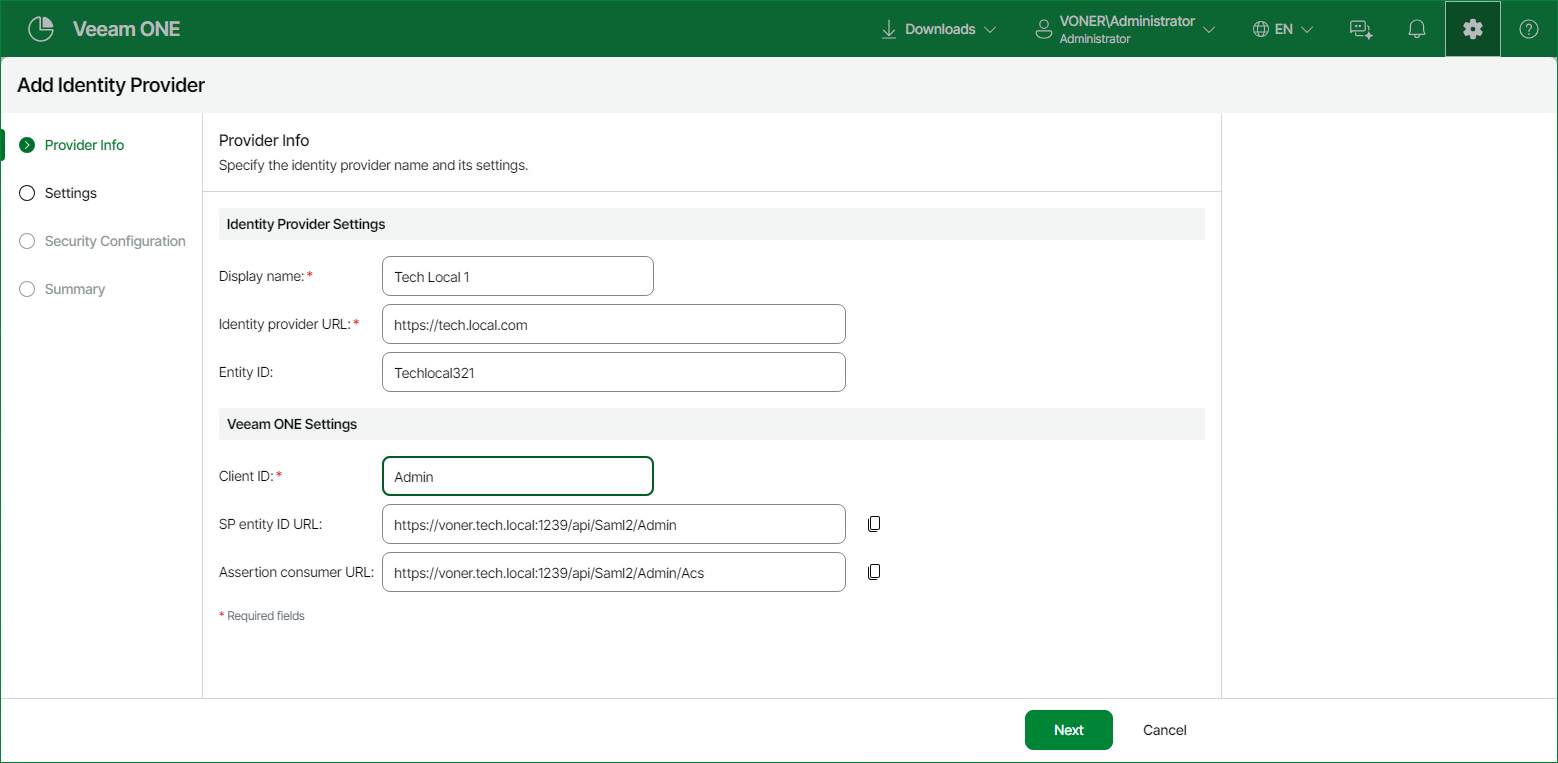
- At the Provider Info step of the wizard, define:
- Identity Provider Settings:
- Display name — specify a friendly name that will be displayed for this identity provider in Veeam ONE.
- Identity provider URL — specify the metadata URL of the identity provider that will be used to retrieve its SAML configuration. The URL must use HTTPS.
- Entity ID — optional. Specify the unique ID of the identity provider. It is required if the identity provider metadata describes more than one entity, or if the provider does not publish its entity ID in its metadata. If you are not sure, leave this field blank and run Test Login. If the configuration cannot be loaded, specify the entity ID and resync the configuration.
- Veeam ONE Settings:
- Client ID — specify a name for this identity provider connection, for example, veeamone-sso. The name can contain only letters, digits, hyphens and underscores. Veeam ONE uses the name in the SP entity ID URL and Assertion consumer URL. Both URLs remain empty until you enter the Client ID.
- SP entity ID URL — a read-only URL that Veeam ONE generates to identify itself as a service provider to the identity provider. The URL has the format https://<FQDN>:<port>/api/Saml2/<Client ID>, where <FQDN> is the address that you used to open Veeam ONE Web Client and <port> is the Veeam ONE Web Client port. You can copy the URL to configure the identity provider.
-
Assertion consumer URL — a read-only URL that Veeam ONE generates as the endpoint where the identity provider sends authentication responses. The URL has the format https://<FQDN>:<port>/api/Saml2/<Client ID>/Acs, where <FQDN> and <port> are the same as in the SP entity ID URL. You can copy the URL to configure the identity provider.
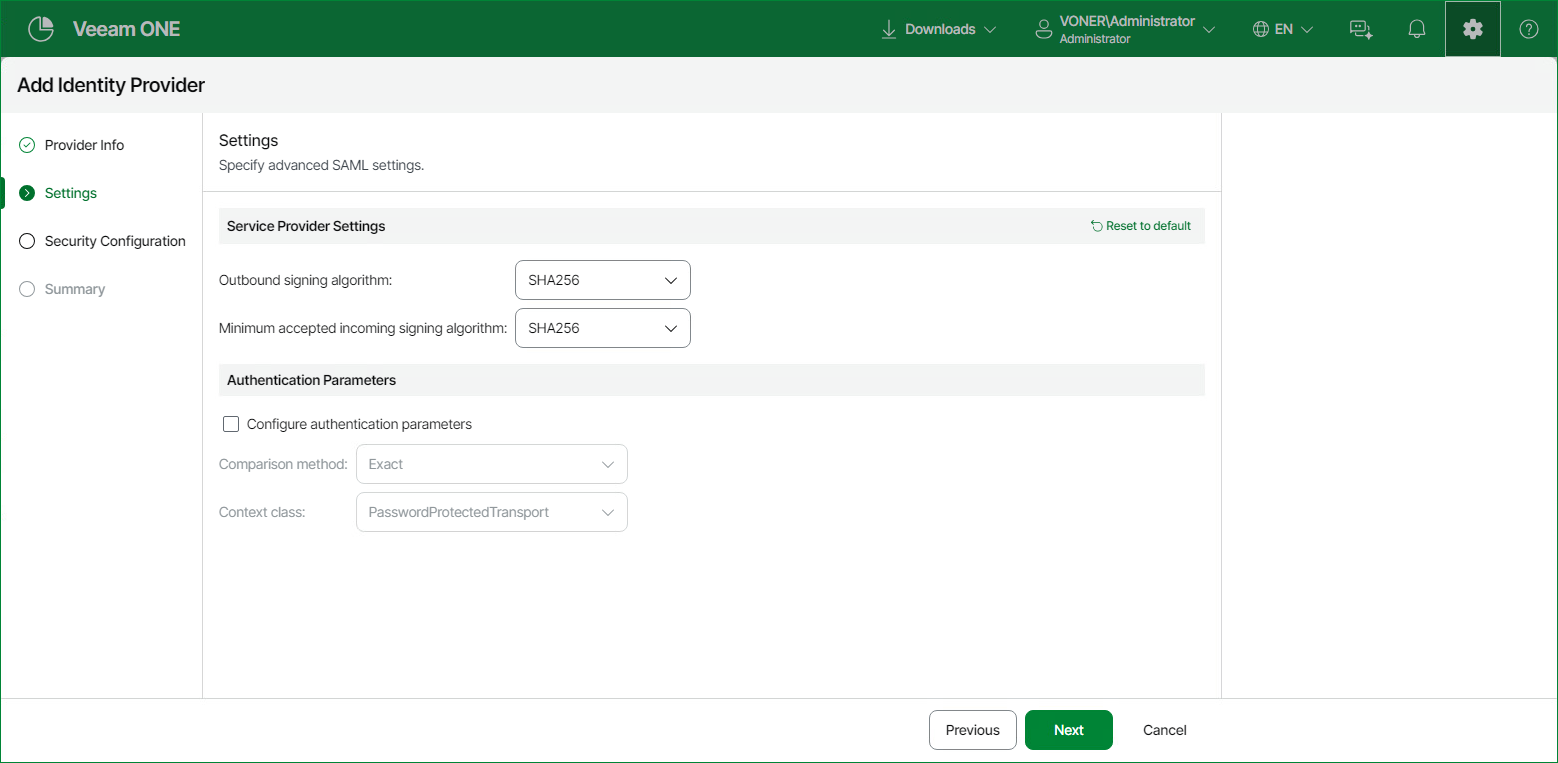
- At the Settings step of the Add Identity Provider wizard, specify the following:
- Service Provider Settings — specify the following, or click Reset to default to restore the default values:
- Outbound signing algorithm — select from SHA256, SHA384 or SHA512.
- Minimum accepted incoming signing algorithm — select from SHA256, SHA384 or SHA512.
- Authentication Parameters — select the Configure authentication parameters check box to specify:
- Comparison method — the rule the identity provider applies when matching the authentication it performed against the requested Context class. Select from Exact, Minimum, Maximum or Better.
-
Context class — the SAML authentication context the identity provider must satisfy. Select a value from the list. For details on each value, see the SAML 2.0 authentication context specification.
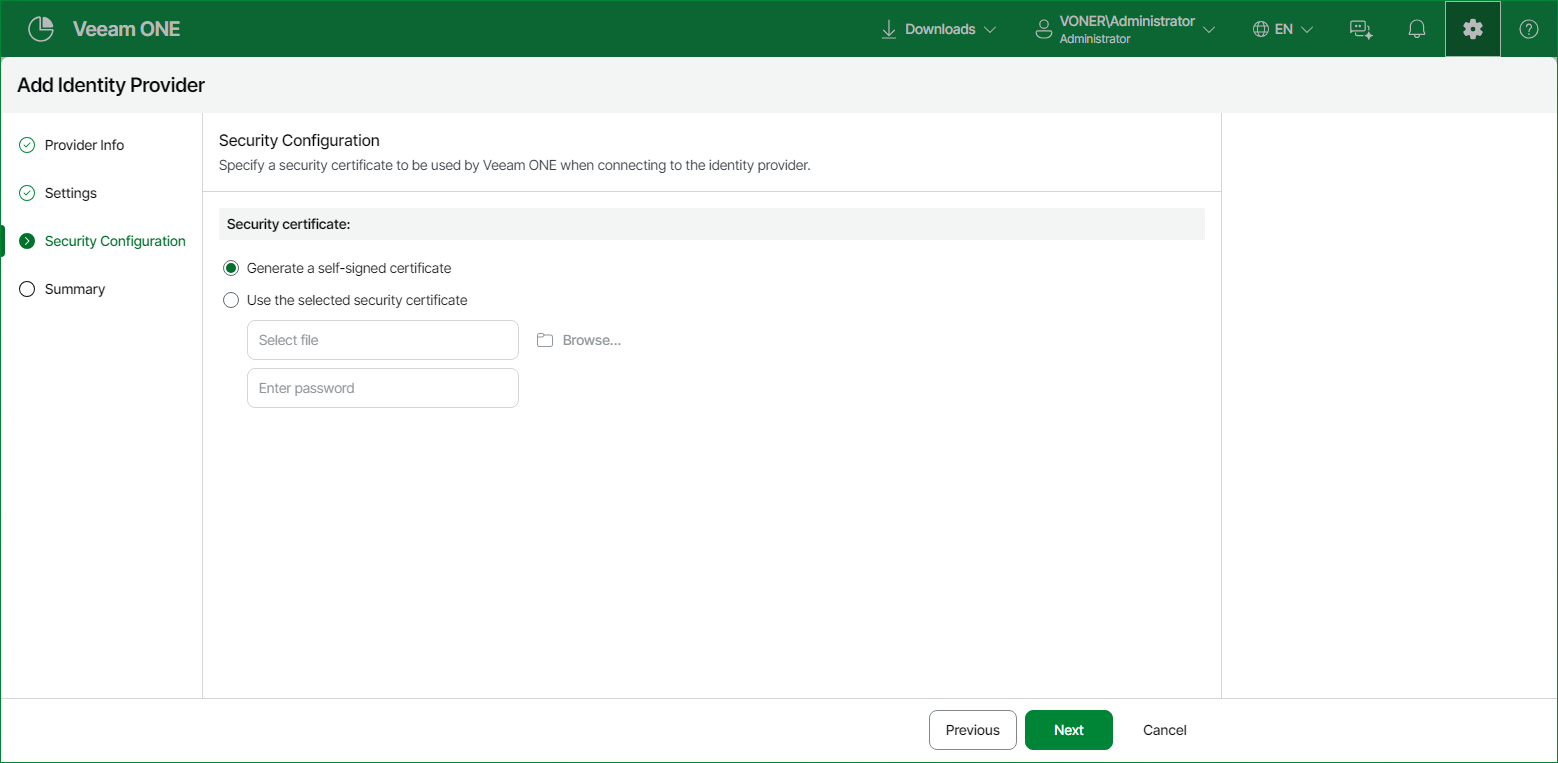
- At the Security Configuration step of the wizard, select either of the following options for a security certificate that will be used by Veeam ONE to connect to the IdP:
- Generate a self-signed certificate — Veeam ONE generates a new self-signed certificate automatically.
-
Use the selected security certificate — upload a certificate in the PKCS#12 format from your local disk or file share and provide the certificate password if the file is password-protected. The certificate file must have the .PFX or .P12 extension.
-
At the Summary step of the wizard, review the configuration settings and click Finish.
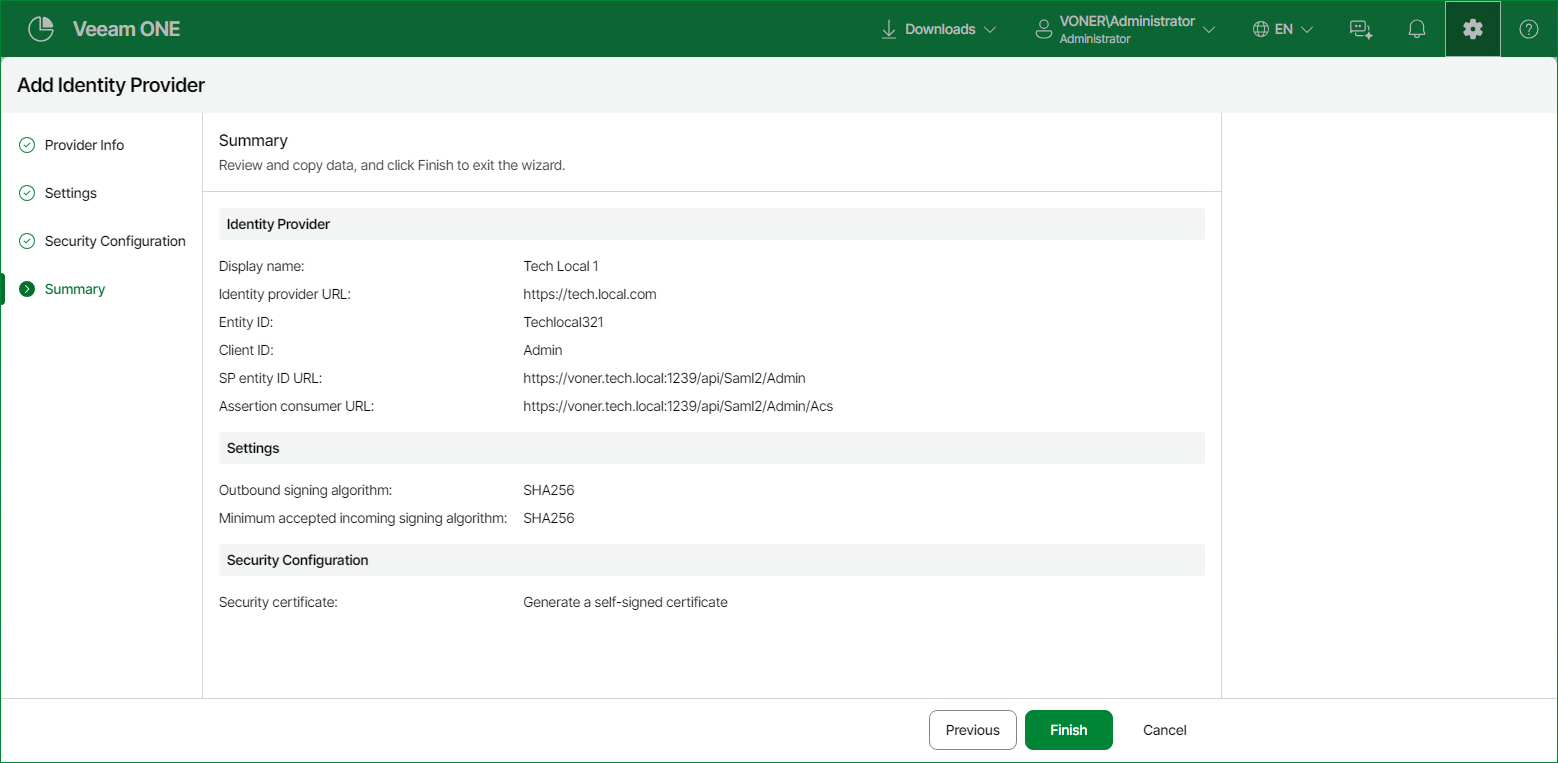
Completing the Setup
When you click Finish, Veeam ONE adds the identity provider to the list with the Pending status. The identity provider is not available and does not appear on the login page until you complete the setup. Click the Pending status to view the configuration instructions.
To complete the setup:
- Select your identity provider name from the Identity Provider Name list.
- Select the Configuration drop down and click Download Metadata File to download the metadata file.
- Import the metadata file into your identity provider.
- If the identity provider creates or changes its token signing certificate after you add the identity provider in Veeam ONE, from the Configuration drop-down list, select Resync Configuration. For example, Microsoft Entra ID creates the signing certificate of a new enterprise application when you save its Basic SAML Configuration for the first time.
- Click Test Login to verify the configuration.
When the test succeeds, the identity provider changes to the Configured status and appears on the login page.
Identity Provider Statuses
On the Identity Providers tab, the Status column shows the current state of each identity provider:
- Configured — the identity provider is set up and available for sign-in.
- Pending — the setup is not complete, and the identity provider is not yet available.
- Failed — the identity provider configuration has an error.
- Disabled — the identity provider is turned off.
For identity providers with the Pending or Failed status, click the status to open a dialog with the setup instructions or the reason for the failure.
Editing Identity Providers
You can edit an existing identity provider to change its configuration.
To edit an identity provider:
- Open Veeam ONE Web Client.
For details, see Accessing Veeam ONE Components.
- At the top right corner of the Veeam ONE Web Client window, click Configuration.
- In the configuration menu on the left, click Access Management.
- On the Identity Providers tab, select the identity provider you want to edit.
- Click Edit.
- In the Edit Identity Provider wizard, change the settings as required and click Finish.
|
NOTE |
|
When you edit an identity provider, the Security Configuration step offers a third option, Use the existing security certificate, which is selected by default and keeps the certificate that is currently in use.
Removing Identity Providers
You can remove identity providers configured in Veeam ONE. Note that when you remove an identity provider, all users and groups mapped to it are removed together with the provider. There is no remapping — you must create them again after you re-add the provider.
To remove an identity provider:
- Open Veeam ONE Web Client.
For details, see Accessing Veeam ONE Components.
- At the top right corner of the Veeam ONE Web Client window, click Configuration.
- In the configuration menu on the left, click Access Management.
- On the Identity Providers tab, select one or more identity providers you want to remove.
- Click Remove.
Updating Identity Provider Configuration
You can resync an identity provider configuration in Veeam ONE after changes on the identity provider side, for example, after the token signing certificate of the identity provider is renewed or replaced. Until you resync the configuration, sign-in through this identity provider fails with the following error: An internal error occurred during authentication. You can also download configuration metadata to troubleshoot issues.
To update an identity provider configuration:
- Open Veeam ONE Web Client.
For details, see Accessing Veeam ONE Components.
- At the top right corner of the Veeam ONE Web Client window, click Configuration.
- In the configuration menu on the left, click Access Management.
- On the Identity Providers tab, select the identity provider whose configuration you want to update.
- From the Configuration drop-down list, select Resync Configuration.
- [Optional] From the Configuration drop-down list, select Download Metadata File to save the metadata file.
- [Optional] From the Configuration drop-down list, select Test Login to test the updated configuration.
|
NOTE |
|
Test Login is unavailable for disabled or failed identity providers. Resync Configuration is unavailable for disabled identity providers. |
Enabling or Disabling Identity Providers
You can temporarily disable an identity provider when required for maintenance or troubleshooting, and re-enable it when ready. To enable or disable an identity provider:
- Open Veeam ONE Web Client.
For details, see Accessing Veeam ONE Components.
- At the top right corner of the Veeam ONE Web Client window, click Configuration.
- In the configuration menu on the left, click Access Management.
- On the Identity Providers tab, select one or more identity providers you want to enable or disable.
- Click Enable or Disable.