This is an archive version of the document. To get the most up-to-date information, see the current version.
Step 3. Specify Microsoft Exchange Connection Settings
At this step of the wizard, specify a Microsoft Exchange server to which you want to connect, provide user credentials, assign appropriate permissions and configure advanced settings.
To specify connection settings to the on-premises Microsoft Exchange server, do the following:
- In the Server name field, specify a Microsoft Exchange server to which you want to connect.
You can use a DNS name of a server, NetBIOS name or its IP address. Make sure that the server has the Mailbox Server role.
- In the Username and Password fields, specify authentication credentials to connect to the Microsoft Exchange server using either of the following formats: domain\account or account@domain.
For more information, see Required Permissions.
Consider that using ADFS accounts to add on-premises Microsoft organizations is not possible. Only Office 365 organizations can be added with non-MFA enabled ADFS accounts.
- Select the Grant this account required roles and permissions check box to automatically assign the ApplicationImpersonation role.
Make sure the account that you use is a member of the Organization Management group and has been granted the Role Management role upfront. Otherwise, the automatic assignment of the ApplicationImpersonation role will fail; an organization will not be added.
- Select the Configure throttling policy check box to set the throttling policy for the account being used to Unlimited.
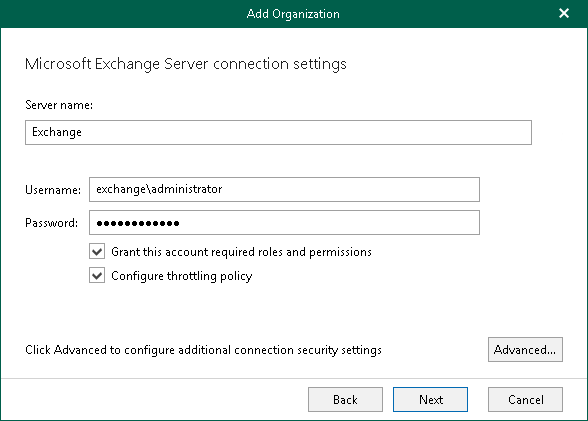
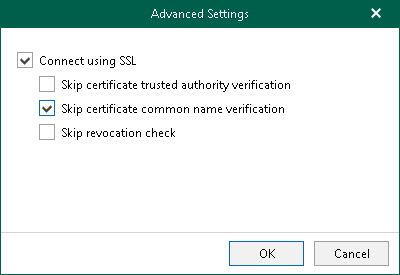
- Click Advanced if you want to skip one or more SSL verifications and select any of the following check boxes:
- Skip certificate trusted authority verification
- Skip certificate common name verification
- Skip revocation check