 This is an archive version of the document. To get the most up-to-date information, see the current version.
Step 4. Specify Network Settings
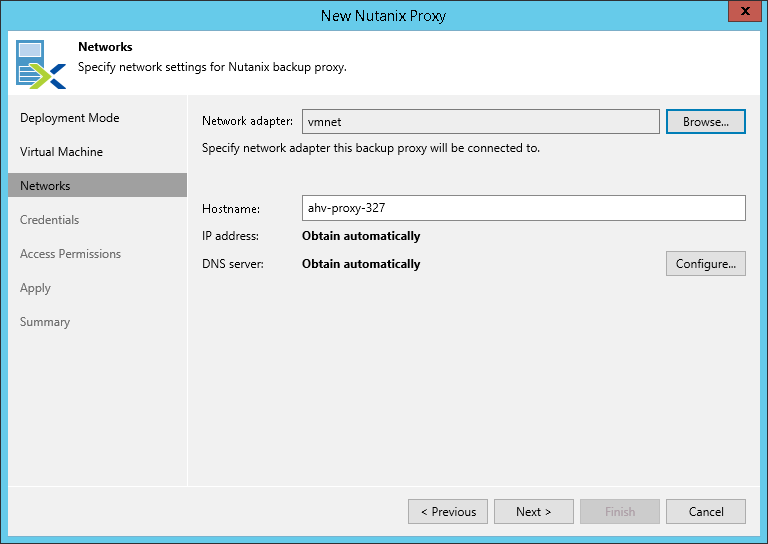
At the Networks step of the wizard, specify the network settings of the AHV Backup Proxy server.
- By default, the AHV Backup Proxy VM is connected to the first network from the list of networks that Veeam Backup & Replication gets from the AHV cluster. If you want to change the default network, click Browse and select the required network adapter.
Important |
To provide the best performance, the AHV Backup Proxy VM and Nutanix Controller VM (CVM) must be connected to the same VLAN. |
- In the Hostname field, specify a hostname that will be assigned to the AHV Backup Proxy VM.
The hostname must meet the following requirements:
- As the VM OS is based on Linux, the hostname must be in the format of a Linux hostname, not in the format of an FQDN with domain zones.
- Hostname must be from 1 to 63 symbols.
- Hostname can contain only one type of special character: "-". The "-" character cannot be used as the first or the last symbol in the hostname.
By default, hostname is the same as the VM name that you assigned in Step 3. Specify VM Configuration.
Important |
After deployment of the VM, Veeam Backup & Replication communicates with AHV Backup Proxy using this hostname. Thus, make sure the DNS server on the Veeam Backup & Replication resolves the hostname and IP address of the AHV Backup Proxy VM. If the DNS server on the Veeam Backup & Replication server is not configured properly and AHV Backup Proxy is in the Not Available state, see Solving Hostname Resolution Problem. |
- When you add a new AHV Backup Proxy server, you can continue with default network settings or set them manually.
If DHCP is enabled for the target network adapter, the IP address and the DNS server for the AHV Backup Proxy VM will be set automatically.
If DHCP is disabled for the target network adapter or you want to set the IP address manually and/or change DNS server settings, you can specify the network settings manually:
- Click Configure.
- In the Network Settings window, specify IP address, subnet mask, default gateway address and DNS server address in the corresponding fields.
Note |
When you add an existing AHV Backup Proxy server, network settings of the proxy remain unchanged. |
