
Staging server is required to fine-tune the restore point in case a user needs to restore database to the state before specific transaction occurred. If necessary, the staging server will be also involved in presenting database hierarchy to the user.
You can specify a local (for Windows VMs only) or remote (for both Windows and Linux VMs) staging server, as described below.
|
If you plan to use a server other than the original or the target Oracle server as a staging system, make sure it has the same version as the source (original) and target Oracle server. |
To configure a staging server, do the following:
- Make sure the server you plan to use meets system requirements; also, check considerations and limitations.
- In Veeam Explorer for Oracle, open the main menu and click Options.
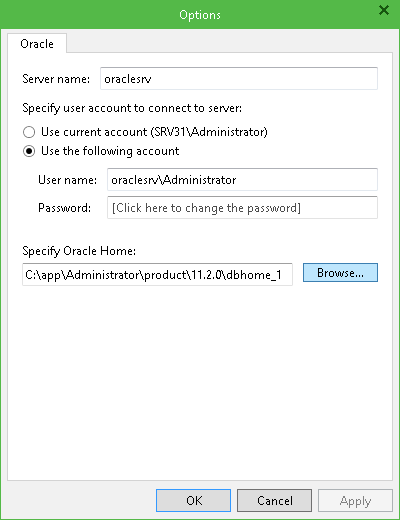
- For Windows-based server, do the following:
- Specify staging Server name.
- Specify user account to connect to Oracle server. You can either use current account (under which Veeam Explorer is running) or specify another one. Make sure is has sufficient permissions, as described here.
- Specify path to Oracle Home folder to be used. You can click Browse, and Veeam Oracle Home Browser will find the corresponding folder for you. If you plan to use Oracle 12c as a staging system, you may also need to enter a password to access Oracle Home on that machine.
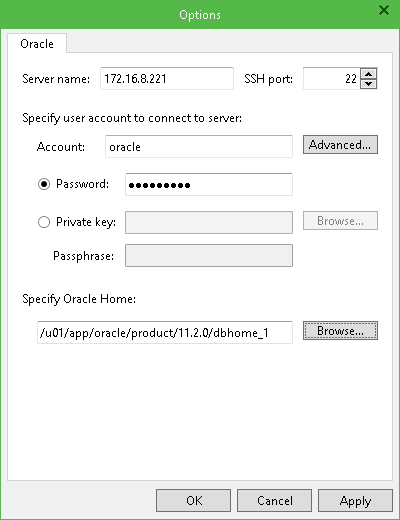
- For Linux-based VM, only the remote server (not the one where Veeam Explorer is running) can be used as a staging system. Do the following:
- Specify staging Server name and SSH port – default is 22.
- Specify account to connect to the staging server. You can use authentication by username and password or by private key. Make sure the account has sufficient permissions, as described here.
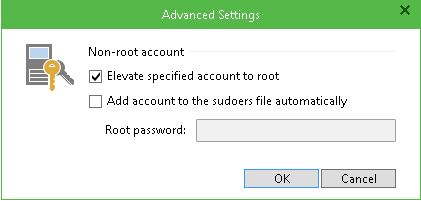
- To elevate specified account to root and to add it to sudoers, click Advanced. Select the options you need; if necessary, enter root password and click OK to save the settings and close the dialog.
- Specify path to Oracle Home folder to be used. You can click Browse, and Veeam Oracle Home Browser will find the corresponding folder for you.
- Return to Options and click OK to save configuration settings.
