
To perform initial configuration, take the following steps after launching Veeam Explorer for Microsoft SharePoint:
- Open main menu and click Options.
- On the SMTP Settings tab configure your e-mail settings.
- On the SQL Server Settings tab configure your SQL server settings.
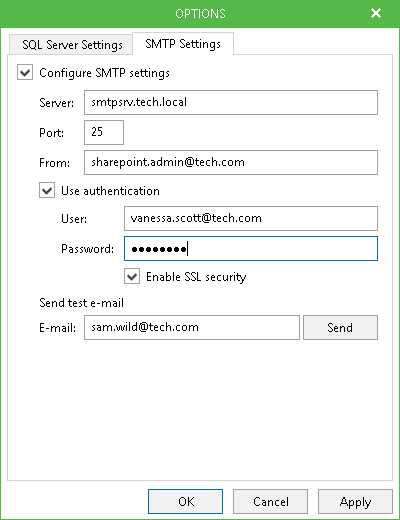
Configuring SMTP Settings
To send items recovered from a SharePoint content database as email attachments, you need to configure SMTP server settings as the following steps describe:
- Click the main menu icon at the top left corner of the Veeam Explorer main window, select Options, and go to the SMTP Settings tab.
- Select the Configure SMTP settings check box.
- In the Server field, specify the DNS name or IP address of the mail server that will be used for sending e-mails.
- In the Port field, enter the SMTP communication port (by default, port number is 25).
- In the From field, specify the email address of the sender (for example, email address of the administrator responsible for Microsoft SharePoint item recovery). When you choose to send restored items as e-mail attachments, this email address will be used by default in the From field of the message.
- If your SMTP server requires SMTP authentication for outgoing mail, select the Use authentication check box and provide credentials for the account that will be used to send emails with attached items.
- For SMTP server with SSL support, select the Enable SSL security check box to enable SSL data encryption.
- To test if email settings have been configured correctly, enter an e-mail address in the Send test e-mail section and click the Send button. Veeam Explorer for Microsoft SharePoint will send a test email message to the specified address.
- Click Apply and close the dialog.
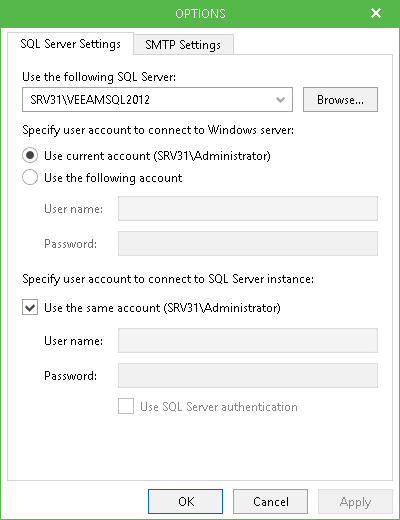
Configuring Staging SQL Server Settings
To perform Microsoft SharePoint item recovery, Veeam Explorer requires a Microsoft SQL Server that will be used as a staging system. You can use Veeam Explorer options to specify Microsoft SQL Server instance (local or remote) according to the following:
- In the Options dialog, open the SQL Server Settings tab.
- In the Use the following SQL server field, specify the SQL server instance that will be used as a staging system. You can click the Browse button to locate the necessary server instance among local or network servers.
|
Remember that selected server must meet all requirements specified in the System Requirements section. |
- Specify user account that will be used to connect to Windows machine where the staging SQL server runs - this can be current account (the one under which Veeam Explorer is running) or another account:
- If you are configuring a local staging server, then both options will be available for you - select the one you need.
- If you are configuring a remote staging server, then only the second option will be available (Use the following account), so you should enter user name and password. Even if you want to use the account currently logged on, you will need to specify credentials for connection explicitly, providing user name and password.
If you plan to add content database(s) to Veeam Explorer scope manually, consider the following when setting up the staging SQL Server:
- If SQL Server belongs to an untrusted domain, connection will not be possible.
- If SQL Server belongs to a trusted domain, then only SQL Server authentication is possible.
- If SQL Server belongs to the same domain as the machine where Veeam Explorer runs, then both Windows and SQL Server authentication methods are possible. In this case, if you plan to use Windows authentication for connection, you will need to configure delegation settings as follows:
- In Active Directory Users and Computers, select the necessary staging SQL Server.
- Open its properties and select the Delegation tab. Select Trust this computer for delegation to specified services only and Use any authentication protocol options for the cifs service on the computer where Veeam Explorer runs.
- After that, restart the staging SQL Server.
- Select the domain user account that you want to use for connection to the staging SQL Server, and in its properties on the Account tab make sure the Account is sensitive and cannot be delegated check box is cleared.
|
Make sure the accounts you specify have sufficient permissions to connect to the Windows machine and to access SQL server. |
