Veeam Help Center Help Center
Veeam Data Cloud for Microsoft Azure
User Guide
Archive
Related documents
Veeam Data Cloud for Microsoft 365 User Guide
Search for "" in this document
Search
Veeam Data Cloud for Microsoft Azure
User Guide
  • Welcome to Veeam Data Cloud for Microsoft Azure
    • Security
  • Planning and Preparation
    • Considerations and Limitations
    • Permissions
      • Service Account Permissions
        • Azure VM Permissions
        • Azure SQL Permissions
        • Azure Files Permissions
        • Virtual Network Configuration Permissions
      • External Storage Permissions
  • Self-Service Onboarding
  • Viewing Dashboard
  • Viewing Resources
    • Viewing Virtual Machines
    • Viewing Azure SQL Resources
    • Viewing Azure Files
  • Performing Backup
    • Creating VM Backup Policies
      • Step 1. Launch New Azure Virtual Machines Policy Wizard
      • Step 2. Select Policy Type
      • Step 3. Specify Policy Details
        • Specifying Details for Default Policy
        • Specifying Details for Custom Policy
      • Step 4. Specify Policy Source
      • Step 5. Specify Policy Schedule
        • Specifying Daily Schedule
        • Specifying Weekly Schedule
        • Specifying Monthly Schedule
        • Specifying Yearly Schedule
      • Step 6. Specify Health Check Settings
      • Step 7. Specify Backup Copy Job Settings
      • Step 8. Complete Backup Policy Configuration
    • Creating SQL Backup Policies
      • Step 1. Launch New Azure SQL Policy Wizard
      • Step 2. Select Policy Type
      • Step 3. Specify Policy Details
        • Specifying Details for Default Policy
        • Specifying Details for Custom Policy
      • Step 4. Specify Policy Source
      • Step 5. Specify Database Processing Settings
      • Step 6. Specify Policy Schedule
        • Specifying Daily Schedule
        • Specifying Weekly Schedule
        • Specifying Monthly Schedule
        • Specifying Yearly Schedule
      • Step 7. Complete Backup Policy Configuration
    • Creating Azure Files Backup Policies
      • Step 1. Launch New Azure Files Policy wizard
      • Step 2. Select Policy Type
      • Step 3. Specify Policy Details
        • Specifying Details for Default Policy
        • Specifying Details for Custom Policy
      • Step 4. Specify Policy Source
      • Step 5. Specify Policy Schedule
        • Specifying Daily Schedule
        • Specifying Weekly Schedule
        • Specifying Monthly Schedule
      • Step 6. Complete Backup Policy Configuration
    • Creating Virtual Network Configuration Backup Policy
      • Step 1. Launch Azure VNET Configuration Backup Wizard
      • Step 2. Specify Policy Details
    • Managing Backup Policies
      • Viewing Backup Policies
      • Viewing Backup Policy Details
      • Editing Backup Policy Settings
      • Enabling and Disabling Backup Policies
      • Starting and Stopping Backup Policies
      • Deleting Backup Policies
    • Creating Backup Copy Jobs
      • Step 1. Launch New Backup Copy Job Wizard
      • Step 2. Specify Backup Copy Job Details
      • Step 3. Specify Backup Copy Job Target
      • Step 4. Specify Backup Copy Job Objects
      • Step 5. Review Backup Copy Job Settings
    • Managing Backup Copy Jobs
      • Viewing Backup Copy Jobs
      • Editing Backup Copy Job Settings
      • Enabling and Disabling Backup Copy Jobs
      • Starting and Stopping Backup Copy Jobs
      • Deleting Backup Copy Jobs
  • Performing Restore
    • Restoring Azure VMs
      • Restoring Entire VMs
        • Step 1. Launch Restore Virtual Machines Wizard
        • Step 2. Select Restore Point
        • Step 3. Select Account and Restore Mode
        • Step 4. Specify VM and Network Settings
        • Step 5. Complete Restore Process
      • Restoring Entire VMs to Amazon EC2
        • Before You Begin
        • Step 1. Launch Restore to Amazon EC2 Wizard
        • Step 2. Select Restore Point
        • Step 3. Select Account and Data Center
        • Step 4. Specify EC2 Instance and Network Settings
        • Step 5. Configure Helper Appliance
        • Step 6. Complete Restore Process
      • Restoring VM Disks
        • Step 1. Launch Restore Disks Wizard
        • Step 2. Select Restore Point
        • Step 3. Select Account and Restore Mode
        • Step 4. Specify Disk Settings
        • Step 5. Complete Restore Process
      • Restoring VM Files
        • Step 1. Launch File-Level Recovery Wizard
        • Step 2. Select Restore Point
        • Step 3. Start Restore Session
        • Step 4. Select Files to Restore
        • Step 5. Stop Restore Session
    • Restoring Azure SQL Databases
      • Step 1. Launch SQL Database Restore Wizard
      • Step 2. Select Restore Point
      • Step 3. Specify Account and Restore Mode
      • Step 4. Specify Restore Settings
      • Step 5. Complete Restore Process
    • Restoring Azure Files
      • Step 1. Launch File-Level Recovery Wizard
      • Step 2. Select Restore Point
      • Step 3. Specify Account and Restore Mode
      • Step 4. Start Restore Session
      • Step 5. Select Files to Restore
      • Step 6. Stop Restore Session
    • Restoring Virtual Network Configuration
      • Restoring Entire Virtual Network Configuration
        • Step 1. Launch Virtual Network Restore Wizard
        • Step 2. Select Region and Restore Point
        • Step 3. Review List of Resources to Restore
        • Step 4. Specify Account and Restore Mode
        • Step 5. Complete Restore Process
      • Restoring Specific Items of Virtual Network Configuration
        • Step 1. Launch Virtual Network Restore Wizard
        • Step 2. Select Region and Restore Point
        • Step 3. Select Resources to Restore
        • Step 4. Select Account
        • Step 5. Complete Restore Process
    • Restoring Azure VMs from Backup Copy
      • Step 1. Launch Restore from Object Storage to Azure
      • Step 2. Select Restore Point
      • Step 3. Select Account
      • Step 4. Specify VM and Network Settings
      • Step 5. Complete Restore Process
  • Viewing Logs and Notifications
    • Viewing Session Logs
    • Viewing Action Logs
    • Viewing Notifications
  • Configuring General Settings
    • Configuring Primary Settings
      • Managing Users
      • Managing Roles
      • Viewing Invoices
      • Viewing Upcoming Charges
      • Managing Organization Profile
    • Configuring Backup Settings
      • Managing Azure Accounts
        • Managing Service Accounts
          • Creating Service Accounts
            • Step 1. Launch New Azure Service Account Wizard
            • Step 2. Specify Account Info and Type
            • Step 3. Specify Connection Type
              • Creating New Microsoft Entra Application
              • Specifying Existing Microsoft Entra Application
            • Step 4. Finish Working with Wizard
          • Editing Service Accounts
          • Deleting Service Accounts
        • Managing Database Accounts
          • Adding Database Accounts
          • Editing Database Accounts
          • Deleting Database Accounts
      • Managing Veeam Data Cloud Repositories
      • Managing External Backup Storage
      • Managing Cloud Credentials
  • Managing Tenant Profile
Download PDF
>User Guide>Performing Restore>Restoring Azure SQL Databases>Step 3. Specify Account and Restore Mode

Step 3. Specify Account and Restore Mode

In this article

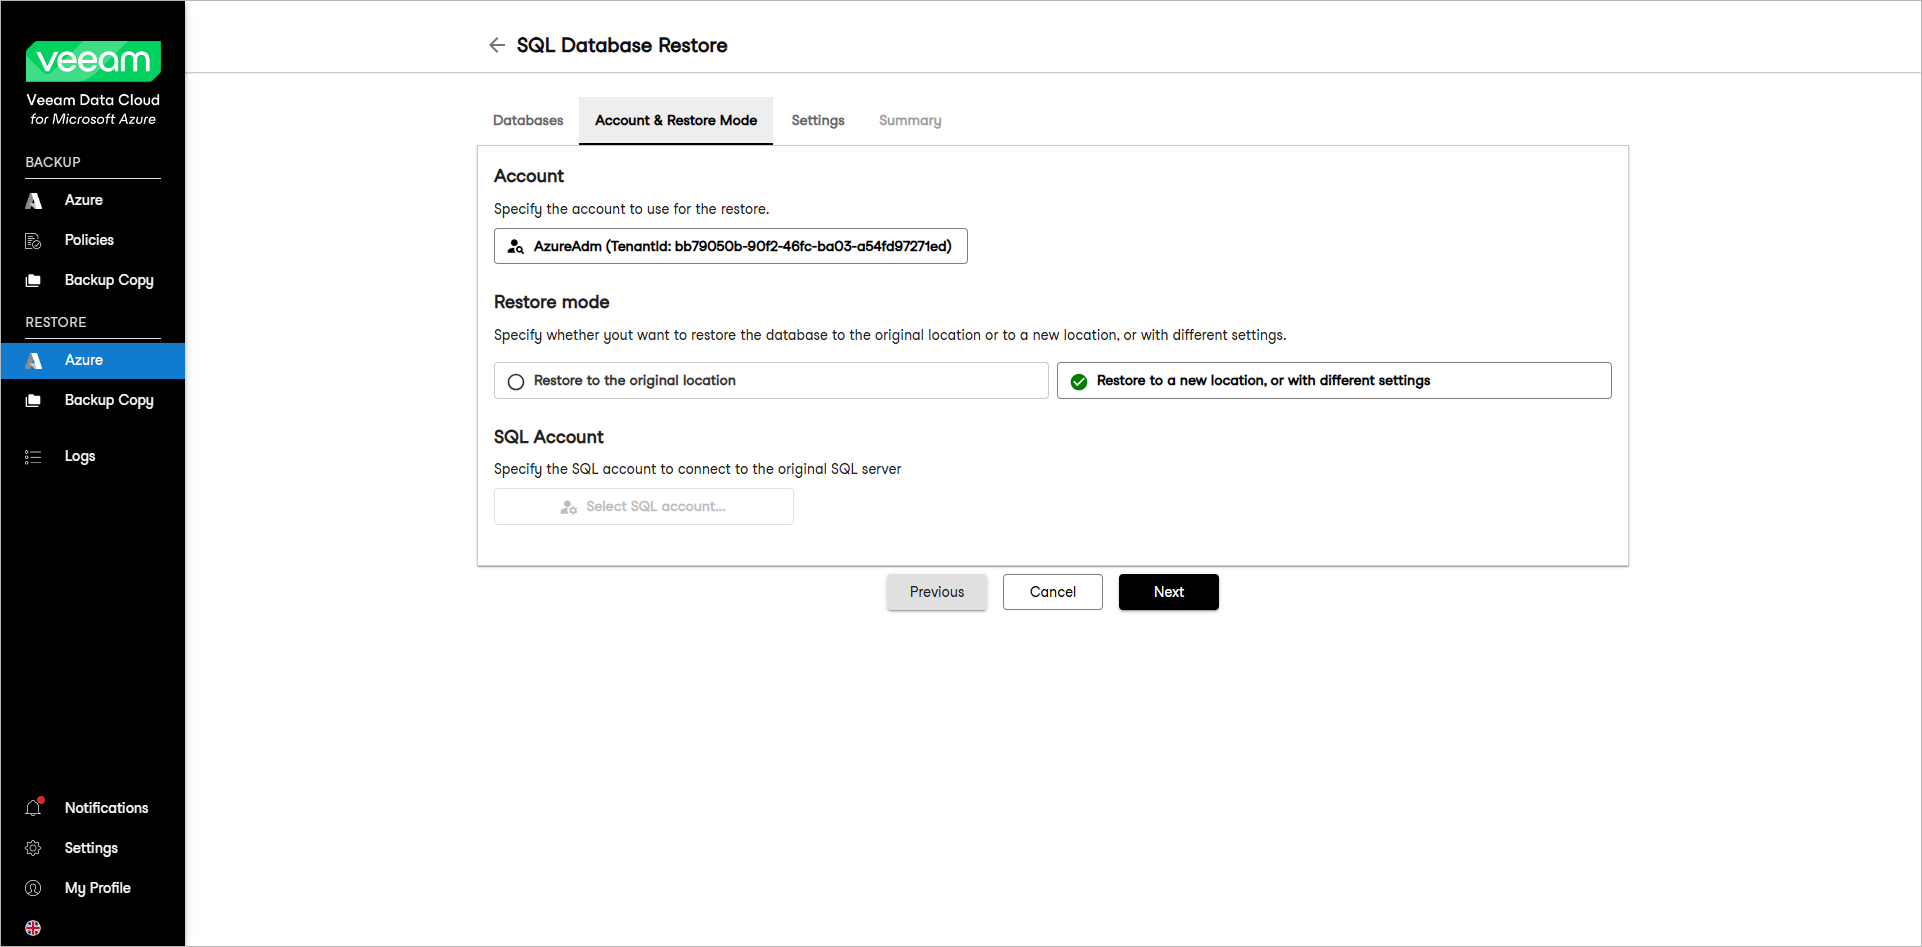
    At the Account & Restore Mode step of the wizard, specify the following restore settings:

    • Azure account
    • Restore mode and destination

    Specifying Azure Account

    To select the account whose permissions Veeam Data Cloud for Microsoft Azure will use to perform the restore operation, do the following:

    1. Click Select account.
    2. In the Select Azure Account window, select an account that you want to use for the restore procedure.


    Specifying Restore Mode and Destination

    In the Restore mode section, choose whether you want to restore the selected Azure VM to the original or to a custom location.

    If you select the Restore to the original location option, you must also specify the SQL server account. To do this, click Select SQL Account and select the account that will be used for the restore in the Select SQL Account window.

    If you select the Restore to a new location, or with different settings option, you will specify settings for the restored Azure SQL server at the Settings step of the wizard.:

    Note

    Data transfer to a new location may result in additional costs and may take more time to complete.


    Specify Account and Restore Mode


    Page updated 4/9/2025

    Send feedback
    Home | Products | Forums | Support | Contact Sales | EULA

    © Veeam® Software Privacy Notice | Veeam Uses AI | Cookie Notice

    View all results across Veeam
    Back to document search
    I want to report a typo

    There is a misspelling right here:


    I want to let the Veeam Documentation Team know about that.

    Submit report