Step 3. Connect to PostgreSQL
At the Connect to PostgreSQL step of the wizard, specify connection settings that will be used to access the following databases:
- The configuration database that will be used to store data on backup policies, sessions, restore jobs, application configuration, connection details to Salesforce organizations and so on
- A database that will be used to store backups of all objects, fields, records and relationships of the Salesforce organization connected at step 6 of the wizard.
|
Note |
|
If you perform configuration of the existing deployment of Veeam Backup for Salesforce, specify connection settings that will be used to access the existing configuration database. |
You can also configure a web proxy that will be used by Veeam Backup for Salesforce to access Salesforce and the Veeam License Server if the management server is not connected to the internet.
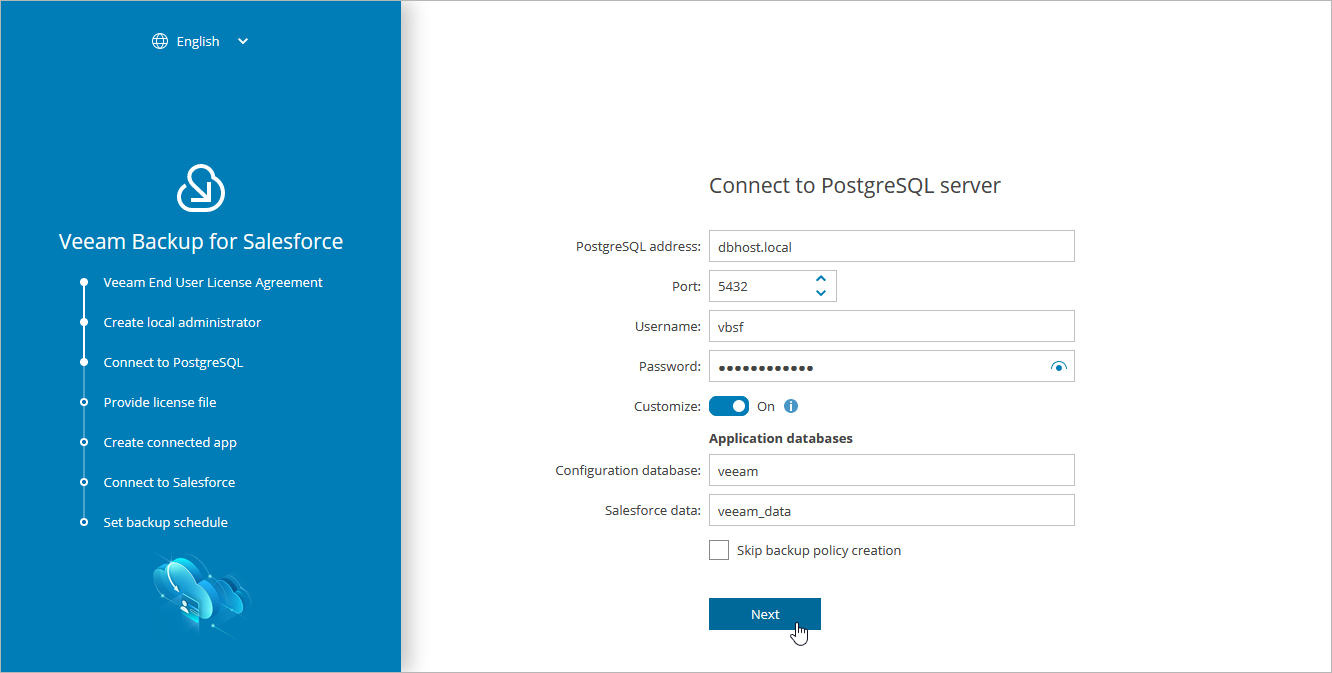
To configure the connection to a PostgreSQL database, do the following:
- In the PostgreSQL address field, specify the DNS name or IP address of a PostgreSQL server that will host the databases.
- In the Port field, choose a network port that will be used by Veeam Backup for Salesforce to connect to the PostgreSQL server. The default port number is 5432.
- Use the Username and Password fields to provide credentials of the PostgreSQL user that will be used to access the configuration and backup databases.
If you enter the name of a database that does not exist yet, Veeam Backup for Salesforce will automatically create a new database on the specified PostgreSQL server. However, Veeam Backup for Salesforce will be able to do this only if the user that will be used to access the database is assigned the createdb permission required to create databases — otherwise, you will have to create an empty database on the specified server manually as described in PostgreSQL Documentation.
|
Note |
|
If you have chosen the option to automatically install PostgreSQL on the management server during Veeam Backup for Salesforce deployment, this step will contain the predefined values: in the PostgreSQL address field, the address of the management server will be specified, in the Username and Password fields, credentials of the vbsf PostgreSQL user created when installing PostgreSQL will be provided. |
By default, Veeam Backup for Salesforce creates new databases with the following names:
- vbsf_backup — the name used for the database that will store the backed-up data.
- vbsf_application — the name used for the configuration database.
If you want to rename the databases or specify the existing ones, set the Customize toggle to On, and specify the custom names.
|
Tip |
|
During the initial configuration, you will be prompted to connect to a Salesforce organization that will be protected by a backup policy, which is automatically created by the product. You can skip the default policy creation and connect to a database later when creating a backup policy. |
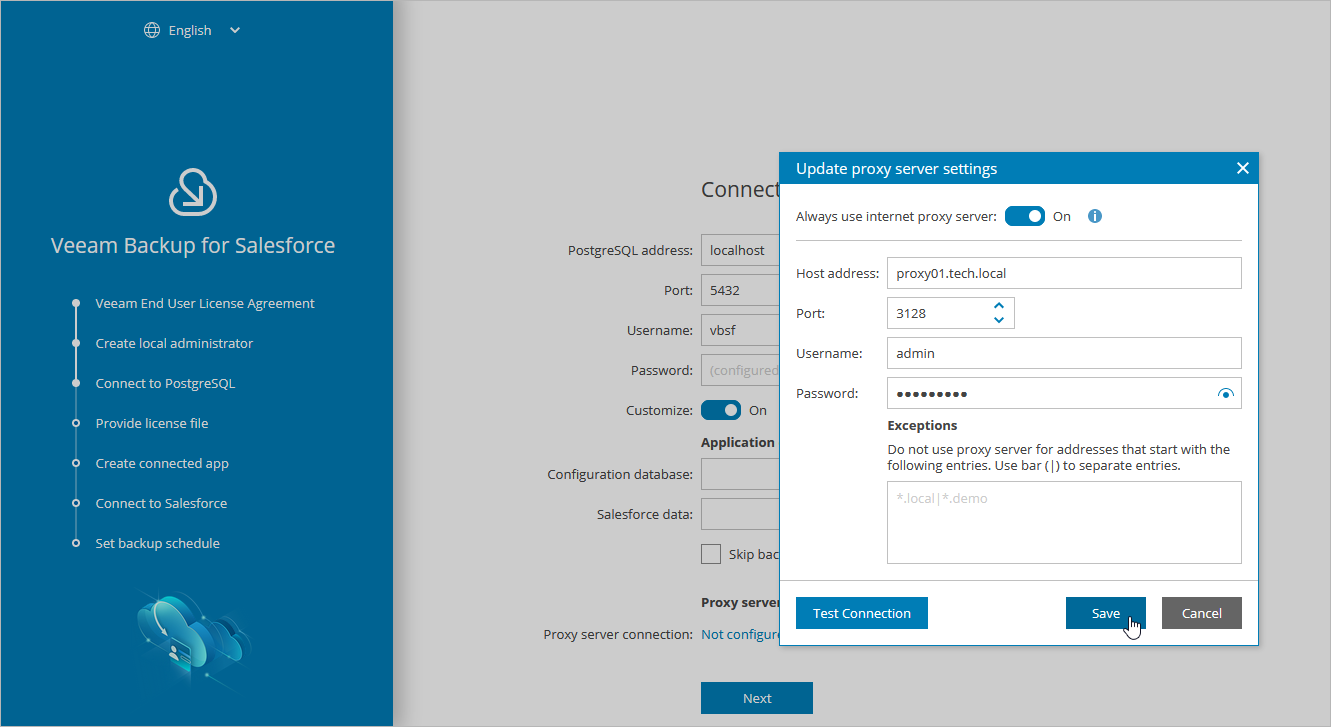
Step 3b. Connect to Proxy Server
To configure a web proxy, do the following:
- In the Proxy server settings section of the Connect to PostgreSQL step of the wizard, set the Customize toggle to On.
- Click the link in the Proxy server connection field.
- Specify the following settings in the Update proxy server settings window:
- Set the Always use internet proxy server toggle to On.
- In the Host address field, enter the IP address or FQDN of the web proxy.
- In the Port field, enter the port that will be used on the web proxy for HTTP or HTTPS connections.
- [Applies only if the web proxy requires authentication] Use the Username and Password fields to provide credentials of the user account configured on the web proxy to access the internet.
- In the Exceptions section, you can specify a domain name which you do not want Veeam Backup for Salesforce to access through the configured web proxy. To specify multiple domain names, use a pipe-separated list.
- Click Apply.
|
Tip |
|
You can skip this step and provide the web proxy settings later. To do that, modify the proxy.settings parameter values as described in section Configuring Advanced Settings. |