This is an archive version of the document. To get the most up-to-date information, see the current version.
Step 4. Select Location for Proxy Appliance
In this article
At the Ready to Apply step of the wizard, select an ESX(i) host to which the clone/virtual copy of the storage snapshot will be mounted. On the selected ESX(i) host, Veeam Backup & Replication will also place a proxy appliance and mount disks of the restored VM to this proxy appliance.
To specify destination for the snapshot clone/virtual copy and proxy appliance:
- Click the Customize link at the bottom of the window.
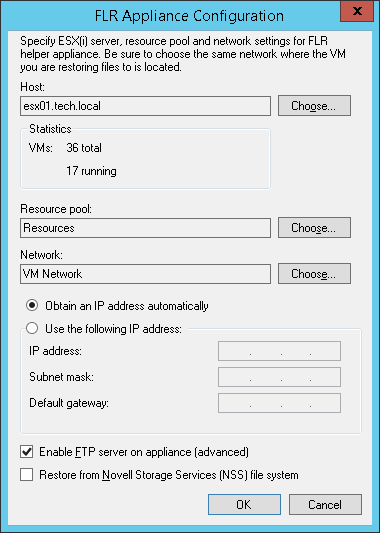
- In the FLR Appliance Configuration window, select an ESX(i) host to which the snapshot clone must be mounted and on which the proxy appliance must be registered.
- In the Resource pool field, specify a resource pool to which the proxy appliance must be placed.
- In the Network section, specify an IP address and other network settings for the proxy appliance. The proxy appliance must be placed in the same network where the backup server resides.
- To enable FTP access to the restored file system, select the Enable FTP server on appliance check box. As a result, your users will be able to access the proxy appliance via FTP, browse the file system of the restored VM and download necessary files on their own.
- If you are performing restore of a VM with the Novell Storage Services file system, select the Restore from Novell Storage Services (NSS) file system check box. In this case, Veeam Backup & Replication will deploy a specific proxy appliance that supports the Novell Storage Services file system.
- Click OK.
|
When choosing an ESX(i) host for the proxy appliance used for file-level restore from the Novell Storage Services file system, make sure that it allows running VMs with 64-bit guest OS'es. |