Veeam Help Center Help Center
Veeam Backup for Microsoft Azure 8
User Guide
Archive
Version 7.0 Version 6.0
Related documents
REST API Reference
Veeam Backup for AWS User GuideVeeam Backup for Google Cloud User GuideVeeam Backup & Replication User Guide
Search for "" in this document
Search
Veeam Backup for Microsoft Azure 8
User Guide
  • Overview
    • Integration with Veeam Backup & Replication
    • Solution Architecture
      • Backup Server
      • Microsoft Azure Plug-In for Veeam Backup & Replication
      • Backup Appliances
      • Backup Repositories
      • Worker Instances
      • Additional Repositories and Tape Devices
      • Gateway Servers
    • Protecting Azure VMs
      • VM Backup
        • Snapshot Chain
          • VM Snapshot Retention
        • Backup Chain
          • Changed Block Tracking
          • Archive Backup Chain
          • VM Backup Retention
            • Retention Policy for Archived Backups
      • VM Restore
        • Entire VM Restore
        • Disk Restore
        • File-Level Recovery
    • Protecting Azure SQL Databases
      • SQL Backup
        • Backup Chain
          • Archive Backup Chain
          • SQL Backup Retention
            • Retention Policy for Archived Backups
      • SQL Restore
    • Protecting Cosmos DB Accounts
      • Cosmos DB Backup
        • Backup Chain
          • Archive Backup Chain
        • Cosmos DB Backup Retention
      • Cosmos DB Restore
    • Protecting Azure File Shares
      • Azure Files Backup
        • Snapshot Chain
          • File Share Snapshot Retention
      • Azure Files Restore
    • Protecting Virtual Network Configurations
      • Virtual Network Configuration Backup
        • Backup Chain
        • Virtual Network Configuration Backup Retention
      • Virtual Network Configuration Restore
        • Entire Virtual Network Configuration Restore
        • Granular Restore
    • SLA-Based Backup Policies
      • SLA Templates
        • Data Protection Windows
        • Temporary Restore Points
      • Storage Templates
    • Retention Policies
    • Immutability
      • Block Generation
    • Private Network Deployment
      • VM Backup in Private Environment
      • SQL Backup in Private Environment
      • Cosmos DB Backup in Private Environment
      • Azure Files Backup in Private Environment
    • Data Encryption
  • Planning and Preparation
    • System Requirements
    • Ports
    • Azure Services
    • Plug-In Permissions
    • Service Account Permissions
      • Repository Permissions
      • Worker Permissions
      • Azure VM Permissions
      • Azure SQL Permissions
      • Cosmos DB Permissions
      • Azure Files Permissions
      • Virtual Network Configuration Permissions
      • Permissions Changelog
    • Azure Resource Providers
    • Considerations and Limitations
    • Sizing and Scalability Guidelines
      • Backup Appliance
      • Azure Files
      • Backup Repository
      • Backup Policies
      • Worker Instances
      • Service Providers
  • Deployment
    • Deploying Plug-In
      • Installing Plug-In
      • Installing and Uninstalling Plug-In in Unattended Mode
      • Upgrading Plug-In
      • Uninstalling Plug-In
    • Deploying Backup Appliance
      • Step 1. Launch New Veeam Backup for Microsoft Azure Appliance Wizard
      • Step 2. Choose Deployment Mode
      • Step 3. Specify Microsoft Azure Compute Account Settings
      • Step 4. Specify Subscription
      • Step 5. Specify VM Instance Name and Description
      • Step 6. Specify Connection Type
      • Step 7. Specify Network Settings
      • Step 8. Specify User Credentials
      • Step 9. Track Progress
      • Step 10. Finish Working with Wizard
  • Licensing
    • Limitations
    • Scenarios
    • Viewing License Information
    • Revoking License Units
    • Removing License
  • Accessing Veeam Backup for Microsoft Azure
    • Accessing Web UI from Console
    • Accessing Web UI from Workstation
  • Configuring Veeam Backup for Microsoft Azure
    • Managing Backup Appliances
      • Adding Appliances
        • Connecting to Existing Appliances
          • Step 1. Launch New Veeam Backup for Microsoft Azure Appliance Wizard
          • Step 2. Choose Deployment Mode
          • Step 3. Specify Microsoft Azure Compute Account Settings
          • Step 4. Specify Subscription and Region
          • Step 5. Select Appliance
          • Step 6. Specify Connection Type
          • Step 7. Specify User Credentials
          • Step 8. Configure Repository Settings
          • Step 9. Track Progress
          • Step 10. Finish Working with Wizard
      • Editing Appliance Settings
        • Eliminating Warnings
      • Rescanning Appliances
      • Removing Appliances
      • Uninstalling Backup Appliances Deployed from Microsoft Azure Marketplace
        • Removing Backed-Up Data
        • Removing IAM Roles and Microsoft Entra Applications
        • Removing Azure Resources
    • Managing Accounts
      • Managing Service Accounts
        • Adding Service Accounts
          • Step 1. Launch Add Account Wizard
          • Step 2. Specify Account Info
          • Step 3. Select Connection Type
            • Creating New Microsoft Entra Application
            • Specifying Existing Microsoft Entra Application
          • Step 4. Select Account Scope
          • Step 5. Select Account Roles
          • Step 6. Check Account Permissions
          • Step 7. Finish Working with Wizard
        • Editing Service Accounts
          • Step 1. Launch Edit Account Wizard
          • Step 2. Update Account Info
          • Step 3. Connect to Microsoft Entra Application
          • Step 4. Update Account Scope
          • Step 5. Update Account Roles
          • Step 6. Check Account Permissions
          • Step 7. Finish Working with Wizard
        • Checking Service Account Permissions
        • Removing Service Accounts
      • Managing SMTP and Database Accounts
        • Adding SMTP and Database Accounts
          • Step 1. Launch Add Account Wizard
          • Step 2. Specify Account Name and Description
          • Step 3. Specify General Settings
          • Step 4. Finish Working with Wizard
        • Editing SMTP and Database Accounts
        • Removing SMTP and Database Accounts
    • Managing Backup Repositories
      • Adding Backup Repositories Using Console
        • Creating New Repositories
          • Step 1. Launch Add External Repository Wizard
          • Step 2. Specify Repository Details
          • Step 3. Configure Repository Settings
          • Step 4. Specify Service Account
          • Step 5. Specify Blob Container
          • Step 6. Enable Data Encryption
          • Step 7. Track Progress
          • Step 8. Finish Working with Wizard
        • Connecting to Existing Repositories
      • Adding Backup Repositories Using Web UI
        • Step 1. Launch Add Repository Wizard
        • Step 2. Specify Repository Name
        • Step 3. Configure Repository Settings
          • Repository Ownership Alert
        • Step 4. Enable Data Encryption
        • Step 5. Configure Load Options
        • Step 6. Finish Working with Wizard
      • Editing Backup Repository Settings
      • Rescanning Backup Repositories
      • Removing Backup Repositories
    • Managing User Accounts
      • Adding User Accounts
      • Editing User Accounts
      • Changing User Passwords
      • Changing Default Admin Password
      • Enabling Multi-Factor Authentication
    • Managing Worker Instances
      • Managing Worker Configurations
        • Specifying Destination for Worker Instances
        • Adding Worker Configurations
          • Step 1. Launch Add Worker Network Configuration Wizard
          • Step 2. Specify General Settings
          • Step 3. Specify Network Settings
          • Step 4. Finish Working with Wizard
        • Editing Worker Configurations
        • Removing Worker Configurations
      • Managing Worker Profiles
        • Adding Worker Profiles
          • Step 1. Launch Add Worker Profiles Wizard
          • Step 2. Choose Regions
          • Step 3. Choose Worker Profiles
          • Step 4. Finish Working with Wizard
        • Editing Worker Profiles
        • Removing Worker Profiles
      • Adding Worker Instance Tags
      • Removing Worker Instances
    • Managing SLA and Storage Templates
      • Managing SLA Templates
        • Adding SLA Templates
          • Step 1. Launch Add SLA Template Wizard
          • Step 2. Specify Template Name
          • Step 3. Configure Snapshot Settings
          • Step 4. Configure Backup Settings
          • Step 5. Configure Template General Settings
            • How Health Check Works
          • Step 6. Finish Working with Wizard
        • Editing SLA Templates
      • Managing Storage Templates
        • Adding Storage Templates
          • Step 1. Launch Add Storage Template Wizard
          • Step 2. Specify Template Name
          • Step 3. Configure Location Settings
          • Step 4. Finish Working with Wizard
        • Editing Storage Templates
      • Removing SLA and Storage Templates
      • Cloning SLA and Storage Templates
    • Configuring General Settings
      • Configuring Deployment Mode
        • Working in Private Environments
          • Configuring Network Settings for VMs
            • Step 1. Create Private DNS Zones
            • Step 2. Add Worker Configuration
            • Step 3. Add VNets to Private DNS Zones
            • Step 4. Configure Peering Connections for Backup Appliance
            • Step 5. Create and Launch Backup Policy
            • Step 6. Configure Private Endpoints
              • Step 6a. Locate Private Endpoints
              • Step 6b. Configure Private Endpoint for Azure Blob Storage
              • Step 6c. Configure Private Endpoint for Azure Queue Storage
            • Step 7. Launch Backup Policy for Disk Access
            • Step 8. Configure Disk Access Settings
            • Step 9. Launch Test Backup Policy
          • Configuring Network Settings for SQL Servers
            • Step 1. Create Private DNS Zones
            • Step 2. Add Worker Configuration
            • Step 3. Add VNets to Private DNS Zones
            • Step 4. Configure Peering Connections for Backup Appliance
            • Step 5. Create and Launch Backup Policy
            • Step 6. Configure Automatically Created Private Endpoints
              • Step 6a. Locate Private Endpoints
              • Step 6b. Configure Private Endpoint for Azure Blob Storage
              • Step 6c. Configure Private Endpoint for Azure Queue Storage
            • Step 7. Disable Public Access to SQL Server
            • Step 8. Create Private Endpoint for SQL Server
              • Step 8a. Launch Create a Private Endpoint Wizard
              • Step 8b. Configure Private Endpoint Settings
              • Step 8c. Specify Resource Settings
              • Step 8d. Specify Virtual Network Settings
              • Step 8e. Specify DNS Settings
              • Step 8f. Assign Tags
              • Step 8g. Finish Working with Wizard
            • Step 9. Configure Private Endpoint for SQL Server
            • Step 10. Launch Test Backup Policy
          • Configuring Network Settings for SQL Managed Instances
          • Configuring Networking Settings for Cosmos DB Accounts
            • Step 1. Disable Public Access Cosmos DB Account
            • Step 2. Create Private Endpoints for Cosmos DB Account
              • Step 2a. Launch Create a Private Endpoint Wizard
              • Step 2b. Configure Private Endpoint Settings
              • Step 2c. Specify Resource Settings
              • Step 2d. Specify Virtual Network Settings
              • Step 2e. Specify DNS Settings
              • Step 2f. Assign Tags
              • Step 2g. Finish Working with Wizard
            • Step 3. Configure Private Endpoints
          • Configuring Network Settings for Storage Accounts
            • Configuring Firewall Settings
            • Creating Private Endpoints
              • Step 1. Launch Create a Private Endpoint Wizard
              • Step 2. Configure Private Endpoint General Settings
              • Step 3. Specify Resource Settings
              • Step 4. Specify Virtual Network Settings
              • Step 5. Specify DNS Settings
              • Step 6. Assign Tags
              • Step 7. Finish Working with Wizard
              • Step 8. Configure Private Endpoint Network Settings
      • Configuring Global Retention Settings
      • Replacing Security Certificates
      • Configuring Global Notification Settings
      • Changing Time Zone
      • Configuring SSO Settings
        • Configuring SSO Settings for Microsoft Entra ID
    • Performing Configuration Backup and Restore
      • Performing Configuration Backup
        • Performing Configuration Backup Using Console
        • Performing Configuration Backup Using Web UI
          • Performing Snapshot-Based Configuration Backup
          • Performing Manual Configuration Backup
          • Performing Scheduled Configuration Backup
          • Exporting Configuration Backup Data
      • Performing Configuration Restore
        • Restoring Configuration Data Using Console
          • Limitations and Considerations
          • Performing Configuration Restore
            • Step 1. Launch Configuration Restore Wizard
            • Step 2. Choose Backup File
            • Step 3. Review Backup File Info
            • Step 4. Specify Password
            • Step 5. Choose Restore Options
            • Step 6. Specify User Credentials
            • Step 7. Track Progress
            • Step 8. Finish Working with Wizard
        • Restoring Configuration Data Using Web UI
          • Step 1. Launch Configuration Restore Wizard
          • Step 2. Choose Backup File
          • Step 3. Review Backup File Info
          • Step 4. Choose Restore Options
          • Step 5. Track Restore Progress
          • Step 6. View Configuration Check Results
          • Step 7. Finish Working with Wizard
  • Viewing Available Resources
  • Performing Backup
    • Performing Backup Using Console
      • Creating Backup Policies
      • Editing Backup Policy Settings
      • Enabling and Disabling Backup Policies
      • Starting and Stopping Backup Policies
      • Deleting Backup Policies
      • Creating Backup Copy Jobs
      • Copying Backups to Tapes
    • Performing Backup Using Web UI
      • Performing VM Backup
        • Creating Schedule-Based VM Backup Policies
          • Step 1. Launch Add VM Policy Wizard
          • Step 2. Specify Backup Policy Name
          • Step 3. Configure Backup Source Settings
            • Step 3a. Select Service Account
            • Step 3b. Select Regions
            • Step 3c. Select Resources
              • Configuring Conditions
          • Step 4. Specify Guest Processing Settings
            • Enabling Application-Aware Processing
            • Enabling Guest Scripting
          • Step 5. Configure Backup Target Settings
          • Step 6. Specify Policy Scheduling Options
            • Specifying Daily Schedule
            • Specifying Weekly Schedule
            • Specifying Monthly Schedule
            • Specifying Yearly Schedule
            • Enabling Harmonized Scheduling
            • Enabling Backup Archiving
          • Step 7. Configure General Settings
            • How Health Check Works
          • Step 8. Review Estimated Cost
          • Step 9. Finish Working with Wizard
        • Creating SLA-Based VM Backup Policies
          • Step 1. Launch Add SLA-Based Policy Wizard
          • Step 2. Specify Policy Name
          • Step 3. Configure Backup Source Settings
            • Step 3a. Select Service Account
            • Step 3b. Select Regions
            • Step 3c. Select Resources
              • Configuring Conditions
          • Step 4. Specify Guest Processing Settings
            • Enabling Application-Aware Processing
            • Enabling Guest Scripting
          • Step 5. Configure Protection Settings
          • Step 6. Enable Azure Tags Assigning
          • Step 7. Configure General Settings
          • Step 8. Review Estimated Cost
          • Step 9. Finish Working with Wizard
        • Creating VM Snapshots Manually
      • Performing SQL Backup
        • Creating SQL Backup Policies
          • Step 1. Launch Add Azure SQL Policy Wizard
          • Step 2. Specify Backup Policy Name
          • Step 3. Configure Backup Source Settings
            • Step 3a. Select Service Account
            • Step 3b. Select Regions
            • Step 3c. Select Resources
          • Step 4. Configure Processing Options
          • Step 5. Specify Policy Scheduling Options
            • Specifying Daily Schedule
            • Specifying Weekly Schedule
            • Specifying Monthly Schedule
            • Specifying Yearly Schedule
            • Enabling Harmonized Scheduling
            • Enabling Backup Archiving
          • Step 6. Configure General Settings
            • How Health Check Works
          • Step 7. Review Estimated Cost
          • Step 8. Finish Working with Wizard
        • Creating SQL Backups Manually
      • Performing Cosmos DB Backup
        • Creating Cosmos DB Backup Policies
          • Step 1. Launch Add Cosmos DB Policy Wizard
          • Step 2. Specify Backup Policy Name
          • Step 3. Configure Backup Source Settings
            • Step 3a. Select Service Account
            • Step 3b. Select Regions
            • Step 3c. Select Resources
              • Configuring Conditions
          • Step 4. Configure Backup Target Settings
          • Step 5. Configure Processing Options
          • Step 6. Specify Policy Scheduling Options
            • Specifying Daily Schedule
            • Specifying Weekly Schedule
            • Specifying Monthly Schedule
            • Specifying Yearly Schedule
            • Enabling Harmonized Scheduling
            • Enabling Backup Archiving
          • Step 7. Configure General Settings
            • How Health Check Works
          • Step 8. Review Estimated Cost
          • Step 9. Finish Working with Wizard
        • Creating Cosmos DB Backups Manually
      • Performing Azure Files Backup
        • Creating Azure Files Backup Policies
          • Step 1. Launch Add Azure Files Policy Wizard
          • Step 2. Specify Backup Policy Name
          • Step 3. Configure Backup Source Settings
            • Step 3a. Select Service Account
            • Step 3b. Select Regions
            • Step 3c. Select Resources
            • Step 3d. Enable File Share Indexing
          • Step 4. Specify Policy Scheduling Options
            • Specifying Daily Schedule
            • Specifying Weekly Schedule
            • Specifying Monthly Schedule
            • Enabling Harmonized Scheduling
          • Step 5. Configure General Settings
          • Step 6. Review Estimated Cost
          • Step 7. Finish Working with Wizard
        • Creating File Share Snapshots Manually
      • Performing Virtual Network Configuration Backup
        • Editing Virtual Network Configuration Backup Policy
          • Step 1. Launch Virtual Network Configuration Backup Wizard
          • Step 2. Select Azure Subscriptions
            • Enabling Automatic Protection
            • Adding Azure Subscriptions Manually
          • Step 3. Enable Additional Backup Copy
          • Step 4. Configure Retention Settings
          • Step 5. Specify Email Notification Settings
          • Step 6. Finish Working with Wizard
        • Enabling and Disabling Virtual Network Configuration Backup Policy
        • Starting and Stopping Virtual Network Configuration Backup Policy
      • Managing Backup Policies
        • Editing Backup Policy Settings
        • Setting Backup Policy Priority
        • Enabling and Disabling Backup Policies
        • Starting and Stopping Backup Policies
        • Exporting and Importing Backup Policies
      • Viewing SLA-Based Backup Policy Details
        • Monitoring SLA-Based Policy Performance
        • How Veeam Backup for Microsoft Azure Estimates SLA Compliance
  • Managing Backed-Up Data
    • Managing Backed-Up Data Using Console
    • Managing Backed-Up Data Using Web UI
      • Azure VM Data
        • Removing VM Backups and Snapshots
          • Removing VM Snapshots Created Manually
        • Retrieving Data from Archive
      • Azure SQL Data
        • Removing SQL Backups
          • Removing SQL Backups Created Manually
        • Retrieving Data from Archive
      • Cosmos DB Data
        • Removing Cosmos DB Backups
          • Removing Cosmos DB Backups Created Manually
        • Retrieving Data from Archive
      • Azure Files Data
        • Removing File Share Snapshots
          • Removing File Share Snapshots Created Manually
      • Virtual Network Configuration Data
        • Comparing Virtual Network Configuration Backups
        • Importing Virtual Network Configuration Data
        • Removing Virtual Network Configuration Backups
  • Performing Restore
    • VM Restore
      • Performing VM Restore Using Console
        • Performing Entire VM Restore
          • Step 1. Launch Restore to Microsoft Azure Wizard
          • Step 2. Select VM and Restore Point
            • Retrieving Data from Archive
          • Step 3. Choose Restore Mode
          • Step 4. Specify Azure Subscription and Region
          • Step 5. Specify VM Name and Resource Group
          • Step 6. Specify VM Configuration Settings
          • Step 7. Specify VM Size
          • Step 8. Configure Network and Security Group Settings
          • Step 9. Specify Restore Reason
          • Step 10. Finish Working with Wizard
        • Performing Guest OS File Recovery
        • Performing Application Restore
      • Performing VM Restore Using Web UI
        • Performing Entire VM Restore
          • Step 1. Launch Restore Virtual Machines Wizard
          • Step 2. Select Restore Point
          • Step 3. Select Service Account
          • Step 4. Choose Restore Mode
          • Step 5. Specify Retrieval Settings
          • Step 6. Specify Instance Settings
          • Step 7. Specify Disk Names
          • Step 8. Configure Network Settings
          • Step 9. Specify Restore Reason
          • Step 10. Finish Working with Wizard
        • Performing Disk Restore
          • Step 1. Launch Restore Disks Wizard
          • Step 2. Select Restore Point
          • Step 3. Select Service Account
          • Step 4. Choose Restore Mode
          • Step 5. Specify Retrieval Settings
          • Step 6. Specify Disk Settings
          • Step 7. Specify Restore Reason
          • Step 8. Finish Working with Wizard
        • Performing File-Level Recovery
          • Step 1. Launch File-Level Recovery Wizard
          • Step 2. Select Restore Point
          • Step 3. Configure Restore Settings
          • Step 4. Specify Recovery Reason
          • Step 5. Start Recovery Session
          • Step 6. Choose Items to Recover
          • Step 7. Stop Recovery Session
    • SQL Restore
      • Performing SQL Restore Using Console
        • Step 1. Launch Restore to Microsoft Azure SQL Wizard
        • Step 2. Select SQL Database and Restore Point
        • Step 3. Choose Restore Mode
        • Step 4. Specify Target SQL Server Settings
        • Step 5. Specify SQL Database Name
        • Step 6. Specify Restore Reason
        • Step 7. Finish Working with Wizard
      • Performing SQL Restore Using Web UI
        • Step 1. Launch SQL Database Restore Wizard
        • Step 2. Select Restore Point
        • Step 3. Select Service Account
        • Step 4. Choose Restore Mode
        • Step 5. Select Azure SQL Account
        • Step 6. Specify Retrieval Settings
        • Step 7. Configure Restore Settings
        • Step 8. Specify Restore Reason
        • Step 9. Finish Working with Wizard
    • Cosmos DB Restore
      • Performing Cosmos DB Restore Using Console
      • Performing Cosmos DB Restore Using Web UI
        • Performing Point-in-time Restore
          • Step 1. Launch Cosmos DB Restore Wizard
          • Step 2. Select Restore Point
          • Step 3. Select Service Account
          • Step 4. Configure Restore Settings
          • Step 5. Specify Restore Reason
          • Step 6. Finish Working with Wizard
        • Performing Restore From Repository
          • Step 1. Launch Cosmos DB Restore Wizard
          • Step 2. Select Restore Point
          • Step 3. Select Service Account
          • Step 4. Specify Retrieval Settings
          • Step 5. Configure Restore Settings
          • Step 6. Specify Restore Reason
          • Step 7. Finish Working with Wizard
    • File Share Restore
      • Performing File Share Restore Using Console
      • Performing File Share Restore Using Web UI
        • Step 1. Launch Azure Files File-Level Recovery Wizard
        • Step 2. Select Service Account
        • Step 3. Choose Restore Mode
        • Step 4. Specify Restore Reason
        • Step 5. Start Recovery Session
        • Step 6. Select Restore Point
        • Step 7. Choose Items to Recover
        • Step 8. Stop Restore Session
    • Virtual Network Configuration Restore
      • Performing Virtual Network Configuration Restore Using Console
      • Performing Virtual Network Configuration Restore Using Web UI
        • Performing Entire Virtual Network Configuration Restore
          • Step 1. Launch Virtual Network Restore Wizard
          • Step 2. Select Region and Restore Point
          • Step 3. Specify Service Account
          • Step 4. Choose Restore Mode
          • Step 5. Configure Additional Restore Settings
          • Step 6. Specify Restore Reason
          • Step 7. Finish Working with Wizard
        • Performing Granular Restore
          • Step 1. Launch Virtual Network Restore Wizard
          • Step 2. Select Region, Restore Point and Items to Restore
          • Step 3. Specify Service Account
          • Step 4. Specify Restore Reason
          • Step 5. Finish Working with Wizard
    • Performing Instant Recovery
    • Exporting Disks
    • Publishing Disks
    • Restoring to AWS
    • Restoring to Google Cloud
    • Restoring to Nutanix AHV
  • Reviewing Dashboard
  • Viewing Session Statistics
  • Collecting Object Properties
  • Updating Veeam Backup for Microsoft Azure
    • Updating Appliances Using Console
      • Upgrading to Version 6.0 or 7.0 from Version 5.0 or Earlier
    • Updating Appliances Using Web UI
      • Upgrading Appliances
      • Checking for Updates
      • Installing Updates
      • Viewing Update History
      • Configuring Web Proxy
  • Getting Technical Support
  • Configuring HTTP Proxy for Backup Appliances
Download PDF
>User Guide>Overview>Solution Architecture

Solution Architecture

In this article

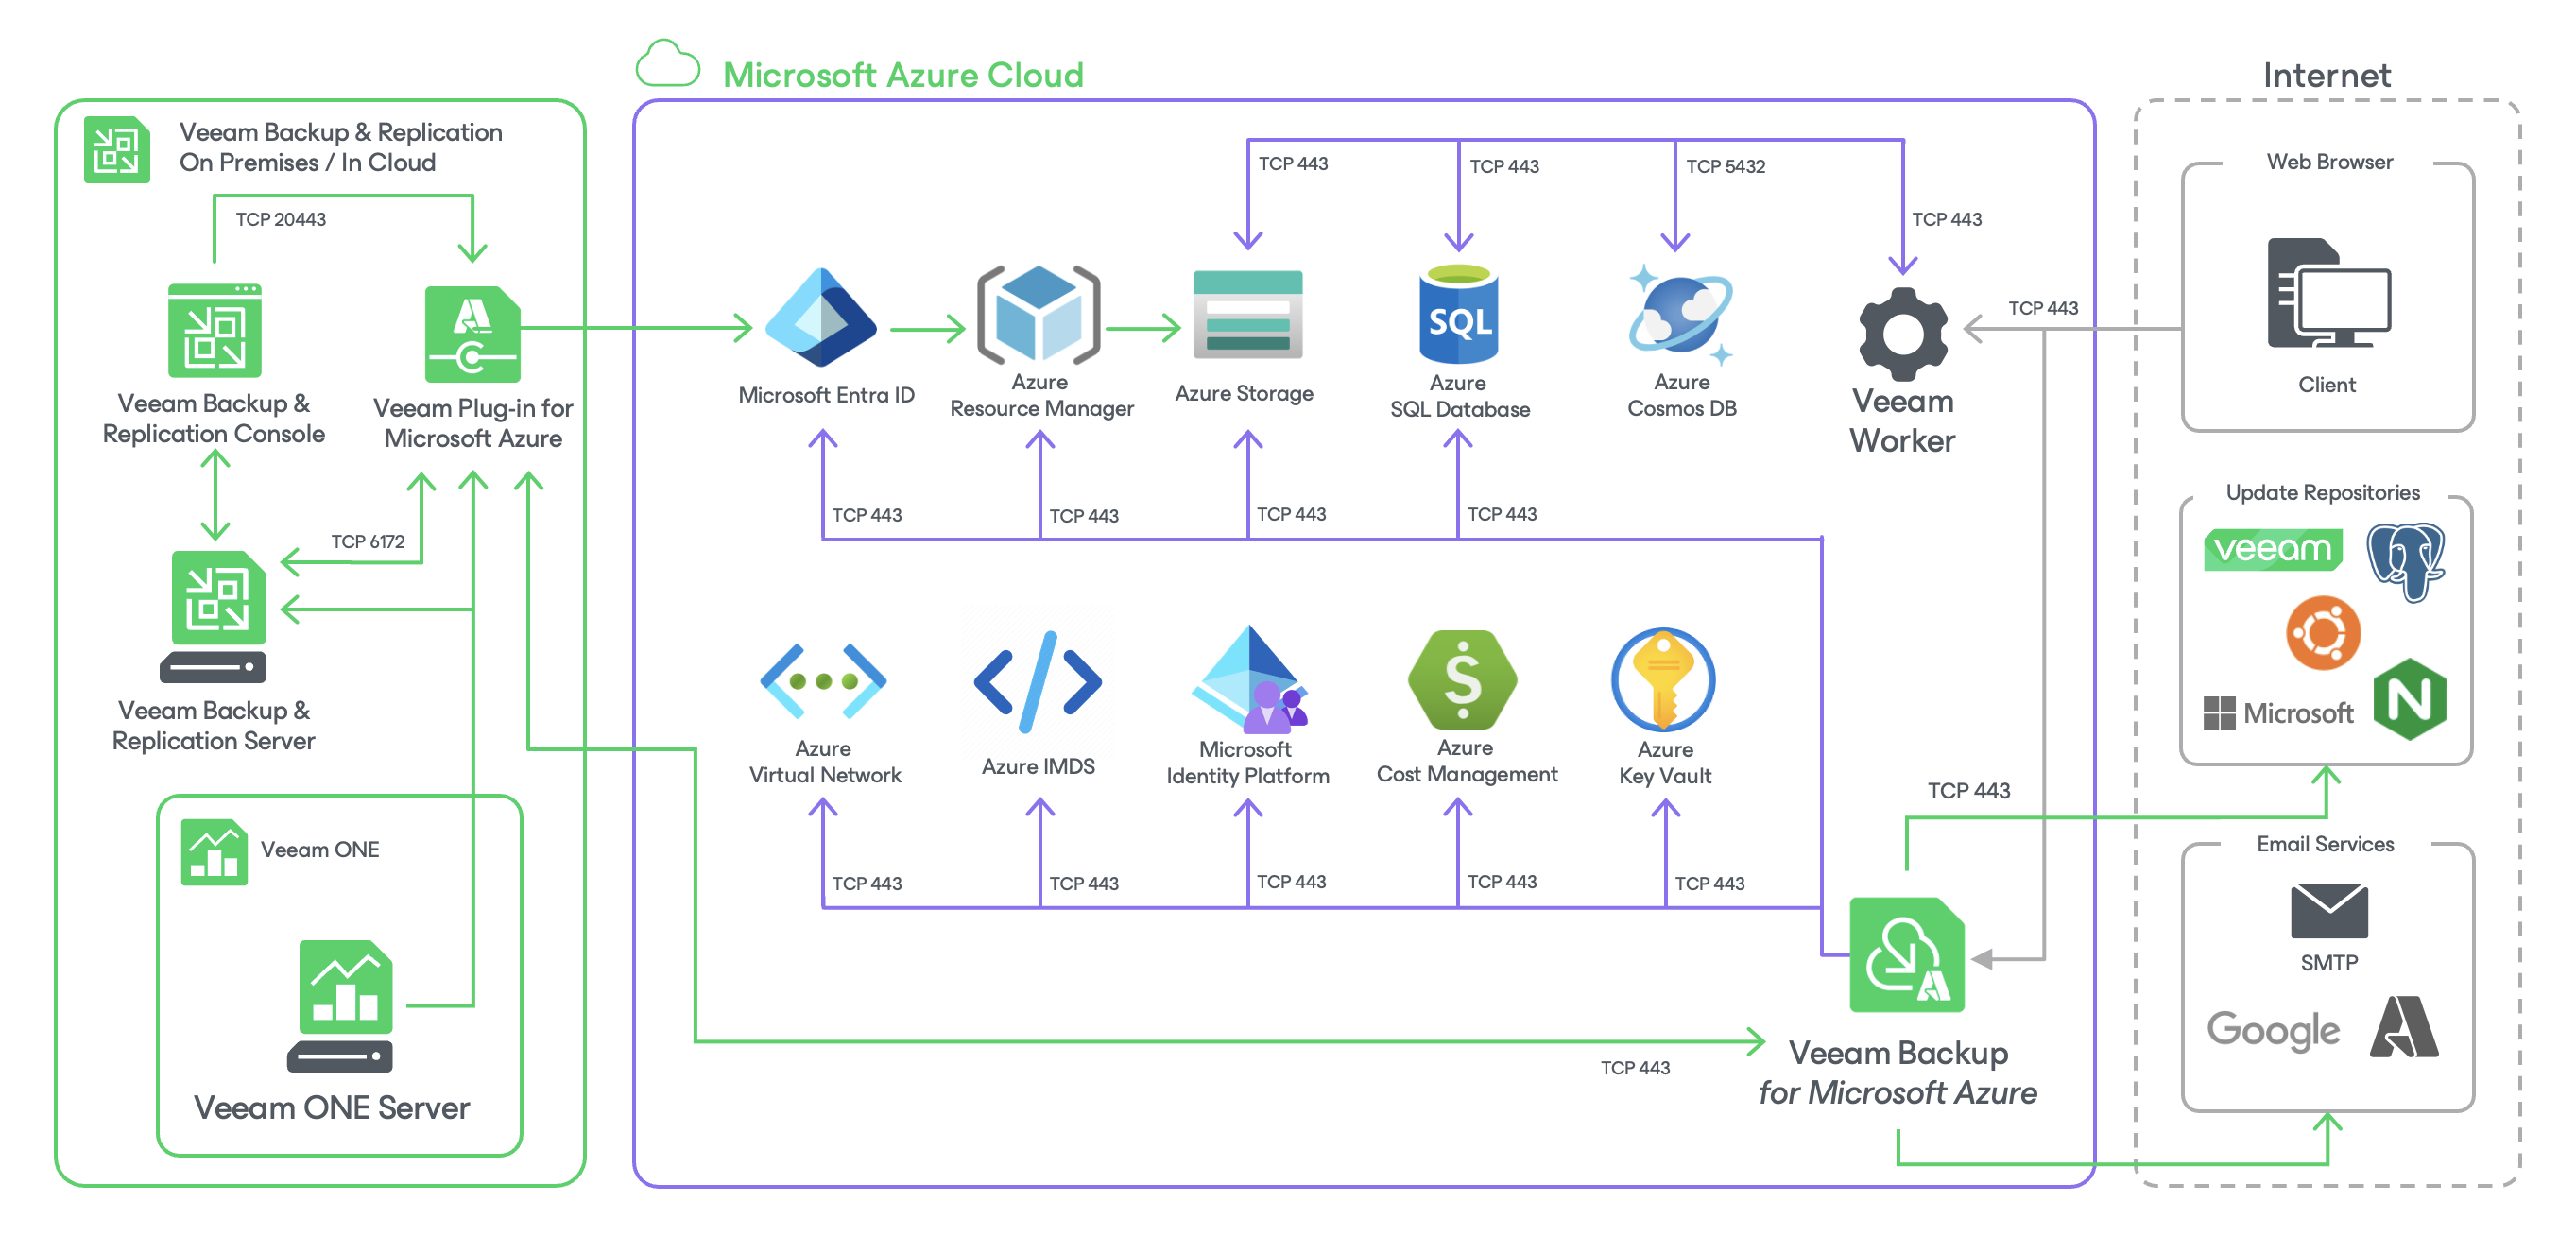
    The Veeam Backup for Microsoft Azure architecture includes the following components:

    • Backup server
    • Microsoft Azure Plug-In for Veeam Backup & Replication
    • Backup appliances
    • Backup repositories
    • Worker instances
    • Additional repositories and tape devices
    • Gateway servers

    Backup Infrastructure

    Page updated 9/5/2024

    Page content applies to build 8.0.0.334

    Send feedback
    Home | Products | Forums | Support | Contact Sales | EULA

    © Veeam® Software Privacy Notice | Veeam Uses AI | Cookie Notice | Cookie Settings

    View all results across Veeam
    Back to document search
    I want to report a typo

    There is a misspelling right here:


    I want to let the Veeam Documentation Team know about that.

    Submit report