Step 2. Select NAS Device
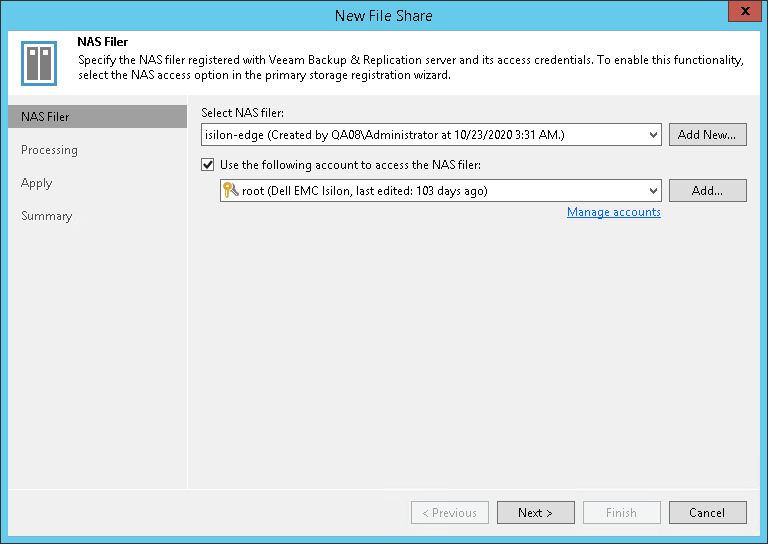
At the NAS Filer step of the wizard, choose the NAS device, which you want to use as a NAS filer where protected file shares reside.
- Select the required NAS device from the Select NAS filer drop-down list.
If the drop-down list does not display the required device, you must add it to the storage infrastructure. To add the NAS device, click Add New and follow the instructions described in Adding NetApp Data ONTAP, Adding Lenovo ThinkSystem DM Series, or Adding Dell EMC Isilon/PowerScale, depending on the type of the storage system you use.
- If you must specify user credentials to access the storage system, select the Use the following account to access the NAS filer check box. From the Credentials drop-down list, select a credentials record for a user account that has Full Control permissions on the storage system.
If you have not set up credentials beforehand, click the Manage accounts link at the bottom of the list or click Add on the right to add the credentials. For more information, see Managing Credentials.

Integration with Dell EMC Isilon/PowerScale
To provide proper integration of Veeam Backup & Replication with Dell EMC Isilon/PowerScale to implement the NAS backup functionality, mind the following:
- The Dell EMC Isilon/PowerScale system must be licensed for SnapshotIQ. Otherwise NAS integration will not work.
- The Isilon service account is used to add the Dell EMC Isilon/PowerScale system to Veeam Backup & Replication, as described in Adding Dell EMC Isilon/PowerScale. This account is used only for registering the storage system in the backup infrastructure and further storage rescans. You cannot use it for NAS file share backup and restore.
- We recommend that you create a custom VeeamStorageIntegration role to group all necessary privileges. This role must be created in the System access zone. For more information on access zones, see the Isilon documentation.
Add the following privileges to the VeeamStorageIntegration role:
Privilege ID | Read Only | Comments |
|---|---|---|
ISI_PRIV_LOGIN_PAPI | True | Used to log in to the Platform API and the web administration interface. |
ISI_PRIV_AUTH | True | Used to configure external authentication providers, including root-level accounts. |
ISI_PRIV_DEVICES | True | Used to create new roles and assign privileges. |
ISI_PRIV_JOB_ENGINE R/W | False | Used for array Change File Tracking report scheduling for changelist API call. |
ISI_PRIV_NETWORK | True | Used to configure network interfaces. |
ISI_PRIV_NFS R/W | False | Used to update export rules. |
ISI_PRIV_SMB | True | Used to configure the SMB server. |
ISI_PRIV_SNAPSHOT R/W | False | Used to schedule, take, and view snapshots. |
For more information on privileges, see the Isilon documentation.
You can use the following command to check privileges added to the VeeamStorageIntegration role:
isi auth roles view VeeamStorageIntegration |
Make sure that you make the service account to be used for NAS integration a member of the VeeamStorageIntegration role.
- To enable backup and restore of SMB file shares, additionally do the following:
- Grant minimum read access to SMB file shares for the account that will be used for NAS integration. That will allow backing up SMB file shares.
- Grant "run as root" access to SMB file shares for the account that will be used for NAS integration. That will allow restoring SMB file shares.
Mind that the Isilon BackupAdmin role is not enough for backup and restore. It is mainly used for SMB access and enables backup and restore of files from /ifs. It does not propagate down to subfolders and therefore cannot be used to backup anything, but the system access zone.