Editing Flex Backup Policies
Users of the Variable License Model can add and remove users and objects to and from Flex backup policies created in Veeam Data Cloud for Microsoft 365.
If you want to edit Flex backup policies under the Fixed License Model, see Fixed License Model.
To edit a Flex backup policy, do the following:
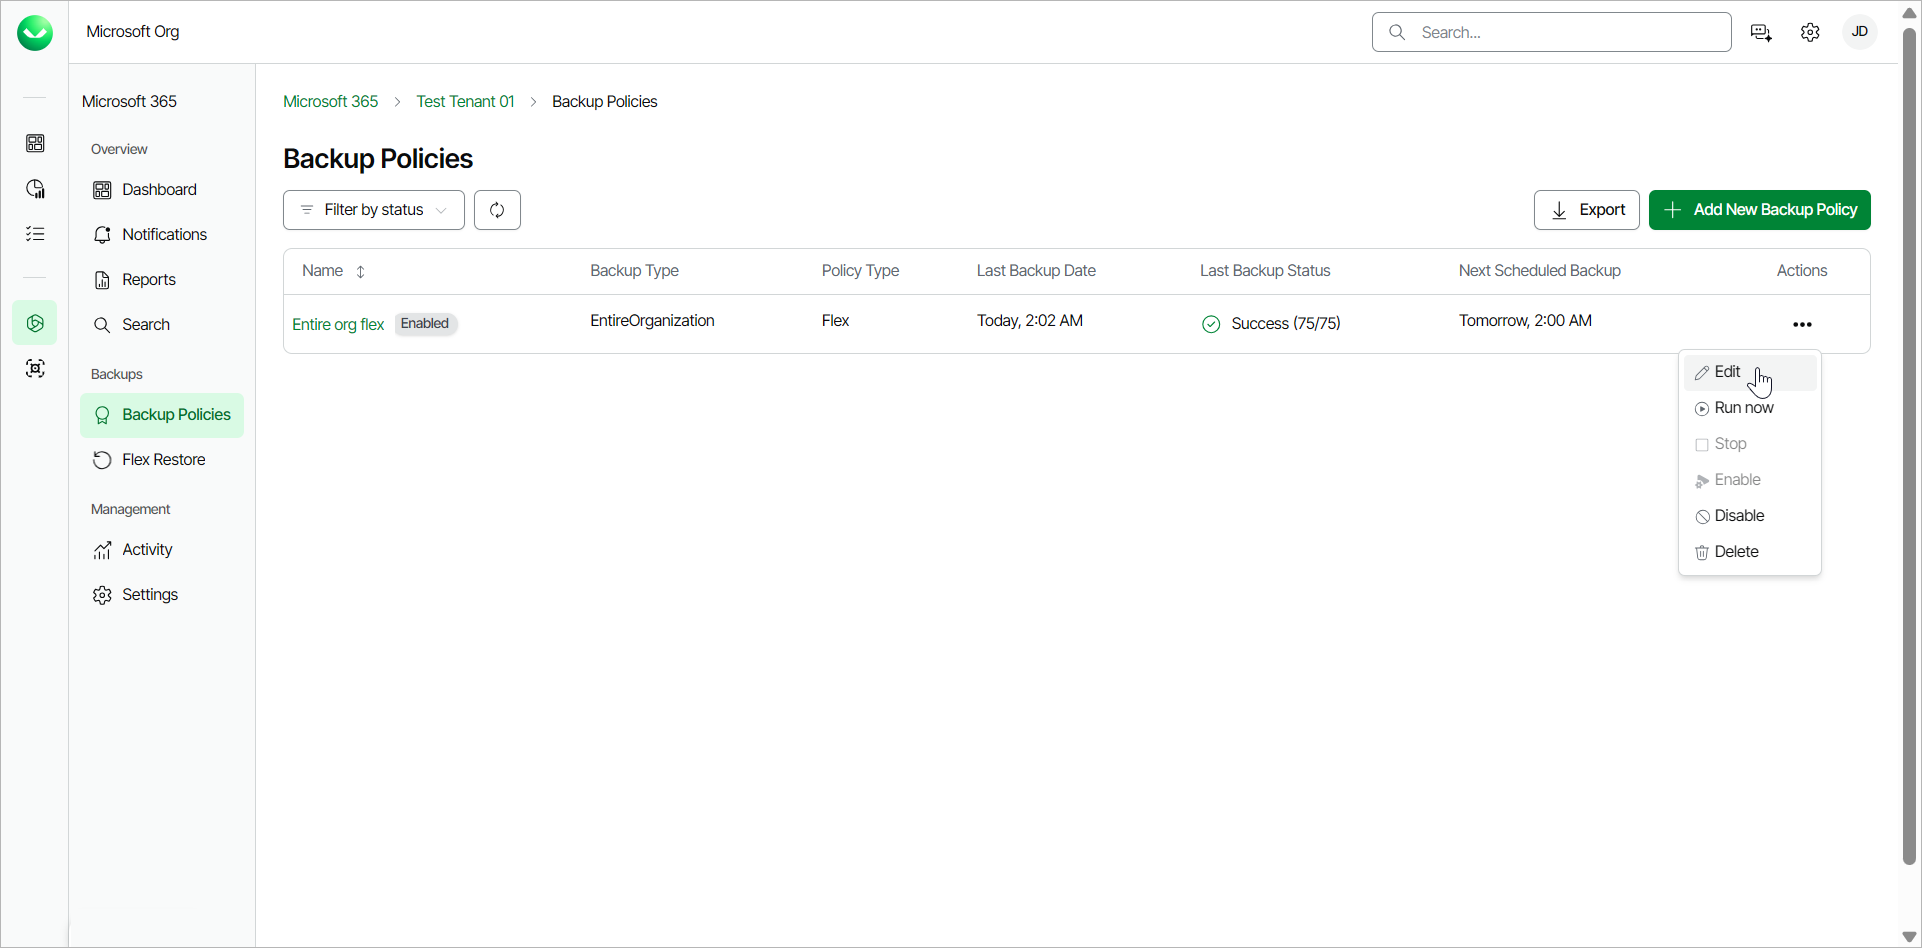
- On the Microsoft 365 page, click the name of the tenant you want to manage.
- Select Backup Policies.
- On the Backup Policies page, in the Actions column of the policy you want to edit, click Edit.
- On the Edit Backup Policy page, in the Policy name field, you can specify a different name for the backup policy.
- In the Description field, you can modify or provide a description for future reference.
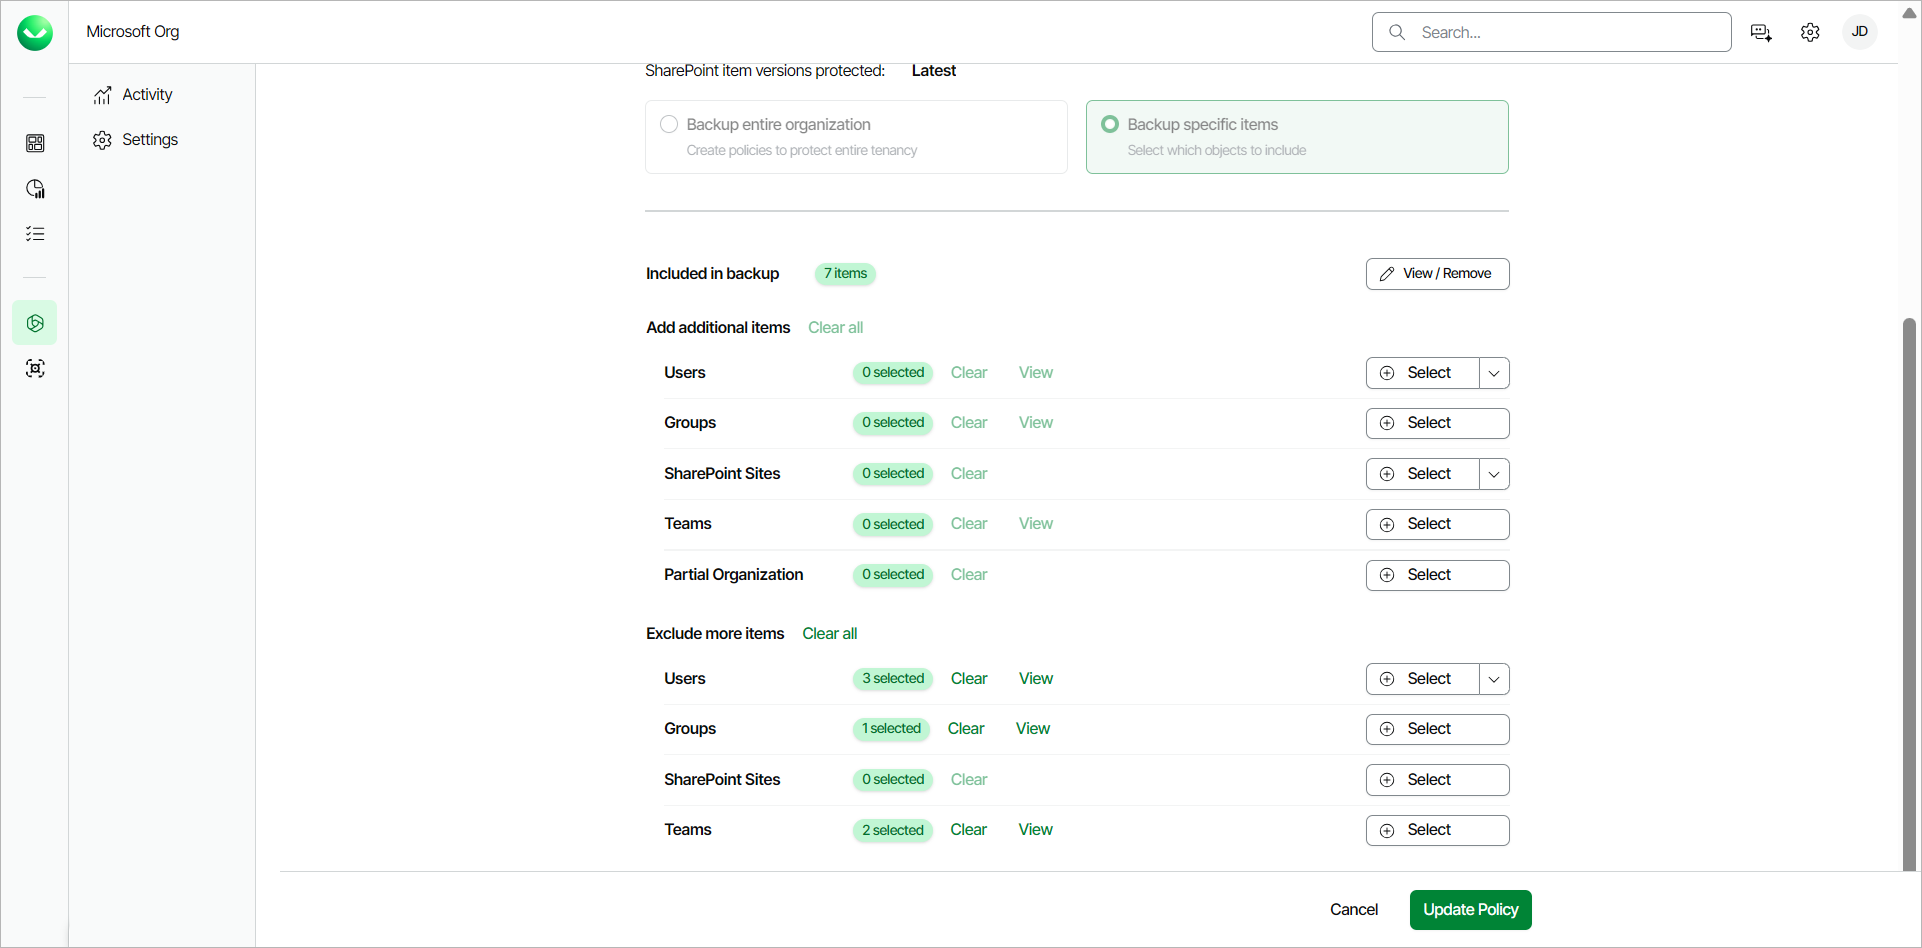
- [For specific items backup policies] In the Included in backup section, click View/Remove to view or modify the objects currently included in the backup policy. You can do the following actions:
- If you want to remove any of the objects, select the check boxes next to them and click Delete.
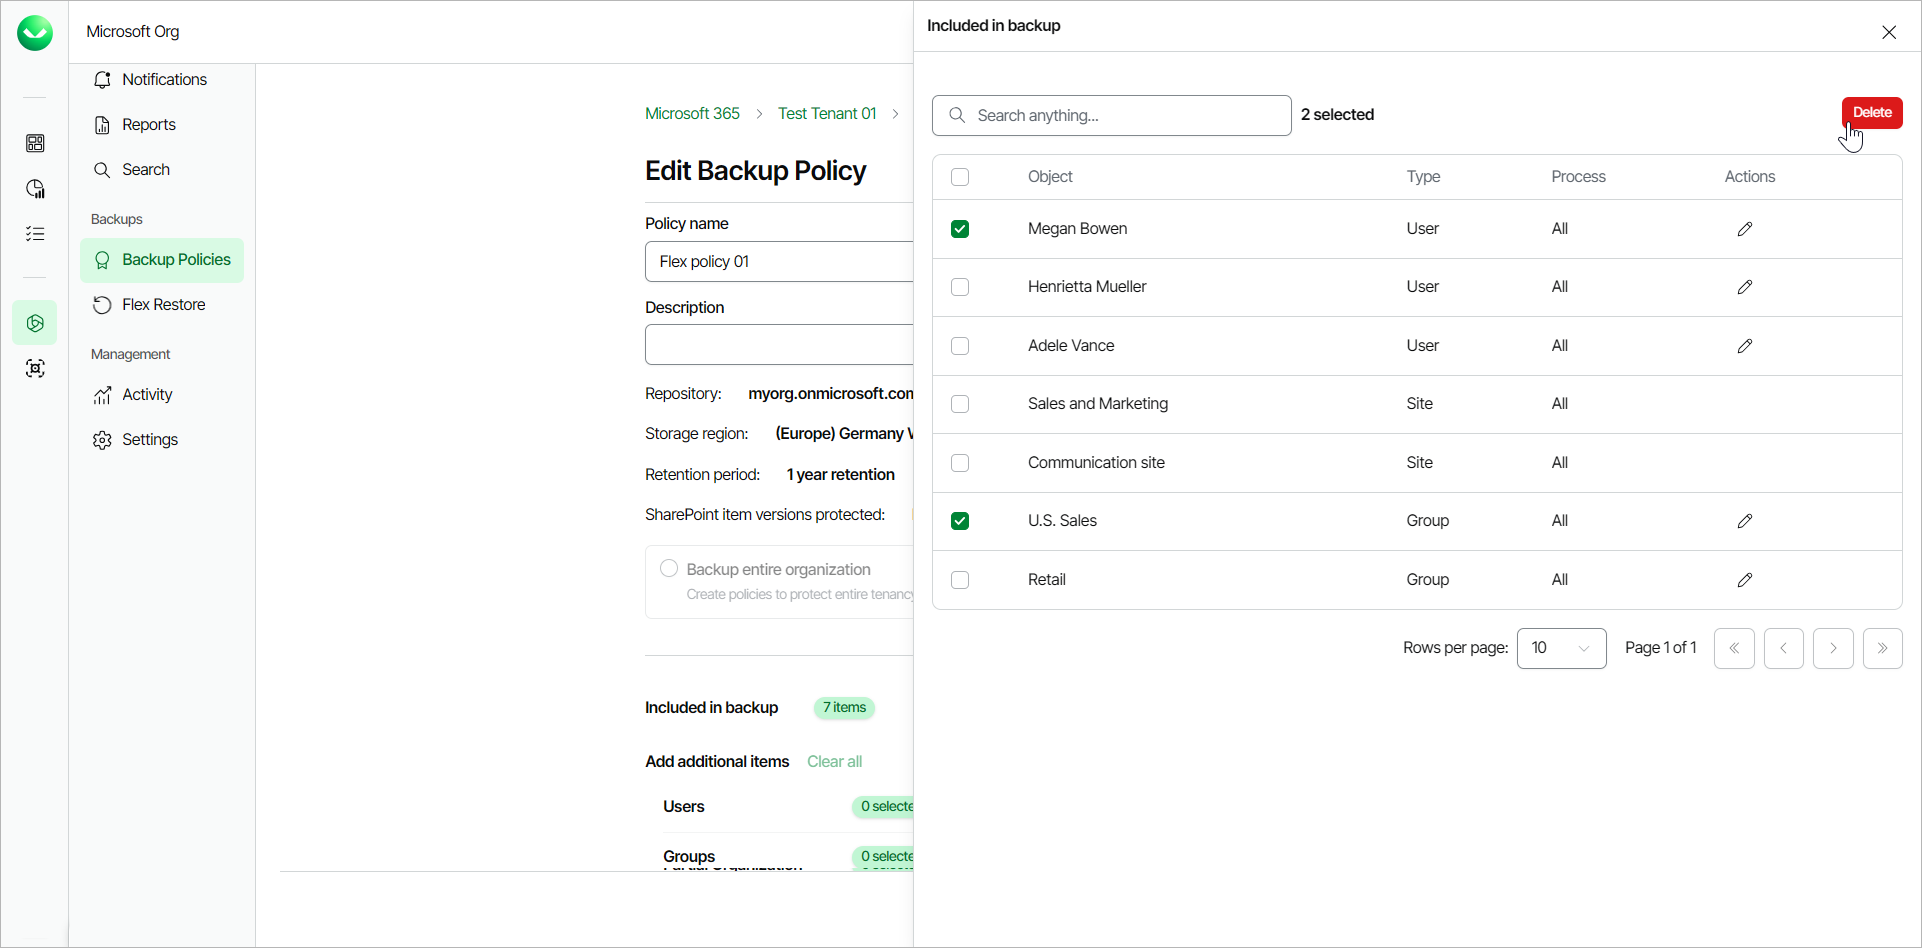
- If you want to modify the processing options for an object, click the pencil icon in the Actions column. In the Specify processing options window, select the check boxes for the objects you want to include in the backup policy and click Ok.

- [For specific items backup policies] In the Add more items section, to add more items to the backup policy do the following:
- Click Select next to Users and select users to to add to the backup policy. For each selected user, you can select check boxes to include their Mailbox, Archive Mailbox, OneDrive and Personal Site in the backup.
You can also click Upload a CSV file to upload a .CSV or text file with one email address per line.
- Click Select next to Groups and select groups to add to the backup policy. For each group member, you can select check boxes to include their Mailbox, Archive Mailbox, OneDrive and Personal Site in the backup. For each group mailbox, you can select check boxes to include the group Mailbox and Site in the backup.
Use dynamic Entra ID groups if you want the groups to be automatically updated between backup policy runs. Otherwise, you must manually add and delete users from the groups.
- Click Select next to SharePoint Sites and select sites to back up. If you select the root SharePoint site, the list of sites to back up will be automatically updated when the backup policy session starts. For example, if some subsites were added or deleted between backup policy runs, the backup policy will reflect those changes.
You can also click Upload a CSV file to upload a .CSV file with one SharePoint site URL per line.
- Click Select next to Teams and select teams to back up. You can select whether to back up team posts if you enabled team posts backup.
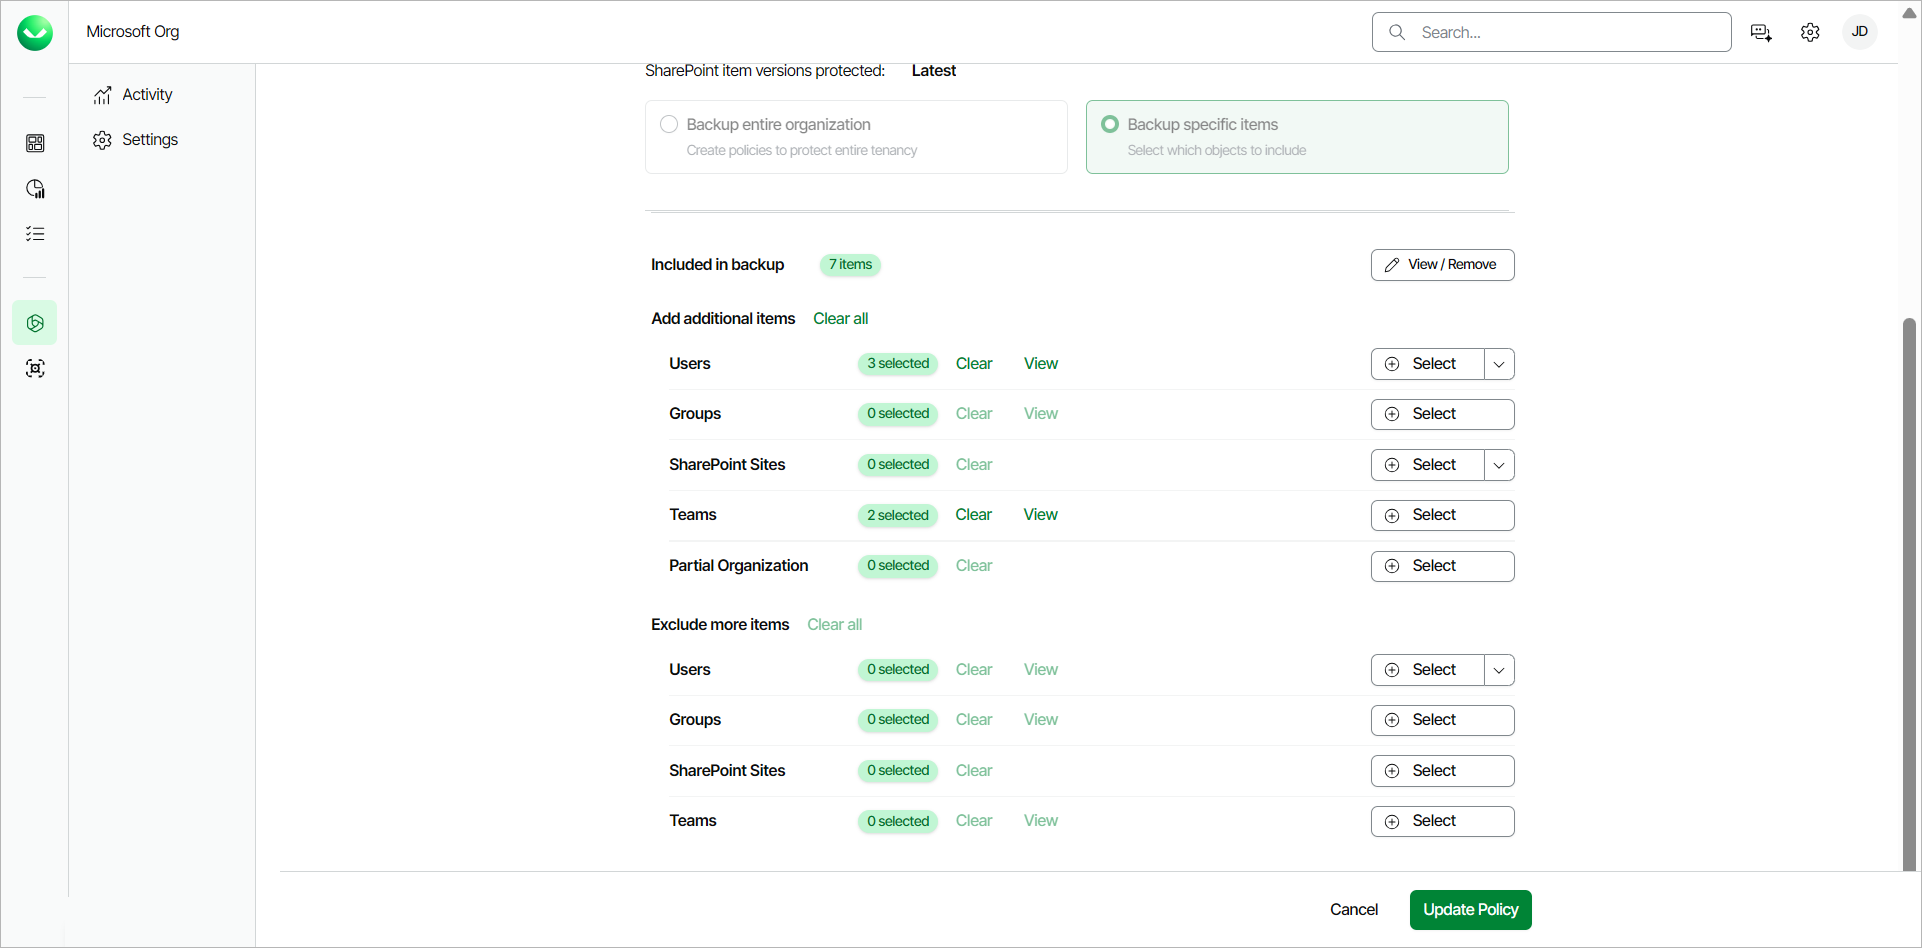
- In the Exclude more items section, click Select next to Users, Groups, SharePoint Sites or Teams and select specific objects to exclude.
For Users, you can also click Upload a CSV file to upload a .CSV or text file with one email address per line.
For SharePoint Sites, you can also click Upload a CSV file to upload a .CSV file with one SharePoint site URL per line.
- Click Update Policy to complete the operation.
IMPORTANT |
The Fixed License Model has been deprecated. Any existing users will be moved to the Variable License Model, which provides additional functionality. No features will be lost in this transition. |
Users of the Fixed License Model can add and remove users and objects to and from Flex backup policies created in Veeam Data Cloud for Microsoft 365.
To edit Flex backup policies under the Variable License Model, see Variable License Model.
To edit a Flex backup policy, do the following:
- On the Microsoft 365 page, click the name of the tenant you want to manage.
- Select Backup Policies.
- On the Backup Policies page, in the Actions column of the policy you want to edit, click Edit.
- Follow instructions to add or remove objects within your backup policies:
Adding Objects to Backup Policy
To add objects to a backup policy, take the following steps:
- To add Microsoft 365 users, do the following:
- In the Microsoft 365 Users and Groups tab of the Manage Backup Items page, click Add User.
- In the User selection window, select check boxes next to user names to specify users to be backed up.
- For each user that you selected, in the Mailbox, Archive Mailbox, OneDrive, and Personal Site columns, select what objects you want to back up.
- Click OK to confirm your selection.
- To add Microsoft 365 groups, do the following:
- In the Microsoft 365 Users and Groups tab of the Manage Backup Items page, click Add Group.
- In the Select Groups window, select the group you want to add.
Veeam Data Cloud searches within the cache to optimize performance. Use Search Microsoft 365 directly (slower but includes newly created Groups) to search for objects recently added through the Microsoft 365 admin center.
- In the User selection window, select check boxes next to user names to specify users to be backed up.
- For each user that you selected, in the Mailbox, Archive Mailbox, OneDrive, and Personal Site columns, select what objects you want to back up.
- Click OK to confirm your selection.
- Click Next.
- To add SharePoint sites, do the following:
- In the Sharepoint Sites and Teams tab, click Sharepoint Sites.
- In the Site selection window, use the search bar or the list of SharePoint sites to find specific sites. Select check boxes next to names of the sites that you want to back up. If you select a root SharePoint site, the list of sites to back up will be automatically updated when the backup policy runs. For example, if some subsites were added or deleted between backup policy runs, the backup policy will reflect those changes.
- Click OK to confirm your selection.
- To add teams, do the following:
- In the Sharepoint Sites and Teams tab, click Teams.
- In the Team selection window, use the search bar or the list of teams to find specific Microsoft 365 teams. Select check boxes next to names of teams that you want to back up.
Veeam Data Cloud searches within the cache to optimize performance. Use Search Microsoft 365 directly (slower but includes newly created Groups) to search for objects recently added through the Microsoft 365 admin center.
- Click OK to confirm your selection.
- Click Start backup to finish the operation.
Removing Groups and Users from Backup Policy
To remove Microsoft 365 users from a backup policy, do the following:
- Navigate to the Microsoft 365 Users and Groups tab.
- In the Microsoft 365 Users window, select check boxes next to user names of users that you want to remove from the backup policy.
- Click Delete to complete the operation.
To remove Microsoft 365 groups from a backup policy, do the following:
- Navigate to the Microsoft 365 Users and Groups tab.
- In the Microsoft 365 Groups window, click the bin icon on the right to remove a group from the backup.
- Click Delete to complete the operation.