Installing License
When you launch the Veeam Agent for Linux control panel for the first time, Veeam Agent for Linux offers you to install a license at the License step of the initial setup wizard. You can choose to install the license immediately or postpone this operation.
If you choose to postpone the license installation process, you can install a license later at any time you need. Until you install a license, Veeam Agent for Linux will operate in the Free edition. To learn more, see Product Editions.
NOTE |
If you choose not to install a license and use Veeam Agent for Linux in the Free edition, Veeam Agent for Linux will display a notification offering to install a license every time you open the control panel. The notification will appear in the control panel until Veeam Agent for Linux completes the first backup job session. |
To install a license:
- Launch the Veeam Agent for Linux control panel with the veeam or veeamconfig ui command.
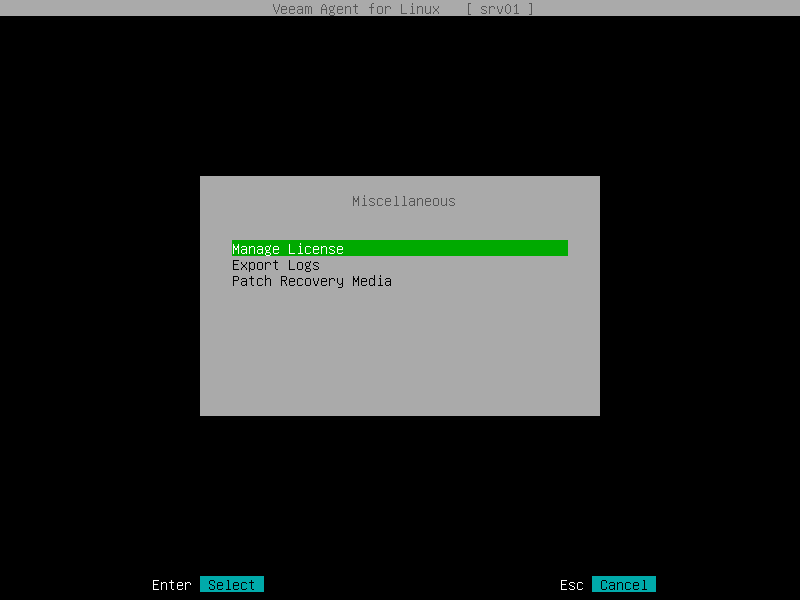
- In the Veeam Agent for Linux control panel, press the [M] key to open the Miscellaneous menu.
- In the menu, make sure that the Manage License option is selected and press [Enter].

- In the Manage llicense window, make sure that the Install button is selected and press [Enter].
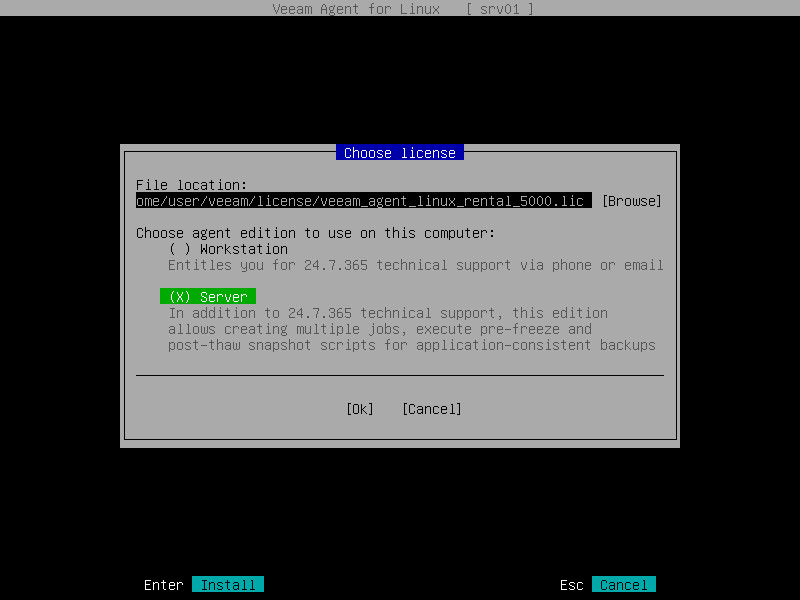
- In the Choose license window, in the File location field, specify a path to the license key:
- Select the Browse option with the [Tab] key and press [Space] or [Enter].
- In the Choose license file location window, select the necessary directory and press [Enter].
- Repeat the step 'b' until a path to the directory in which the license key resides appears in the Current directory field.
- In the directory where the license key resides, select the license key and press [Enter].
TIP |
If you chose to install the license immediately from the Veeam Agent for Linux welcome screen notification, you will pass to the Choose license step right from the notification window. |
- In the Choose agent edition to use on this computer section, select the product edition in which Veeam Agent for Linux will operate and press [Enter]. To learn more about editions, see Product Editions.
- Veeam Agent for Linux will install the license and display a window notifying that the license is successfully installed. Press [Enter] to finish the license installation process.
TIP |
After you install a license, you can view information about the license (expiration date, status of the license, current edition of the product and so on) in the Manage license window. You can also check information about the license using the Veeam Agent for Linux command line interface. To learn more, see Viewing License. |
