Microsoft 365 Account
You can authorize Veeam Backup for Microsoft 365 to send email notifications on behalf of your Microsoft 365 account. To send notifications, Veeam Backup for Microsoft 365 communicates with the Microsoft Graph API. For authentication, Veeam Backup for Microsoft 365 uses an access token issued by the Microsoft Identity platform. To acquire an access token, you can either use an application preinstalled by Veeam or specify details of the custom Microsoft Entra application registered in Microsoft Identity platform. For more information on obtaining client credentials, see Registering Application in Microsoft Identity Platform.
|
Note |
|
Sending email notifications on behalf of your Microsoft 365 account is not supported in Microsoft Entra ID for US Government GCC High and Microsoft Entra China regions. |
To configure sending email notifications on behalf of your Microsoft 365 account, do the following:
- In the main menu, click General Options.
- Open the Notifications tab.
- Select the Enable email notifications check box.
- From the Mail server drop-down list, select Microsoft 365 (modern authentication).
- Do one of the following:
- To use an application preinstalled by Veeam, click Authorize now and enter credentials of your Microsoft 365 account to complete authentication.
- To use the custom application, click Advanced to specify the advanced settings, then click Authorize now and enter credentials of your Microsoft 365 account to complete authentication.
- In the From field, review the email address to be shown as a sender.
|
Note |
|
You can change the sender email address. To send email notifications on behalf of another Microsoft 365 account, click Re-authorize and use another email address to sign in. |
- In the To field, specify the email address of the notification recipient.
To specify multiple email addresses, use semicolon.
- In the Subject field, edit a notification subject if needed.
By default, a notification subject is "[%JobResult%] %OrgName% - %JobName% (%ObjectCount% objects), %Issues% issues",
where:
- %JobResult%. A job result (Success, Warning, Failed).
- %OrgName%. A Microsoft 365 organization for which the job was configured.
- %JobName%. A job name.
- %ObjectCount%. Total number of processed objects.
- %Issues%. Number of objects with Failed or Warning statuses.
- %Time%. Date and time of a job completion.
- Select the Include detailed report as an attachment check box if you want to include a detailed report as an email attachment.
If you select this option, Veeam Backup for Microsoft 365 will provide a summary about the job results in the notification body and a detailed report for each object processed by the job in the email attachment. Keep in mind that for jobs that process up to 1000 objects, Veeam Backup for Microsoft 365 always provides both a summary and a detailed report in the notification body.
- By default, system notifications are sent every time a job session is completed with any of the following statuses: Success, Warning and Failure. To turn off unwanted notifications, clear check boxes next to the events for which you do not want to receive notifications:
- Notify on success
Veeam Backup for Microsoft 365 will send email notifications if a backup or backup copy job completes successfully without any warnings or errors.
- Notify on warning
Veeam Backup for Microsoft 365 will send email notifications if a backup or backup copy job completes with warnings.
- Notify on failure
Veeam Backup for Microsoft 365 will send email notifications if a backup or backup copy completes with errors.
- If a backup or backup copy job is configured to perform retry attempts, select the Suppress notifications until the last retry check box to send email notifications according to the job schedule settings. The following email notification scenarios are possible:
- If the job fails, Veeam Backup for Microsoft 365 will send a notification message on the last job retry.
- If the job completes with Success or Warning, Veeam Backup for Microsoft 365 will send a notification message on the last completion status.
- If the job is scheduled to Terminate job if it exceeds allowed backup window, Veeam Backup for Microsoft 365 will send a notification message on the last attempt within the configured interval.
- Click Test Message to send a test message.
- Click OK.

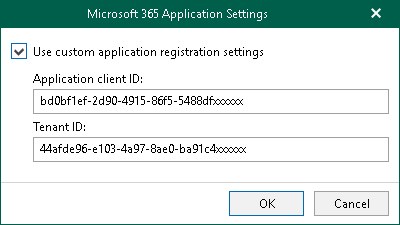
Configuring Advanced Settings
In the Microsoft 365 Application Settings window, select the Use custom application registration settings check box and specify the following:
- In the Application client ID field, specify an identification number of your Microsoft Entra application. You can find this number in an application settings in your Microsoft Entra ID. For more information, see this Microsoft article.
- In the Tenant ID field, specify the Microsoft Entra tenant ID.