Step 6. Specify Scheduling Options
At this step of the wizard, configure a schedule for your backup job and actions that will be performed after completion of the wizard.
To configure a schedule, do the following:
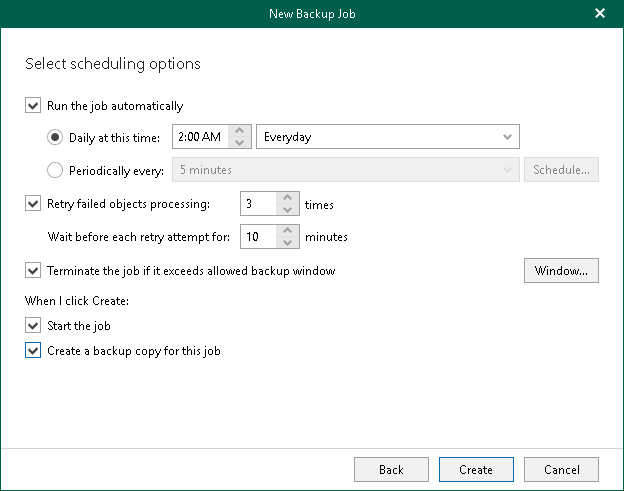
- If you want Veeam Backup for Microsoft 365 to run your backup job automatically in accordance with the schedule, select the Run the job automatically check box and customize a schedule. You can select one of the following options:
- Daily at this time. Select this option if you want to run the job on the specified days at the specified hours. Keep in mind that the Workdays option means that Veeam Backup for Microsoft 365 will run the job every day from Monday to Friday at the specified time.
Note |
When you configure the job schedule, keep in mind possible date and time changes (for example, related to daylight saving time transition). |
- Periodically every. Select this option if you want to run the job every N minutes or hours. If you select the period in hours, click Schedule and specify allowed and prohibited hours for the backup job to run. For more information, see Selecting Time Periods.
- Select the Retry failed objects processing check box and specify the maximum number of retry attempts. You can also set an interval between subsequent retries.
- Select the Terminate the job if it exceeds allowed backup window check box, click Window and specify allowed and prohibited hours for the backup job. For more information, see Selecting Time Periods.
- In the When I click Create section, do the following:
- Select the Start the job check box if you want to start a backup job right after completion of the wizard.
If you do not want to start the job immediately, you can start it later. For more information, see Starting Backup Job.
- Select the Create a backup copy for this job check box if you want to configure creating backup copies.
Right after you click Create, you will be taken to the Select Target Backup Repository step of the New Backup Copy Job wizard.
Keep in mind that this check box is available only if the following conditions are met:
- You have specified an object storage repository to store your backups.
- You have added at least one more object storage repository to the Veeam Backup for Microsoft 365 backup infrastructure. For more information, see Object Storage Repositories and Backup Copy.
If you do not want to configure a backup copy job immediately, you can launch the New Backup Copy Job wizard later. For more information, see Launch New Backup Copy Job Wizard.

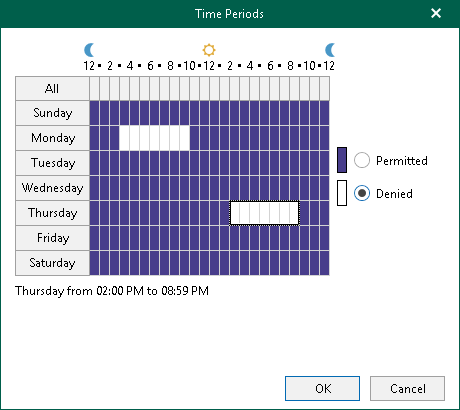
When you click Schedule or Window, the Time Periods dialog appears in which you can:
- Set the Permitted execution time frame for the backup job.
- Set the Denied execution time frame for the backup job.
- [In the Schedule window only] Specify a number of minutes for which you want to shift starting of the backup job within an hour if several backup jobs are scheduled to be started simultaneously. Using this option allows you to decrease the load on the Veeam Backup for Microsoft 365 backup infrastructure.
The main area of the dialog is divided into two axes:
- The vertical axis represents days of the week from Sunday to Saturday.
- The horizontal axis represents time intervals from 12 AM to 11:59 PM.
Within these axes a matrix is placed consisting of blocks. Each block represents a 59 minutes interval for each day of the week. The total number of blocks is 168 (24 blocks per each day of the week).
To set up an execution frame for the backup job, do the following:
- Select a block that corresponds to the day of the week (vertical axis) and to the time interval (horizontal axis) on which you want to allow or prohibit the execution of a backup job.
In addition, you can:
- Select multiple blocks simultaneously by clicking and holding the mouse pointer on the first block and dragging it until the last one that you want to use, including different days of the week.
- Click a day of the week in the vertical axis to select all the blocks of the day.
- Click All in the vertical axis to select all the blocks of the entire week.
- On the right-hand side, select either the Permitted or Denied option to set up the execution rule for the selected blocks.
The following is an example in which it is prohibited to run a backup job on the following days of the week:
- Monday from 03:00 AM up until 09:59 AM.
- Thursday from 02:00 PM up until 08:59 PM.
