Installing Veeam Backup Agents Automatically
If you install Veeam Service Provider Console management agents outside Veeam Service Provider Console (manually or using 3rd party automation tools), you can configure auto deployment settings. Auto deployment settings define whether Veeam Service Provider Console must automatically register new management agents, and whether registered management agents must automatically install Veeam backup agent on hosting computers and assign a backup policy.
Note: |
|
Prerequisites
Before you install Veeam backup agents, make sure that:
- The computers on which you plan to install Veeam backup agents are powered on.
- The computers on which you plan to install Veeam backup agent have access to the Internet.
- [For Veeam Agent for Microsoft Windows] The computers on which you plan to install Veeam backup agents are configured to allow installation: the File and Printer Sharing (SMB-In) firewall rule must allow inbound traffic.
- [For Veeam Agent for Linux and Veeam Agent for Mac] You have the root account or any user account with super user privileges on all hosted and client computers.
Required Privileges
To perform this task, a user must have the following role assigned: Portal Administrator.
Configuring Auto Deployment Settings
To configure auto deployment settings:
- Log in to Veeam Service Provider Console.
For details, see Accessing Veeam Service Provider Console.
- In the menu on the left, click Discovery.
- Open the Discovered Computers tab and navigate to Computers.
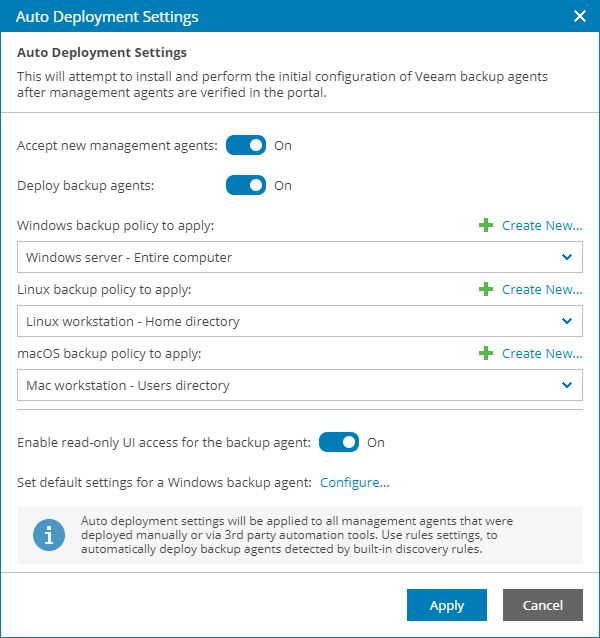
- Click Change Settings to open the Auto Deployment Settings window.
- Use the Automatic registration of new management agents toggle to specify whether Veeam Service Provider Console must accept connections from new Veeam Service Provider Console management agents.
- Set the toggle to On if Veeam Service Provider Console must accept connections from new management agents.
In this case, when a new management agent connects to Veeam Service Provider Console, Veeam Service Provider Console will automatically register this agent.
- Set the toggle to Off if Veeam Service Provider Console must not accept connections from new management agents.
In this case, when a new management agent connects to Veeam Service Provider Console, Veeam Service Provider Console will display this agent in the list of discovered computers but will not register it. To register the agent, you must manually accept the agent connection. For details, see Accepting and Rejecting Management Agent Connections.
- [For Veeam Agent for Microsoft Windows and Veeam Agent for Linux]Use the Automatic backup agents deployment toggle to specify whether management agents must automatically install Veeam backup agent after registration with Veeam Service Provider Console.
- Set the toggle to On if after registration (either automatic or manual) management agents must download from the Veeam Installation Server the Veeam backup agent setup file, install Veeam backup agent and assign the backup policy specified in the auto deployment settings.
- Set the toggle to Off if after registration management agents must not automatically install Veeam backup agent.
- In the Windows/Linux/macOS backup policy to apply lists, select backup policies that must be assigned to configure Veeam backup agent job settings after automatic software deployment. Note that for automatic deployment you can assign only public and predefined backup policies.
If you do not want to configure backup job settings after installation, choose No policy from the list.
To create a new backup policy, click the Create New link. For details on backup policies, see Configuring Backup Policies.
Note that you cannot assign a backup policy targeted to a Veeam Cloud Connect repository to a hosted Veeam backup agent.
- Use the Read-only UI access for the backup agent toggle to enable read-only access mode for Veeam backup agents.
- Set the toggle to On if the read-only access mode must be enabled immediately after deploying Veeam backup agents.
- Set the toggle to Off if the read-only access mode must not be enabled after deploying Veeam backup agents.
For details on the read-only access mode for Veeam backup agents, see Enabling Read-Only Access Mode.
- [For Veeam Agent for Microsoft Windows]To push global settings for Veeam backup agents, click Configure and specify default global settings for Veeam backup agents. For details on the global settings for Veeam backup agents, see Configuring Global Settings for Veeam Agent for Microsoft Windows.
- Click Apply.
Configuration Example
Consider the following configuration example for automatic deployment:
- Automatic registration of new management agents: On
- Automatic backup agents deployment: On
- Windows backup policy to apply: Windows server - Entire computer
- Read-only User access: Off
- Default Veeam backup agent settings: Disable Control Panel notifications, Disable backup over metered connection
With this automatic deployment configuration, as soon as a new management agent is installed and configured to communicate with Veeam Service Provider Console, the agent will be registered with Veeam Service Provider Console, and will attempt to install Veeam Agent for Microsoft Windows.
If installation is successful, the agent will configure the Veeam Agent for Microsoft Windows job settings in accordance with the Windows server - Entire computer backup policy. Read-only access mode will not be enabled. Control Panel notifications will be disabled. Backup over metered Internet connection will be disabled.
