Step 1. Install Veeam Service Provider Console Plugin for ConnectWise Automate
You can download Veeam Service Provider Console plugin from the ConnectWise Automate Solution Center or install it manually, in the ConnectWise Automate Plugin Manager.
Downloading plugin from the ConnectWise Automate Solution Center
To download Veeam Service Provider Console plugin for ConnectWise Automate from the ConnectWise Automate Solution Center:
- Log in to the ConnectWise Automate Control Center.
The account used to access ConnectWise Automate must have the necessary permissions. For details, see section Permissions of the Deployment Guide.
- From the ConnectWise Automate Control Center, choose System > Solutions > Solution Center.
- In the lower left corner, search for the Veeam Service Provider Console solution.
- Click the Veeam Service Provider Console solution and click Queue.
- In the Terms of Service window, click Yes.
- At the top of the navigation sidebar, click Solutions in Queue.
- In the Queued Solutions section, click Install/Update.

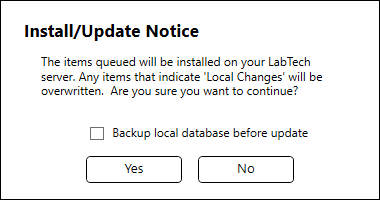
- In the Install/Update Notice window, choose whether you want to back up the ConnectWise Automate local database before update and click Yes. For details on ConnectWise Automate database backup, see ConnectWise Automate Documentation.
- After the installation completes, click Close Solution Center and click Yes.
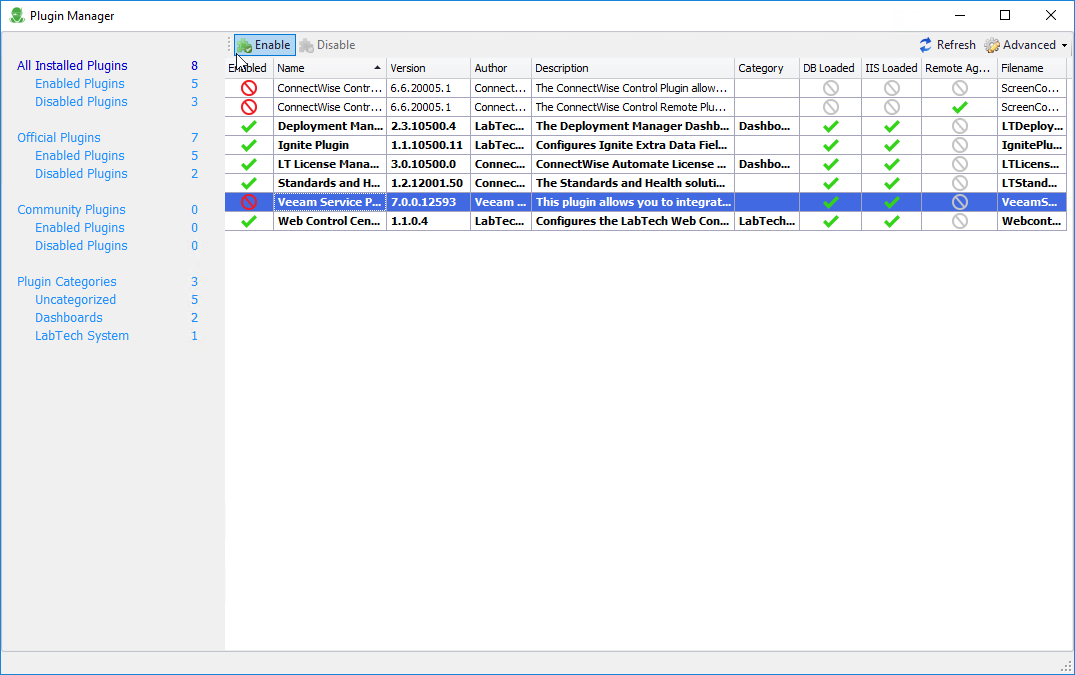
- From the ConnectWise Automate Control Center, choose System > Solutions > Plugin Manager.
- In the list of available plugins, select Veeam Service Provider Console and click Enable.
- In the Restart Database Agent window, click Yes to update ConnectWise Automate database.
- Restart the ConnectWise Automate Control Center to apply changes.
Installing ConnectWise Automate for Veeam Service Provider Console Manually
To install ConnectWise Automate Plugin for Veeam Service Provider Console manually:
- Contact Veeam Customer Support to obtain Veeam Service Provider Console plugin for ConnectWise Automate setup file.
- Unpack the plugin file to a location that can be accessed from a machine where the ConnectWise Automate Control Center is installed.
- Log in to the ConnectWise Automate Control Center.
The account used to access ConnectWise Automate must have the necessary permissions. For details, see section Permissions of the Deployment Guide.
- From the ConnectWise Automate Control Center, choose System > Solutions > Plugin Manager.
- In the Plugin Manager window, click Advanced, select Manage Plugins > Add Plugin.
- In the plugin setup folder, open VeeamServiceProviderConsole.Plugin.ConnectWise.Automate.dll.
- Click Save and Close.

- In the list of available plugins, select Veeam Service Provider Console and click Enable.
- In the Restart Database Agent window, click Yes to update ConnectWise Automate database.
- Restart the ConnectWise Automate Control Center to apply changes.
Uninstalling Veeam Service Provider Console Plugin from ConnectWise Automate Control Center
If you no longer need Veeam Service Provider Console plugin, you can uninstall the plugin from ConnectWise Automate Control Center. In this case, you will remove Veeam Service Provider Console plugin, data about managed companies and company mapping settings.
To uninstall Veeam Service Provider Console plugin:
- Log in to ConnectWise Automate Control Center.
The account used to access ConnectWise Automate must have the necessary permissions. For details, see section Permissions of the Deployment Guide.
- In the lower left corner, click System > Configuration > Dashboard.
The System Dashboard window will pop up.
- Open the Config > Integration > Veeam Service Provider Console tab.
- In the menu on the left, click About.
- Click Delete Plugin.
- In the confirmation window, click Yes.
- Restart the ConnectWise Automate Control Center to apply changes.
