 This is an archive version of the document. To get the most up-to-date information, see the current version.
Step 9. Finalize Restore
After the wizard is closed, Veeam Backup & Replication opens the Veeam Backup browser displaying the file system tree of the restored VM.
In the Veeam Backup browser, you can perform the following operations:
- Restore files to the original location
- Restore files to a new location
- Access files over FTP
- Access helper appliance logs
Note |
You can browse the VM guest OS files and access restored files on the FTP only while the Veeam Backup browser with the restored files is open. After the Veeam Backup browser is closed, Veeam Backup & Replication unmounts the VM disks from the helper appliance and removes helper appliance from the ESXi host. |
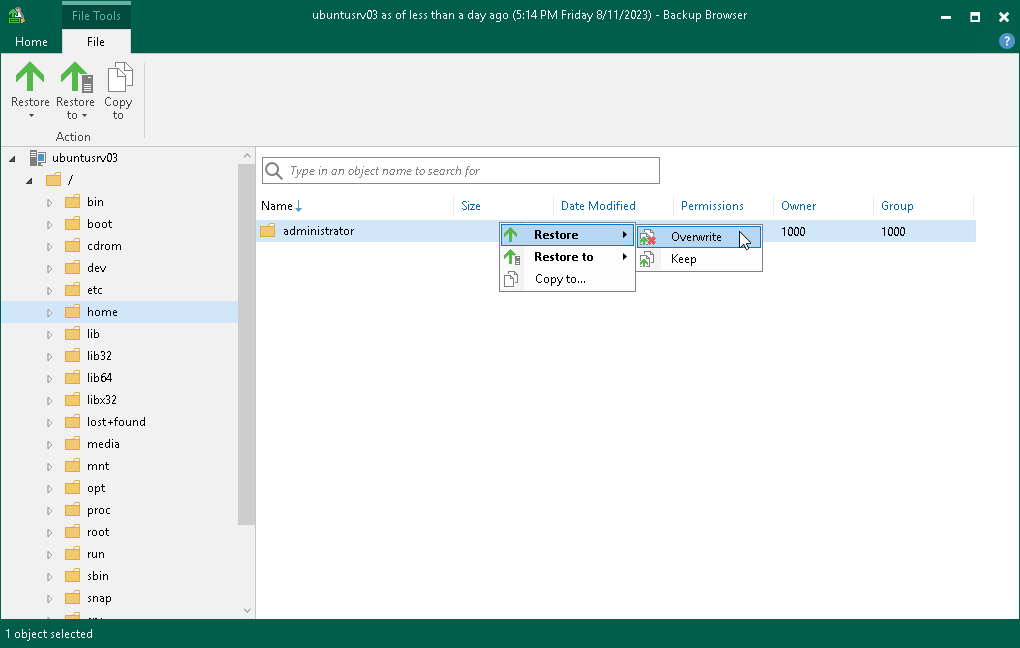
Restoring Files to Original Location
To restore files and folders to the original location, right-click the necessary file or folder in the file system tree or in the details pane on the right and select one of the following commands:
- To overwrite the original file on the VM guest OS with the file restored from the backup, select Restore > Overwrite.
- To save the file restored from the backup next to the original file, select Restore > Keep.
Veeam Backup & Replication will add the .RESTORED-YYYYMMDDHHMMSS suffix to the original file name and store the restored file in the same folder where the original file resides.
To restore files to the original location, Veeam Backup & Replication uses the account for VM guest OS access specified in the backup job settings. If this account does not have sufficient rights to access the target VM, you will be prompted to enter credentials. In the Credentials window, specify a user account to access the destination location (server or shared folder). For more information on adding credentials, see Credentials Manager.
In some cases, you may remove the original VM and restore it from the backup by the time of file-level restore. If you then attempt to restore VM guest OS files to the original location, Veeam Backup & Replication will not be able to find the original VM by its reference ID, and display a warning. Click OK and browse to the target VM in the virtual infrastructure to which you want to restore VM guest OS files.
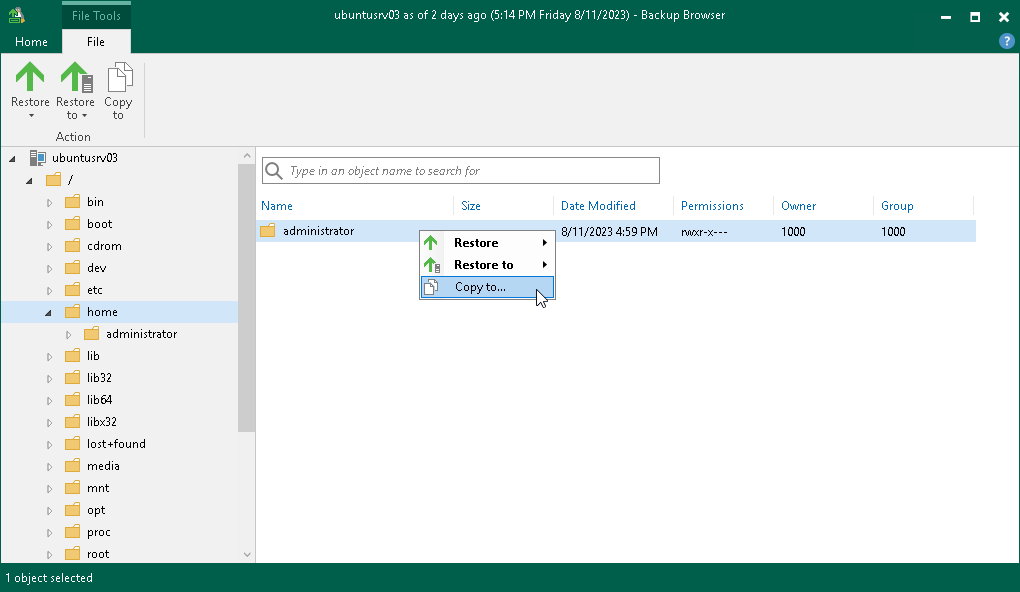
To save files and folders to a new location:
- Right-click the necessary file or folder and select Copy to.
- In the Select Destination window, select the necessary destination:
- To recover files to a server already added to the Veeam Backup & Replication infrastructure, select the server from the Server drop-down list and then specify the path to a folder where files will be recovered.
- To recover files to a Linux server that is not added to the Veeam Backup & Replication infrastructure, select Specify a different host from the Server drop-down list and follow the steps of the wizard to add a Linux server that will be used as a target host. The server will be added ad-hoc. Then specify the path to a folder where files will be recovered.
The server you add ad-hoc will not appear in the list of managed hosts in Veeam Backup & Replication: its purpose is to host the files that you recover. It will only remain visible in the Veeam Backup browser until all currently active file-level restore sessions are completed.
Important |
Only Linux servers can be added ad-hoc. |
- To recover files to a shared folder, specify a path to the destination folder in the Path to folder field.
- If you want to preserve original permissions and ownership for recovered files, select the Preserve permissions and ownership check box in the Select Destination window.
Important |
To restore original permissions and ownership settings, the user account you have specified must have privileges to change the owner on the selected server or shared folder. |
- If prompted, in the Credentials window, specify settings of the user account to access the destination location.
If you have chosen to enable FTP server on the helper appliance, the restored file system will also be available over FTP at ftp://<FLR_appliance_IP_address>. Other users in the same network can access the helper appliance to restore the files they need.
Accessing the appliance over FTP requires credentials. Use the Guest OS helper appliance credentials specified in managed credentials. If the password has not been updated, refer to the following knowledge base article: this Veeam KB article.
Note |
[For restore from storage snapshots] You can browse to the VM guest OS files and access restored files on the FTP only while the Veeam Backup browser is open. After the Veeam Backup browser is closed, Veeam Backup & Replication will unmount VM disks from the helper appliance, remove the helper appliance and unmount the storage snapshot from the ESXi host (unless this storage snapshot is used by other restore operations). |
Accessing Helper Appliance Logs
If you need to access logs of the helper appliance, click Support Logs on the Veeam Backup browser ribbon. Veeam Backup & Replication will show the Log node under the file system tree. To hide this node, click Support Logs once again.
