Installing RHEL Server
To install Red Hat Enterprise Linux (RHEL), download the server install image from the Red Hat Product Downloads page. For more information on the installer and options of the installation wizard, see the official Red Hat guide. Before you start the installation process, see Requirements and Limitations.
During installation process, consider the following Veeam recommendations:
- Before you boot the installer, enable UEFI secure boot to prevent unsigned Linux kernel modules from being loaded.
- At the welcome screen of the installation wizard, select the language for the installer and the default language for the installed system. For troubleshooting purposes, it is recommended to select the English language.
- On the Installation Summary step of the installation wizard, add any additional languages, keyboard layouts, and set your time zone as needed.
- Go to the Network & Host Name screen and create a bond. To do this, perform the following steps:
- Select the plus icon and choose Bond in the drop down menu.
- Specify a name for the connection and the interface.
- Press Add.
- Select Ethernet as your connection type and add the device using the drop down menu.
- Set the bonding mode:
- Round Robin (if you use EtherChannel without LACP).
- 802.3ad (if you use EtherChannel with LACP).
- Active-backup (for other configurations).
- Repeat this process for the second network card.
- Select IPv4 Settings or IPv6 Settings, depending on your connection. Configure your IP address and DNS. A static IP address should be used if possible. Click Save.
- Specify a hostname.
- Go to the Connect to Red Hat screen and log in using your Red Hat account details.
- Go to the Installation Destination screen. Select all the disks on your server (excluding any external storage devices such as SD cards), set your Storage Configuration to Custom and click Done.
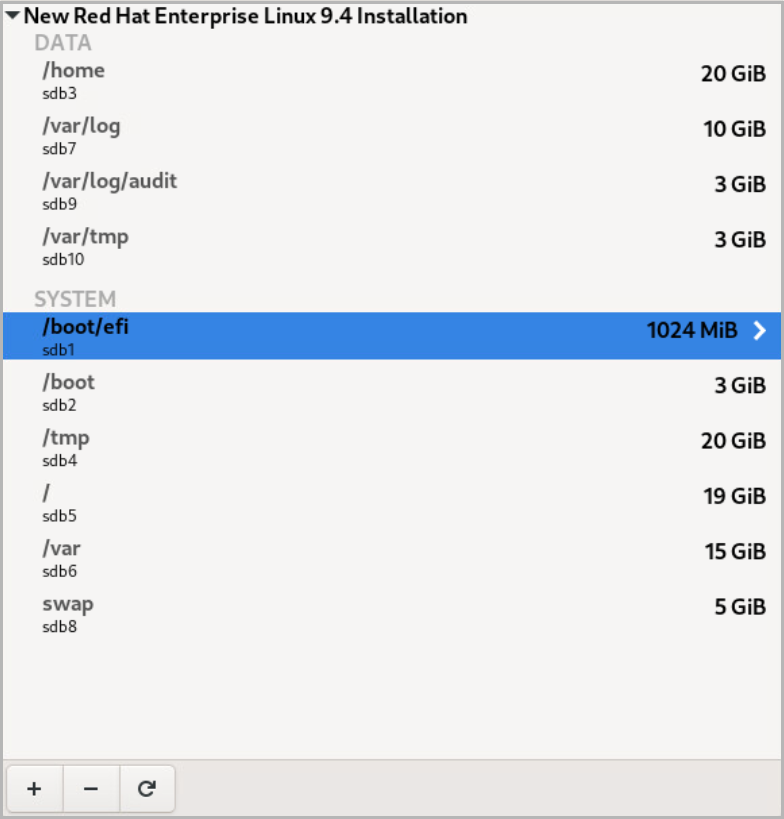
- At the Manual Partitioning screen, add required partitions and mount points using the Standard Partition device type. For a disk with 100 GiB capacity, the following partitioning scheme is recommended:
Note |
If you are using a larger disk, adjust the values proportionally. |
- Add the disk for backup data using the /mnt/backup mount point. Leave the Desired Capacity field empty to use the whole disk. If you have multiple disks, use your preferred naming convention.
- Click Done and confirm the formatting. Note that everything on the disks will be deleted during the installation process.
- Go to the Software Selection screen and select Minimal Install.
- Go to the Security Profile screen, select the DISA STIG profile, and click Done.
- Go to the User Creation screen and create a user account with administrator privileges. When setting a password, ensure that it meets the following DISA STIG requirements:
- 15 characters minimum.
- 1 upper case character.
- 1 numeric character.
- 1 special character.
- No more than 3 characters of the same class in a row. For example, more than 3 lowercase or 3 numerical characters in sequence.
- Minimum password lifetime – 24 hours.
If it does not, you will be prompted to change the password after your initial login.
- Click Begin Installation. After the installation finishes, remove the installation media and reboot the system.
