Before You Begin
To assemble an HA cluster, you must install Veeam Software Appliance on the Linux-based servers that you plan to use as HA nodes, configure your HA network environment, and enable the High Availability option for both Linux-based servers using Veeam Host Management Web UI. If you use Kerberos authentication, you must create a .keytab file and import it to the primary node using the Veeam Host Management Web UI.
Configuring HA Nodes and HA Network Environment for Standard HA cluster
To configure Linux-based servers that you plan to use as HA nodes and the HA network environment, do the following:
- [Optional] Deploy a Veeam Software Appliance on a Linux-based server that you plan to use as a primary node of your HA cluster.
- Deploy a Veeam Software Appliance on a Linux-based machine that you plan to use as a secondary node of your HA cluster.
Important |
The machine you plan to use as a secondary node must have a fresh Veeam Software Appliance deployment with no existing backup data. If any backup data is present, it will be permanently deleted once you assemble the HA cluster. |
- Assign static IP addresses to both Linux-based servers on your DNS server.
- Reserve a static IP address for an HA cluster on your DNS server. This IP address will be used to connect to the HA cluster.
Important |
If you use Kerberos authentication, you must reserve for the cluster a static IP address that can contact the Kerberos Key Distribution Center (KDC). |
- Configure the HA cluster DNS name to resolve to the HA cluster IP address.
- [For Kerberos authentication] Join both Linux-based servers to a domain where Kerberos authentication is configured. For more information, see Managing Domain Settings.
Configuring HA Nodes and HA Network Environment for Cross-Subnet HA cluster
Before you assemble the cross-subnet HA cluster, you must do the following:
- Reserve 2 static external IP addresses for the cluster endpoint.
- Reserve 2 static internal IP addresses for the cluster nodes. They must be from the same address family as the external IP addresses. For example, if the external IP addresses are IPv4, the internal IP addresses must also be IPv4. If the external IP addresses are IPv6, the internal IP addresses must be IPv6.
- [Optional] Deploy a Veeam Software Appliance on a Linux-based server that you plan to use as a primary node of your HA cluster.
- Deploy a Veeam Software Appliance on a Linux-based machine that you plan to use as a secondary node of your HA cluster.
- Install the Veeam Data Platform Premium License on the primary node.
- Add a remote backup repository, and then remove the Default Backup Repository from the primary node.
- On your DNS server, create two A (or AAAA) records for the cluster hostname — one record for each external IP address.
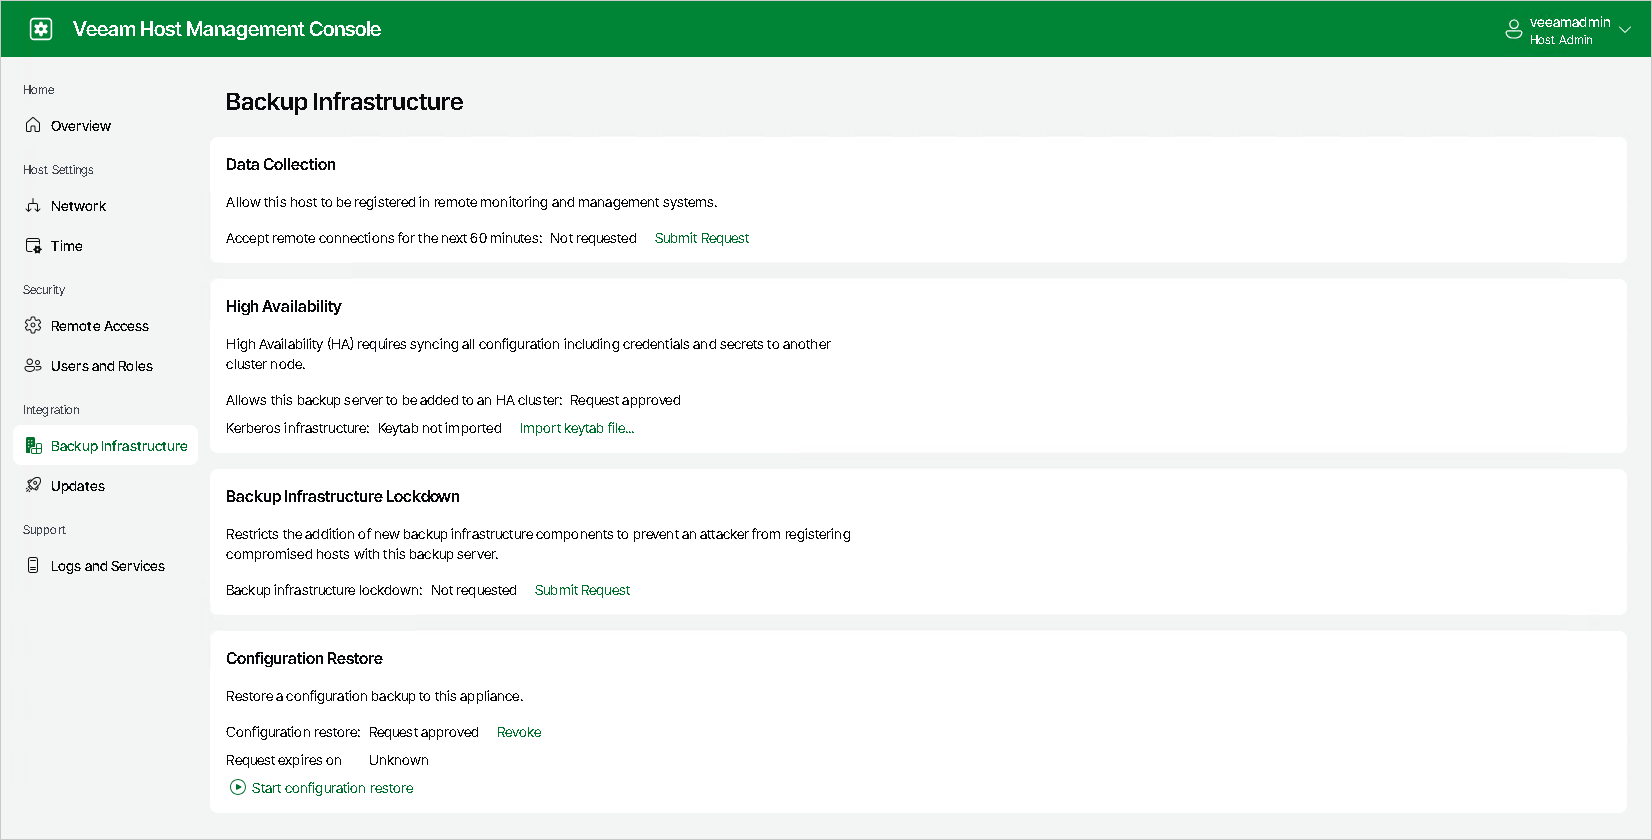
Enabling High Availability
After you configure the HA nodes, submit a request to enable the High Availability option for both Linux-based servers. Note that if you have disassembled the HA cluster, you will need to resubmit the request.
To submit the request, do the following:
- Log in to the Veeam Host Management web UI.
- In the management pane, click Backup Infrastructure.
- In the High Availability section, click Submit Request.
- If you did not configure the Security Officer account during the Veeam Software Appliance installation, the request is approved automatically.
- If you configured the Security Officer account, you must wait until the security officer approves your request. This approval expires in 8 hours; ensure that you assemble the cluster within this period.
- [For Kerberos authentication] If you use the Kerberos environment, you must create a .keytab file and import it to the primary node using the Veeam Host Management Web UI.
Important |
|
Consider the following:
|
To create the .keytab file, do the following:
- Create a computer account in your Active Directory in one of the following ways:
- Specifying the password in the interactive password prompt.
New-ADComputer -Name <computer account name> -AccountPassword (Read-Host "Enter your password" -AsSecureString) -KerberosEncryptionType AES256 -PasswordNeverExpires $true -ServicePrincipalNames HOST/<DNS cluster hostname>,HOST/<DNS cluster hostname>.<domain name> -Path "OU=<organizational unit name>,DC=<first label of the domain name>,DC=<second label of the domain name>" |
- Specifying the password directly in the script.
New-ADComputer -Name <computer account name> -AccountPassword (ConvertTo-SecureString "<computer account password>" -AsPlainText -Force) -KerberosEncryptionType AES256 -PasswordNeverExpires $true -ServicePrincipalNames HOST/<DNS cluster hostname>,HOST/<DNS cluster hostname>.<domain name> -Path "OU=<organizational unit name>,DC=<first label of the domain name>,DC=<second label of the domain name>" |
Note |
|
Consider the following:
|
- On your Windows Domain Controller (DC), generate the .keytab file using the ktpass utility. For more information on the parameters, see Microsoft Docs.
ktpass -princ <computer account name>$@DOMAIN.LOCAL -mapuser DOMAIN\<computer account name>$ -crypto AES256-SHA1 -ptype KRB5_NT_PRINCIPAL -pass <computer account password> -setPass -setUpn -out custom.keytab |
Important |
|
We recommend that you specify the following values for these parameters:
|
- [Optional] Check the computer account details and its SPNs.
Get-ADComputer <computer account name>$ -Properties msDS-SupportedEncryptionTypes,passwordNeverExpires setspn -L <computer account name> |
- Verify the .keytab file before uploading it to the Veeam Host Management console.
- Verify the contents of the .keytab file on the Windows DC using the ktpass utility. The file should contain the correct SPNs.
ktpass /in custom.keytab |
- Verify that the .keytab file can be used to get a Kerberos ticket-granting ticket (TGT) for the specified SPNs.
kinit.exe -k -t krb.keytab {cluster SPN} |
- Upload the keytab using the Veeam Host Management console. After that you can verify it with the following commands.
- Verify the contents of the .keytab file.
klist –k /etc/veeam/auth/krb.keytab |
- Check if the .keytab file can be used to get a Kerberos TGT for the specified SPNs.
kinit -k -t /etc/veeam/auth/krb.keytab {cluster SPN} |
Creating Keytab File Examples
![]() Step 1. Creating Computer Account Using Interactive Prompt
Step 1. Creating Computer Account Using Interactive Prompt
|
This example shows how to create a computer account using interactive prompt.
Specify the following:
|
![]() Step 2. Generating Keytab File
Step 2. Generating Keytab File
|
This command generates the .keytab file.
Specify the following parameters:
|
![]() Step 3. Verifying Computer Account Information
Step 3. Verifying Computer Account Information
|
This command verifies computer account information.
|
![]() Step 4. Verifying Keytab File Before Uploading it to Veeam Host Management Console
Step 4. Verifying Keytab File Before Uploading it to Veeam Host Management Console
|
![]() Step 5. Verifying Keytab File after Uploading it to Veeam Host Management Console
Step 5. Verifying Keytab File after Uploading it to Veeam Host Management Console
|